
Changing the timing belt on the IS200
- en
- is200
- service
- timing belt
Mr. Bidouille - 2020-05-06
My IS200 is going to turn 20 real soon and she is approching 300'000 km. It's about time to change the timing belt, especially since I'm not 100 % sure it has been done at 150'000 km (it would seem so, but the previous owner had no idea).
It's going to be my first "big" job as far as mechanical work goes. Up until now, I mainly did small things in mechanics and a lot of body work.
Tools
Without further ado, here is absolutely everything I needed to complete the job at home, in my driveway.
- A jack (you could use the one included with the car, but I would recommend you invest in a good jack. You'll save a lot of time)
- At least 2 jack stands
- A set of metric sockets (10 mm to 22 mm)
- A small ratchet and a big one, compatible with your sockets. Having 2 sizes will help accessing certain bolts
- Extensions for your ratchets
- A spark plug socket, 16 mm for this car. For example: Sealey S12SP10
- A set of hex keys (5 mm, 8 mm & 10 mm)
- Pliers to clamp and cut
- A thick pen of visible color (a marker)
- A breaker bar
- An extension. It could be a long tube of scrap metal. It will increase our maximum leverage when using the breaker bar
- A torque wrench, going from 17.5 Nm to 220 Nm (I bought a digital torque adapter, but I wouldn't necessarily recommand it. I'll talk about it in the article)
- A hammer and some wooden blocks (to soften the impact)
- Protections for your hands and eyes (recommanded)
- A container of at least 5L, to recover the coolant
- A closable container of at least 5L, to store the used coolant
- A tarpaulin or cardboard, to cover the ground under the car and make your life more comfortable and cleaner
- Some household paper
- Some cable ties
If this is your first job on the car, it might look like a lot, but theses are tools you'll need later on as well. You just have to accept the fact that there is an initial cost. But don't spend all your money on expensive tools from the beginning. Buy the bare minimum, and increase your arsenal as you need to.
Adding up everything I spent on the tools mentioned above, I get about CHF 250, for your reference. Some tools I bought, but some I already had, like the containers and pliers, for example.
Products
- WD-40, the magical oil that loosens everything. It really does work, you should always have some lying around
- Some brake cleaner, or all purpose quick cleaner, whatever it is called where you live. Super useful to clean dirty or oily surfaces
- Concentrated antifreeze, or pre-diluted coolant. You'll have to refill the car's coolant. Plan for 5L, with either 33 % or 50 % antifreeze, but sometimes you'll only need 4L. This time, removing the radiator and letting it drain for a long period of time, I could put 4.4L back in. I bought it concentrated from the nearest Toyota dealer. It is called "Toyota Pink Long Life Coolant"
Parts
For parts, 99 % of the time, I go with genuine parts from Toyota. Use "no-name" parts at your own risks. I find everything on Ebay. It sometimes takes quite a bit of research, but no exception this time:
- Genuine timing belt, branded "Gates" Toyota part number: 13568-79235
- Tensioner bearing, usually included in kit with the timing belt. Toyota part number: 13540-70021
- Idler sub-assembly (you don't have to replace this one, but I prefered to change it, for my own peace of mind) Toyota part number: 13503-70080
- Auxiliary belts (3), branded "Gates", that I found as a kit for the IS200. Even if you could reuse the old ones, I would advise you change them while you're at it. Especially since we are going to sacrifice one of the old ones to undo a bolt. The specs for the three belts are as follows: 4PK898, 4PK1070, 3PK890
Price: I was able to find all the mentioned parts, shipping & Paypal fees included, for around CHF 203 in April 2020.
Steps overview
Before we get to the timing belt, there are a few things to do. Here is everything I'm going to cover.
- Remove the radiator
- Remove the air box
- Remove the spark plugs
- Undo the auxiliary belts
- Remove the crankshaft pulley bolt
- Mark the timing
- Remove the crankshaft pulley
- Remove the main belt
- Install the new timing belt
- Install the crankshaft pulley bolt
- Reinstall the rest
- Test & ending
Before we start
To make things clear, since we are working at the front of the car, when I refer to the location of something, I'll call the side as seen from the front of the car and not the direction of travel. With this system, the right side would be the driver side, here in Switzerland (even though we drive "on the left").
Coolant is not too dangerous for you, but avoid having some on your skin. More importantly, don't leave it in the open, because it will attract animals (I'm thinking about the cats) , and it can be deadly for them if they drink it (and they will, that curious bunch).
1. Remove the radiator
It's quite easy. First we have to drain the coolant. Start by lifting the front of the car.
Engine undercover
The is a cover underneath the whole front of the car. Remove it. It's the first thing to remove everytime you work in the front of the car, because it gives access to the engine bay from underneath. To remove it, there is a certain amount of 10 mm bolts to remove. Take your time and find them all.
Drain engine coolant
Underneath the car, on the right side, there is a small valve. Place a container underneath, and open it. Sometimes, you will be able to open it by hand, and sometimes you'll need help from a plier.
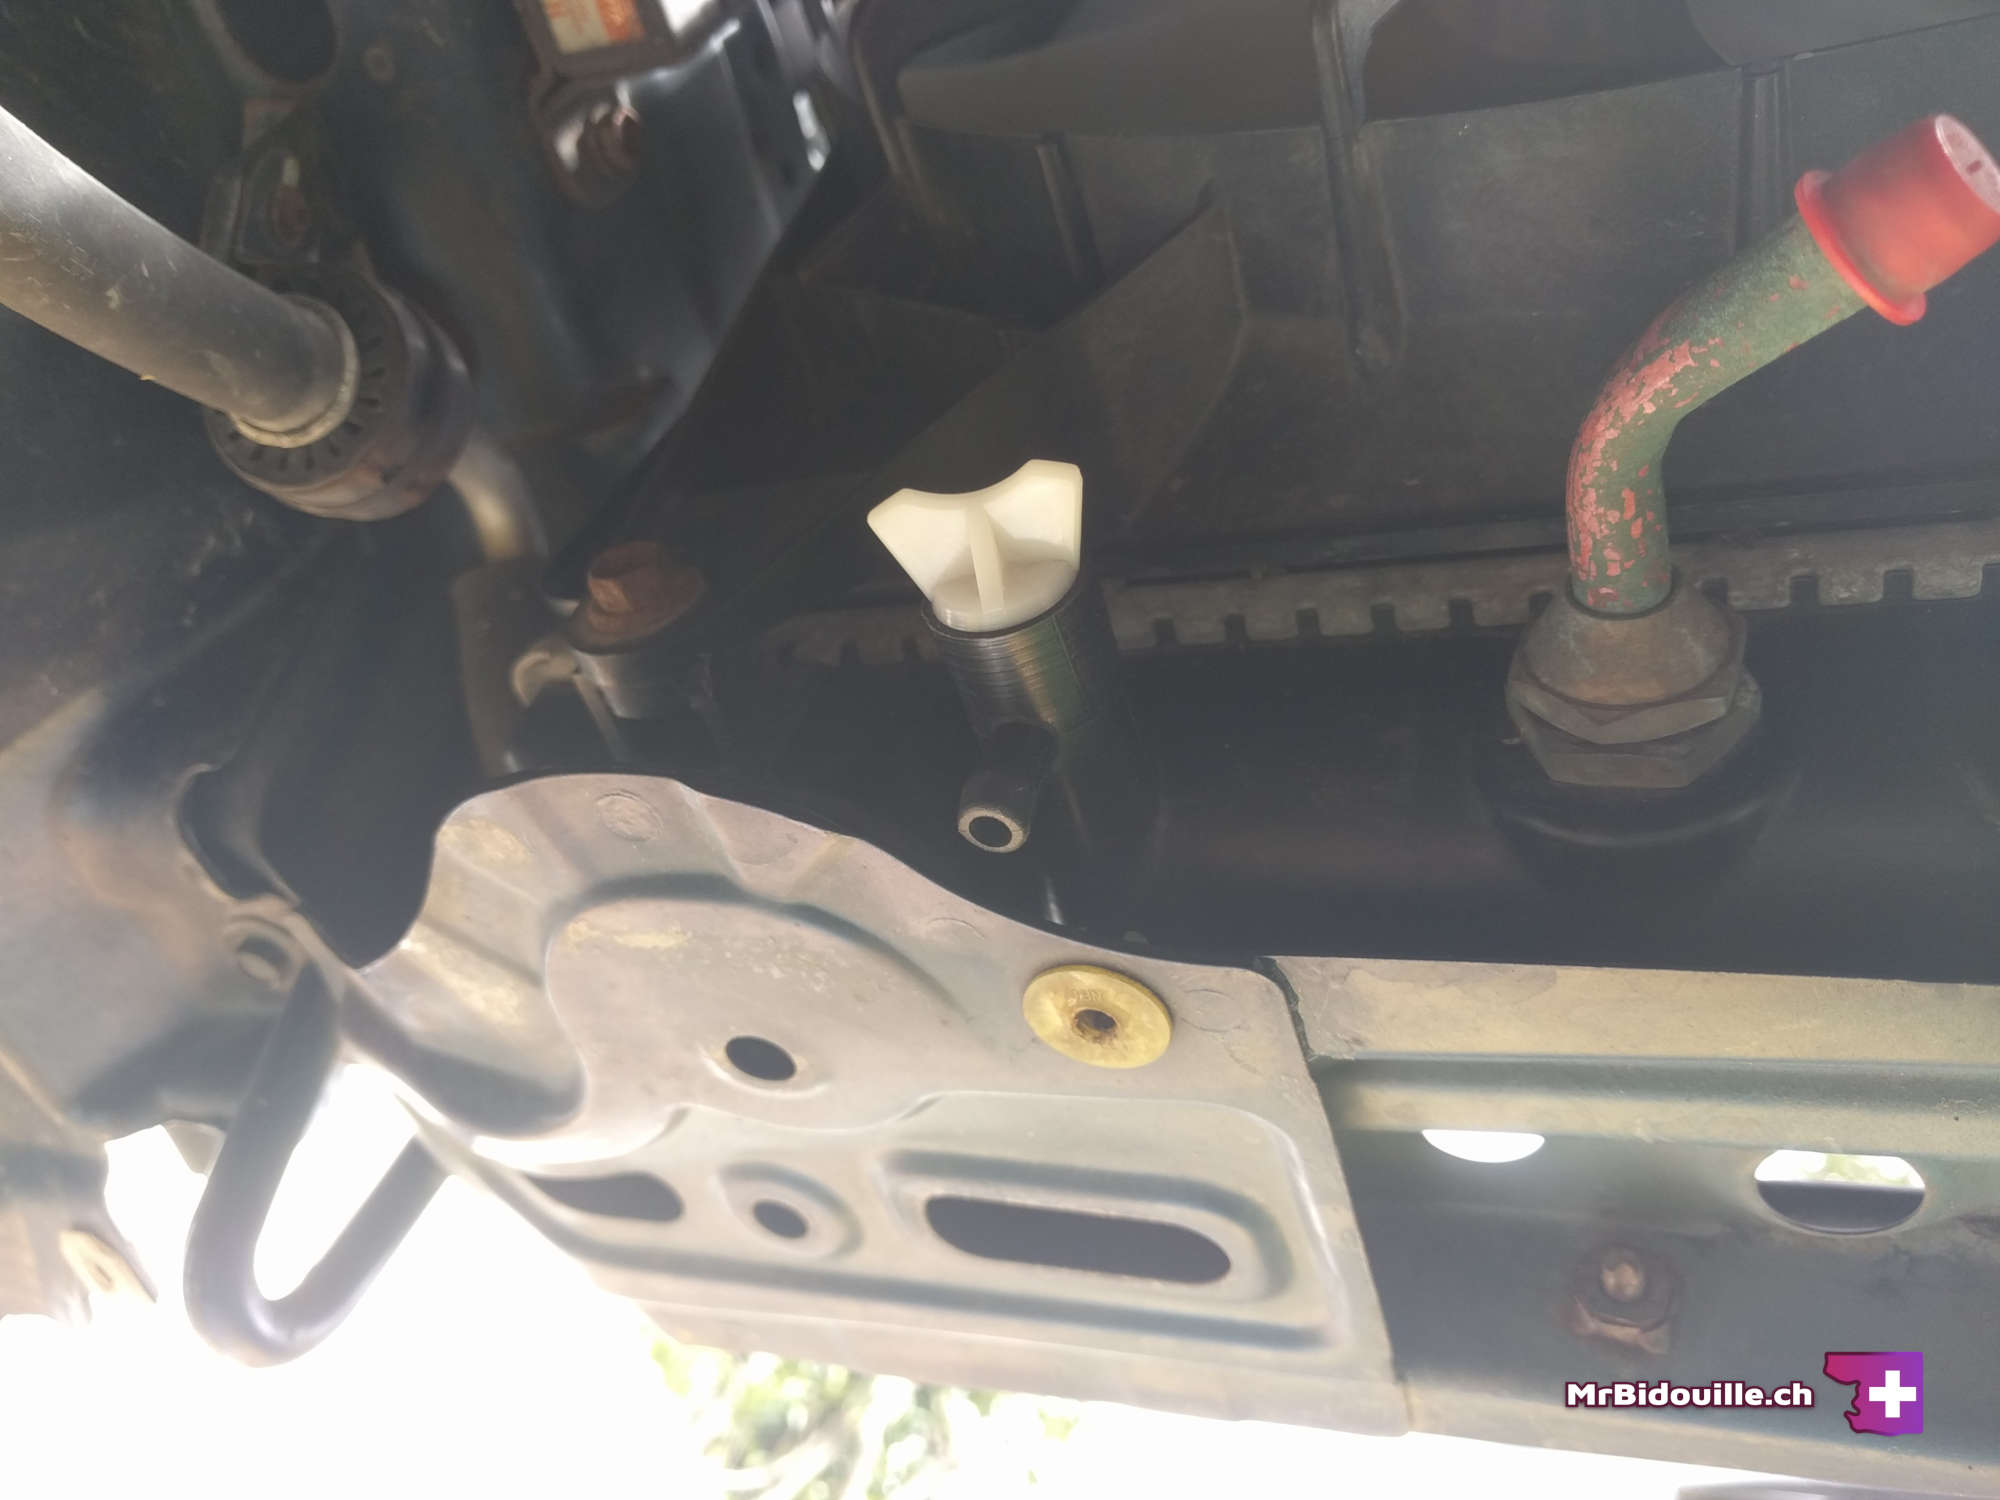
Do not immediately remove the plug. Open it just enough for the liquid to start flowing. Later, you can open the radiator cap to increase the flow. Then even later, you can remove the plug.
It is going to take some time for the 4L - 5L of coolant to come out.
Front bumper
Meanwhile, you can remove the front bumper. It is not required, but will give you more room to access things when working under the hood.
To remove it, some of the 10 mm were already removed when removed the undercover. There are some left on the sides and behind the wheel wells. You can remove the grill at the same time, it is attached to the bumper.
Radiator
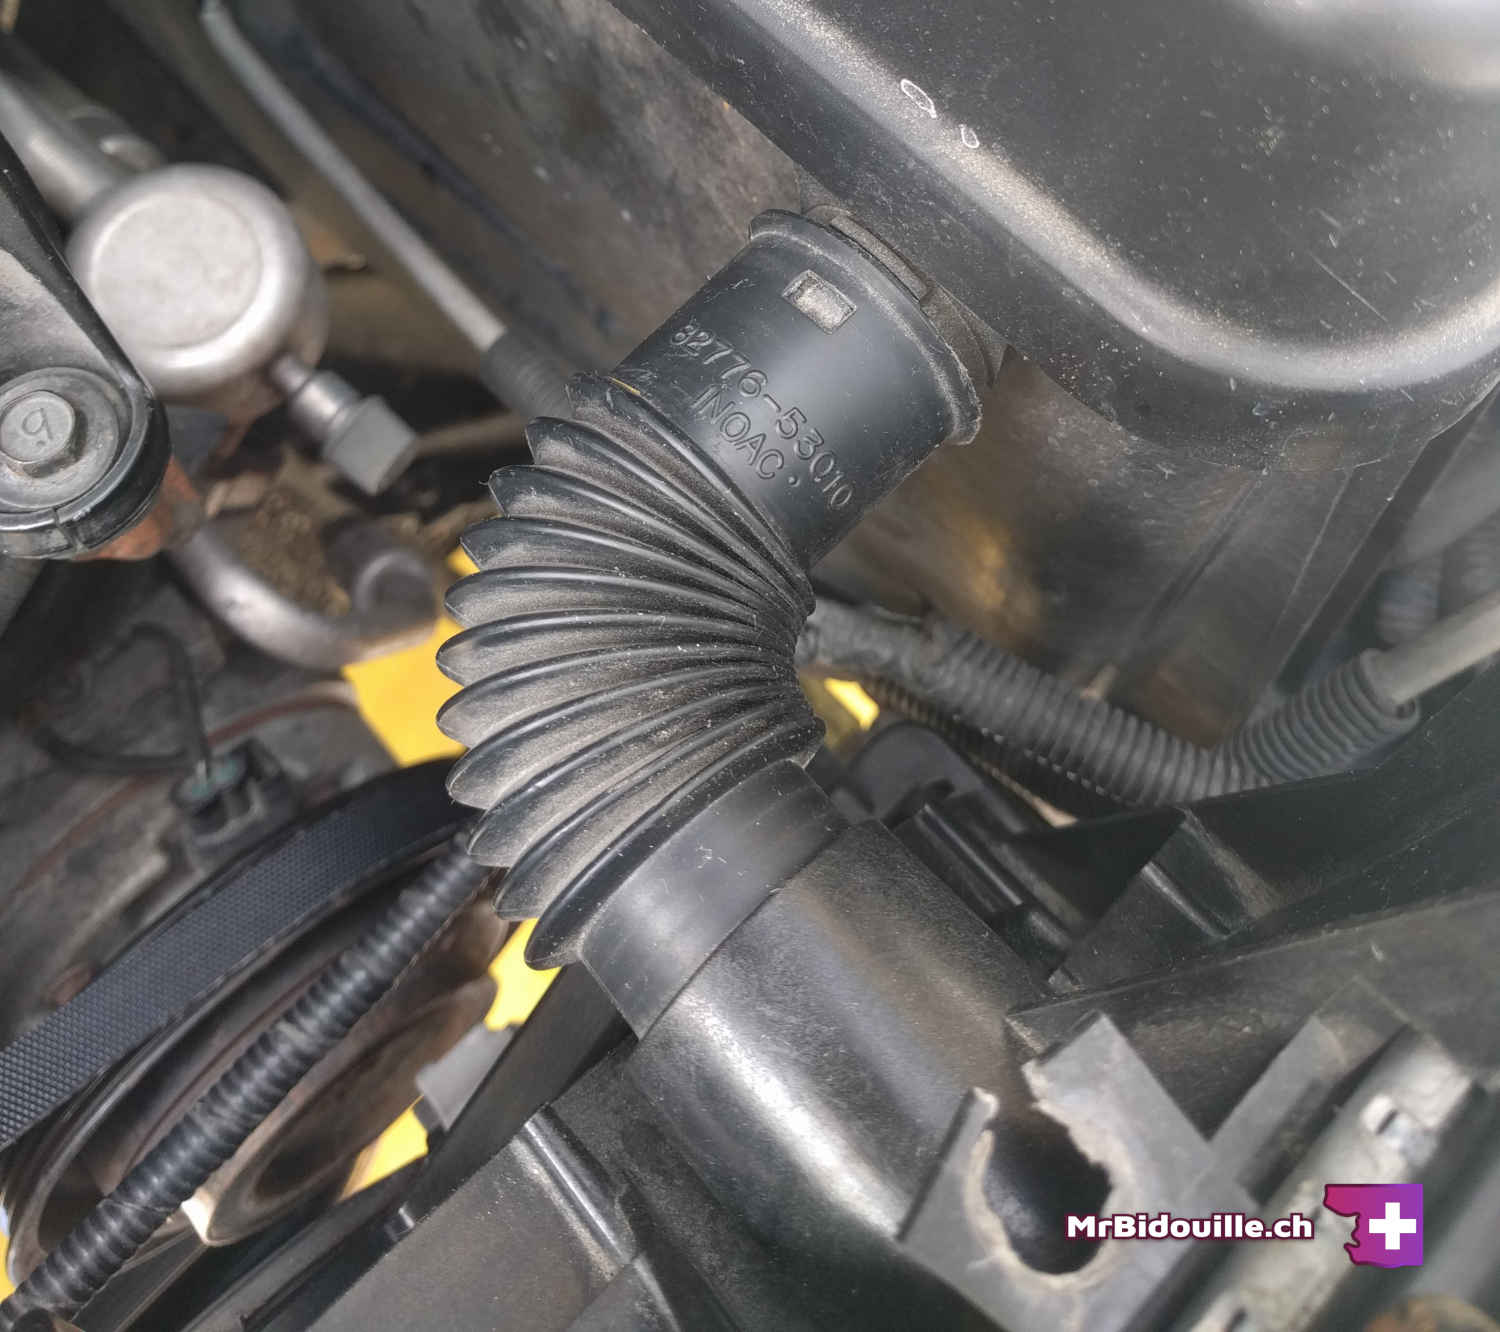
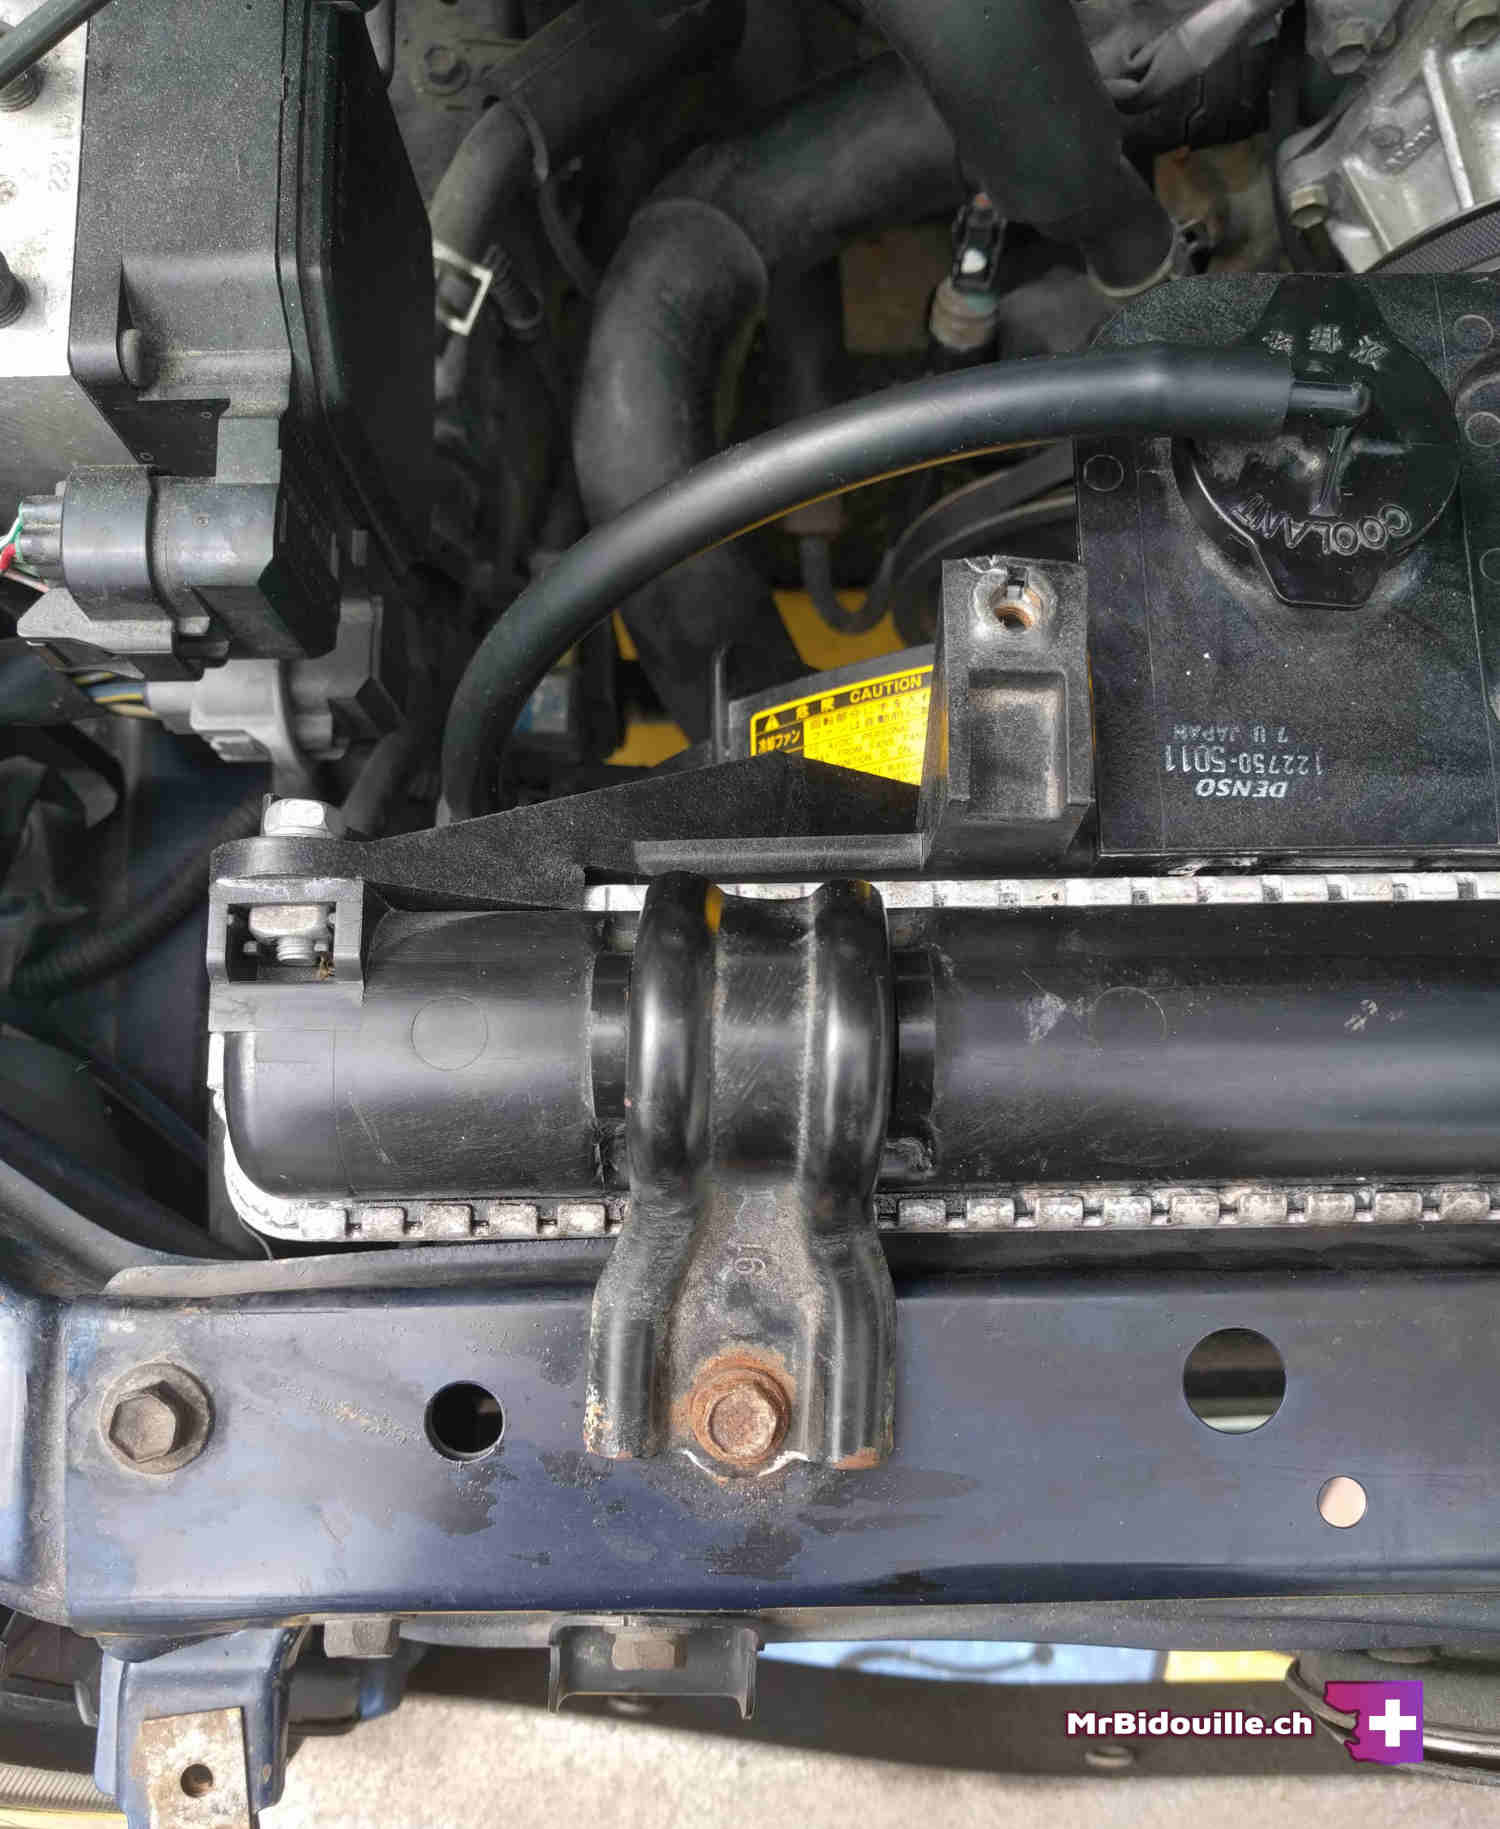
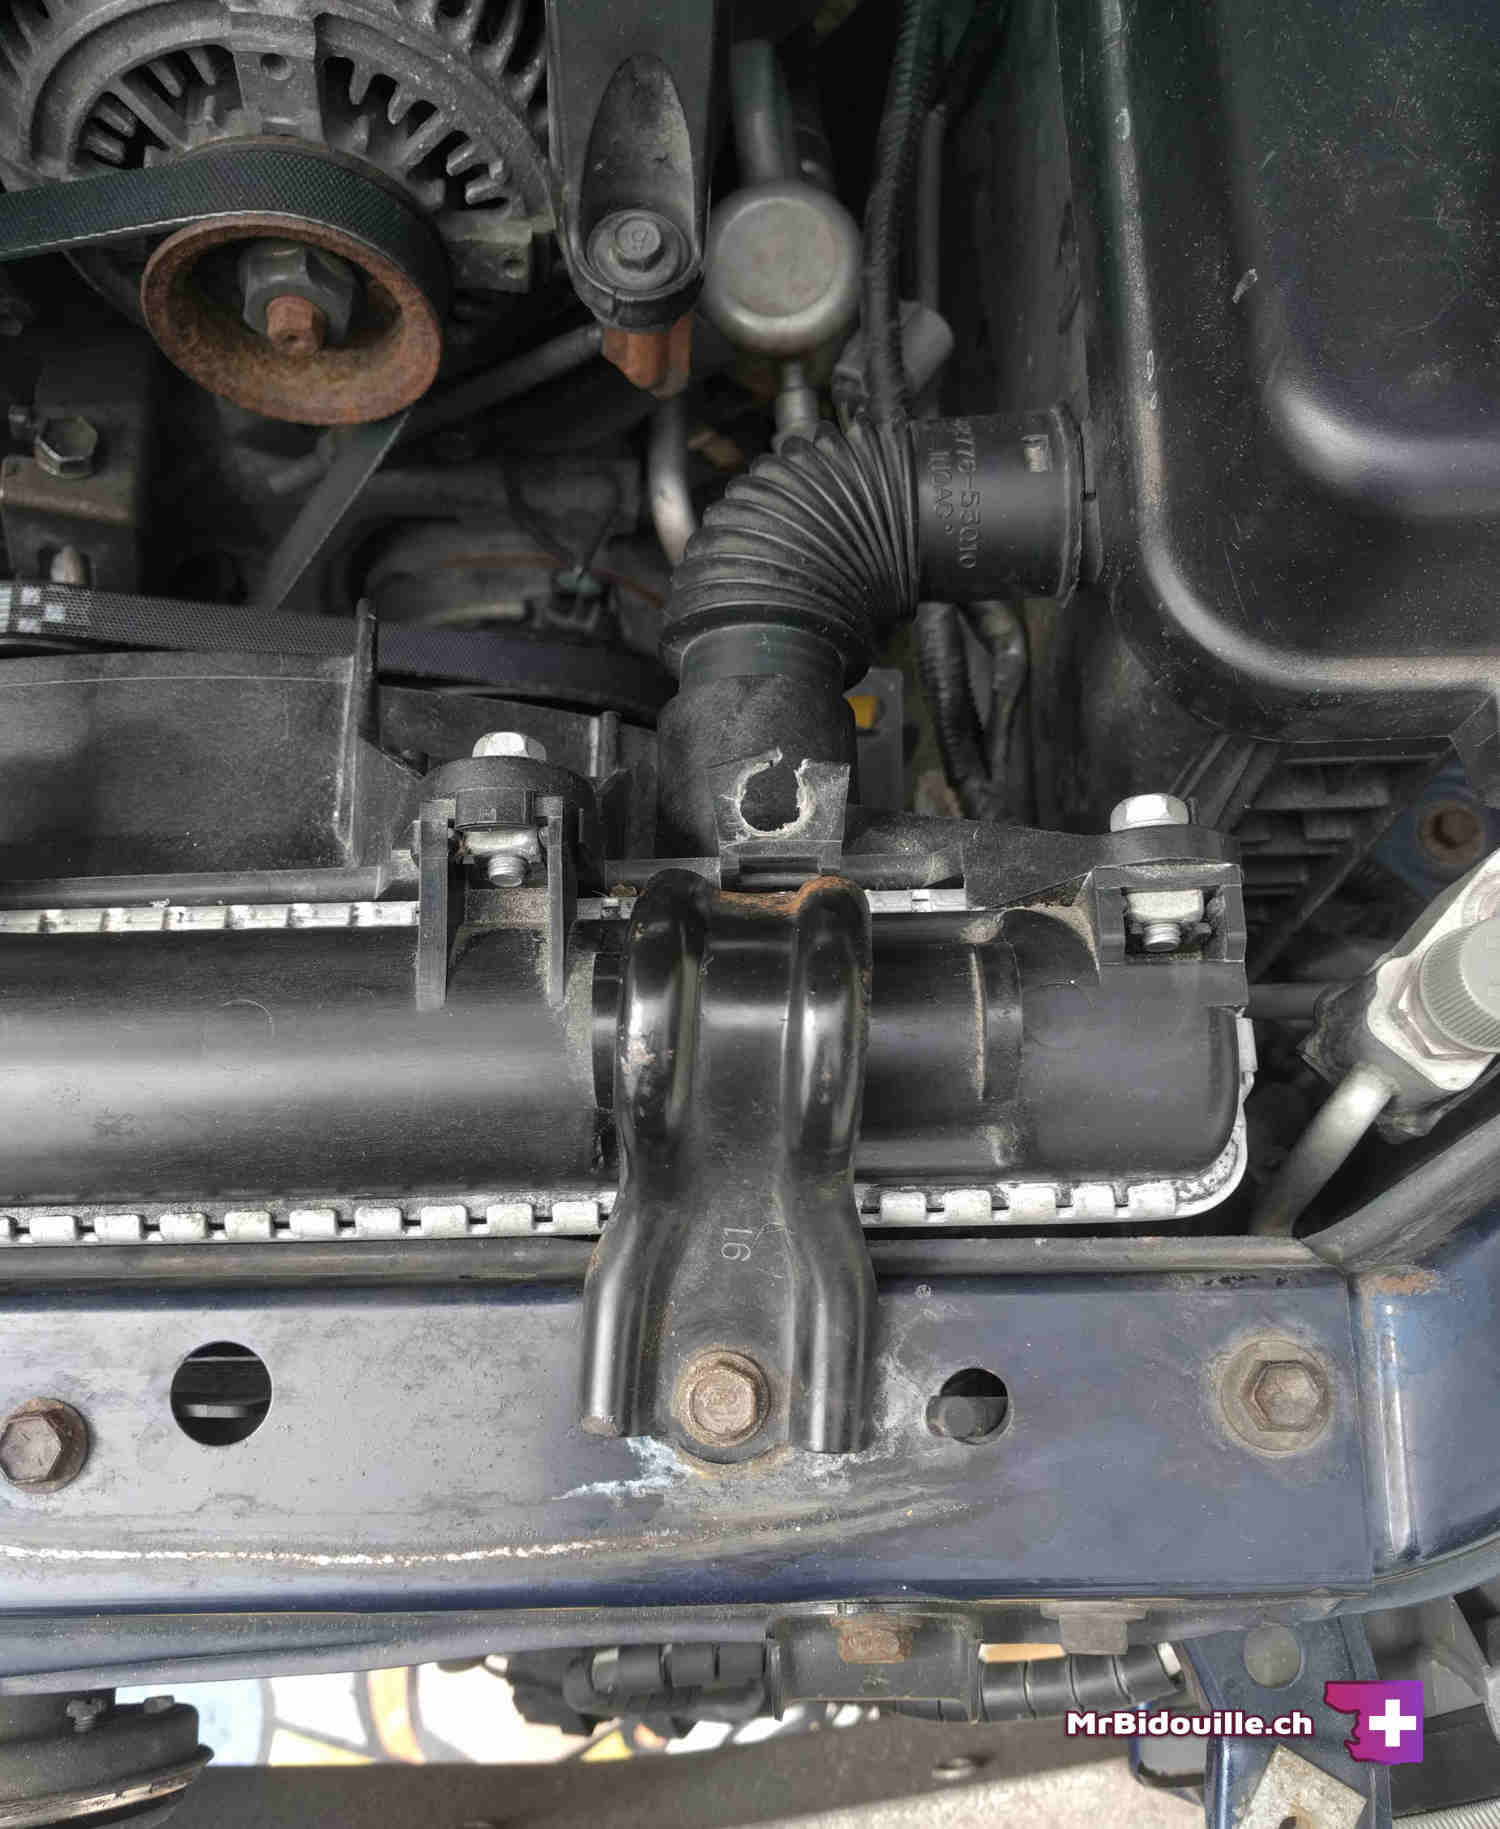
Once the bumper is removed, all the while the coolant is draining, you can start undoing the radiator. You need to remove the first part of the air intake, held in place by 3 10 mm bolts above the radiator. Then this parts slides to the front of the car and can be removed.

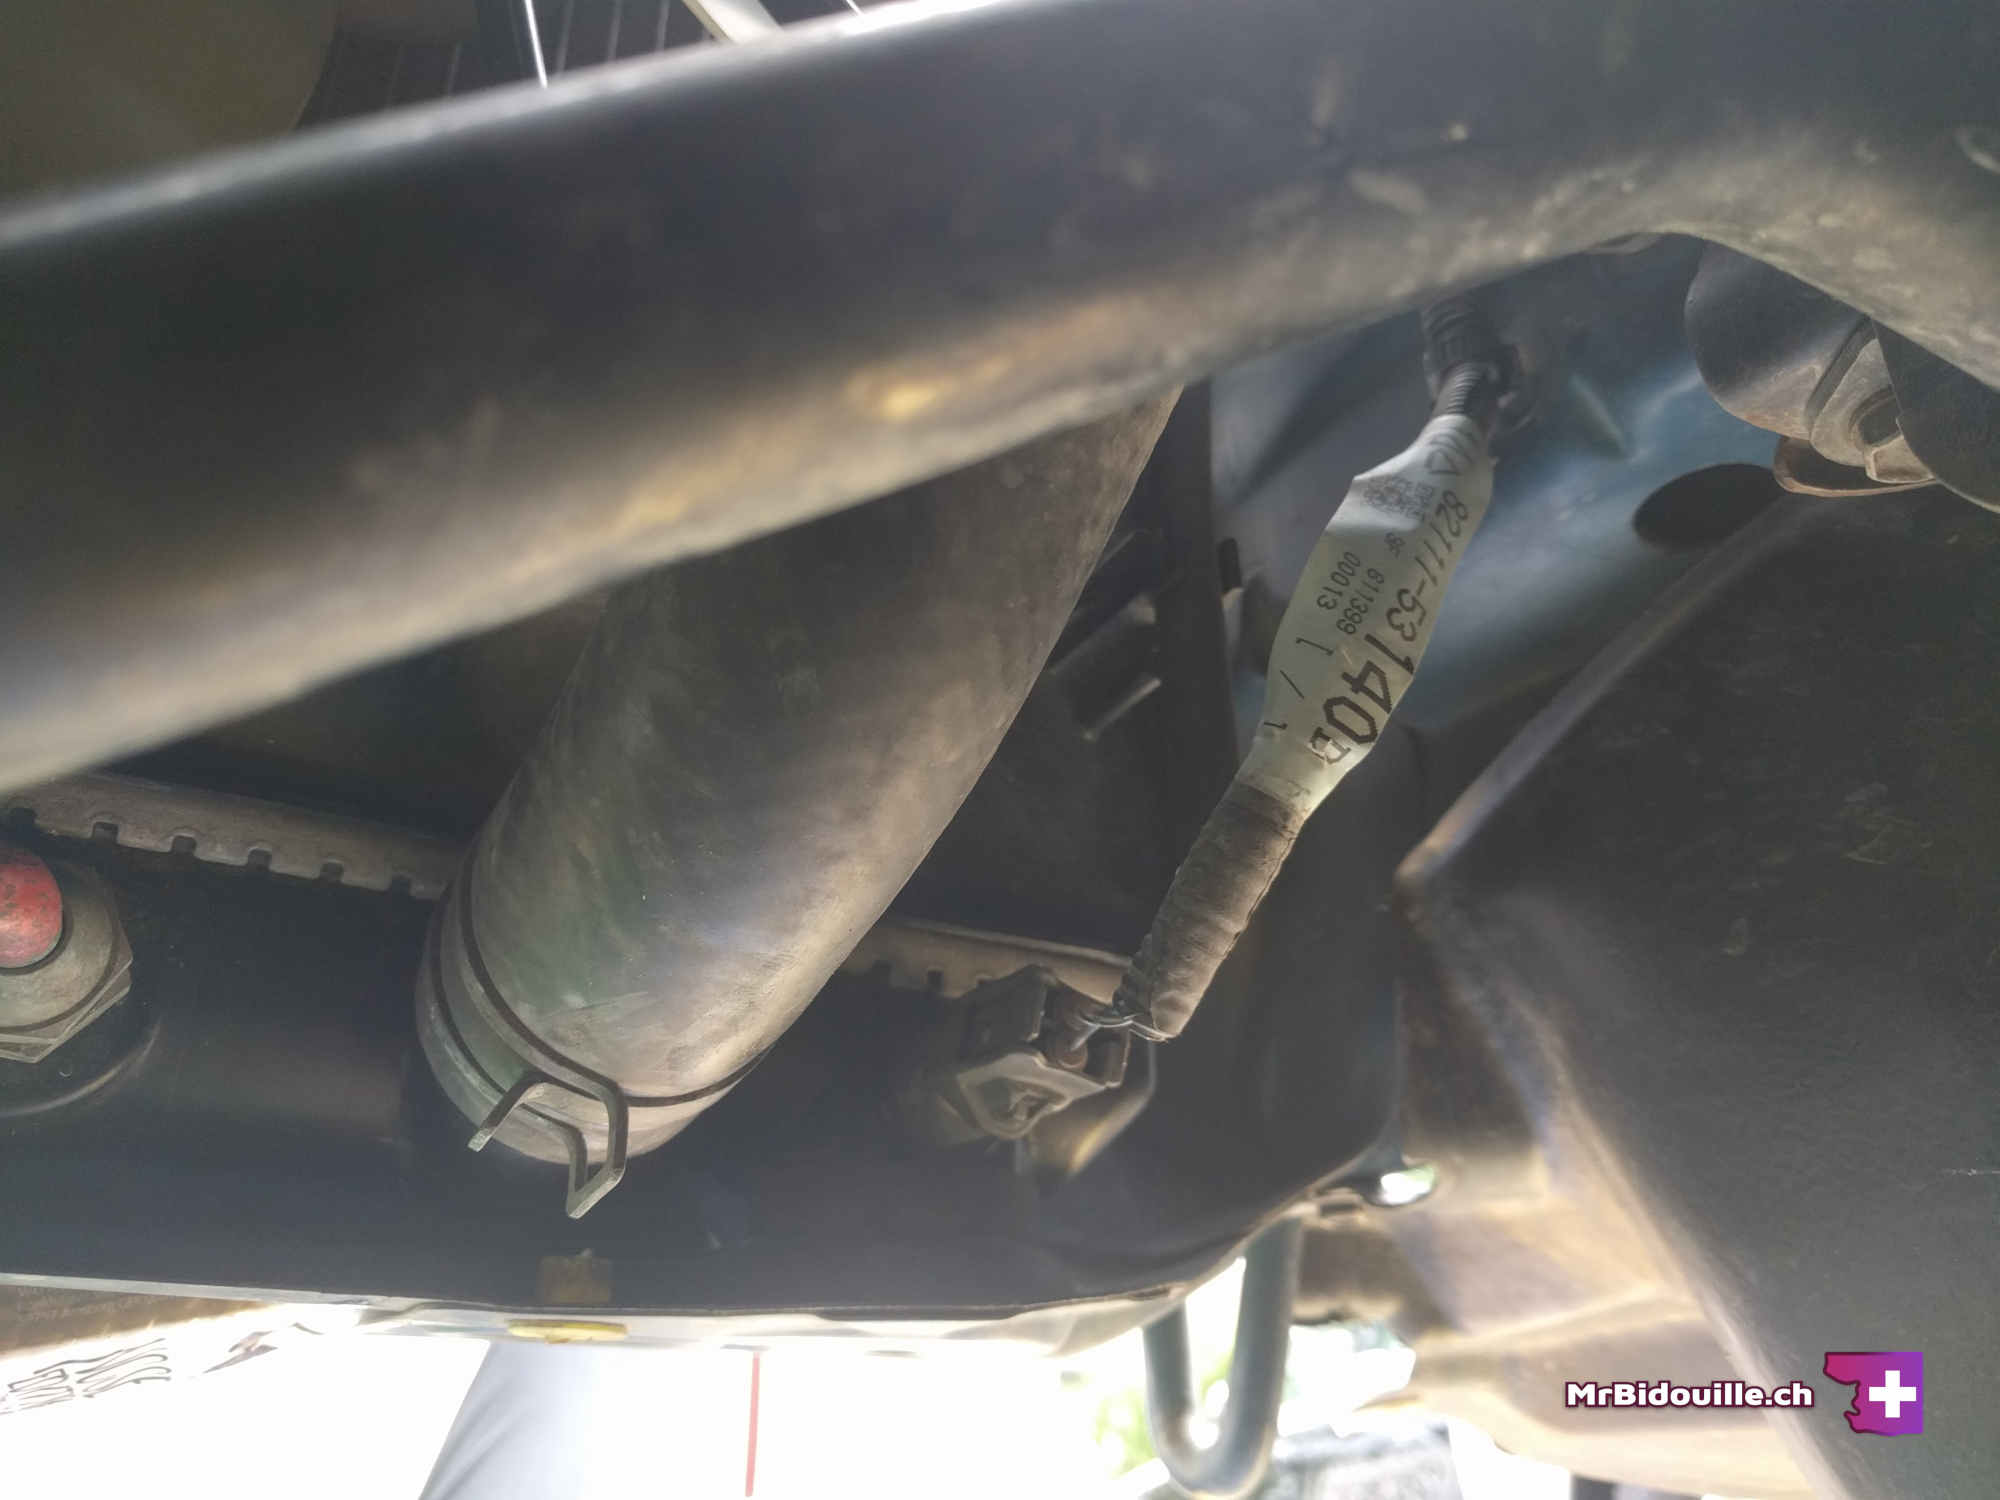
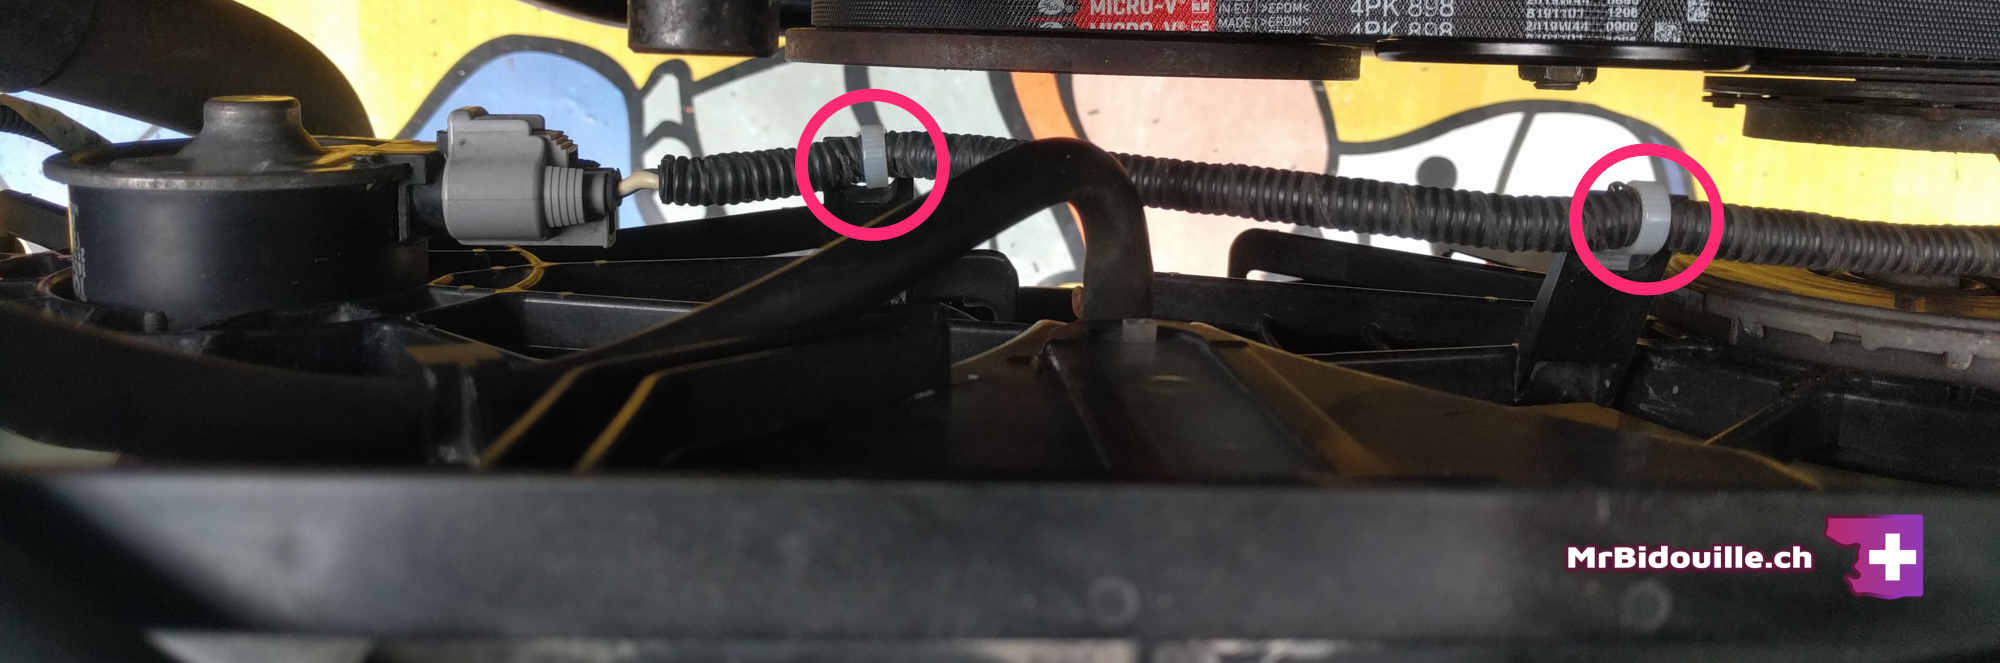
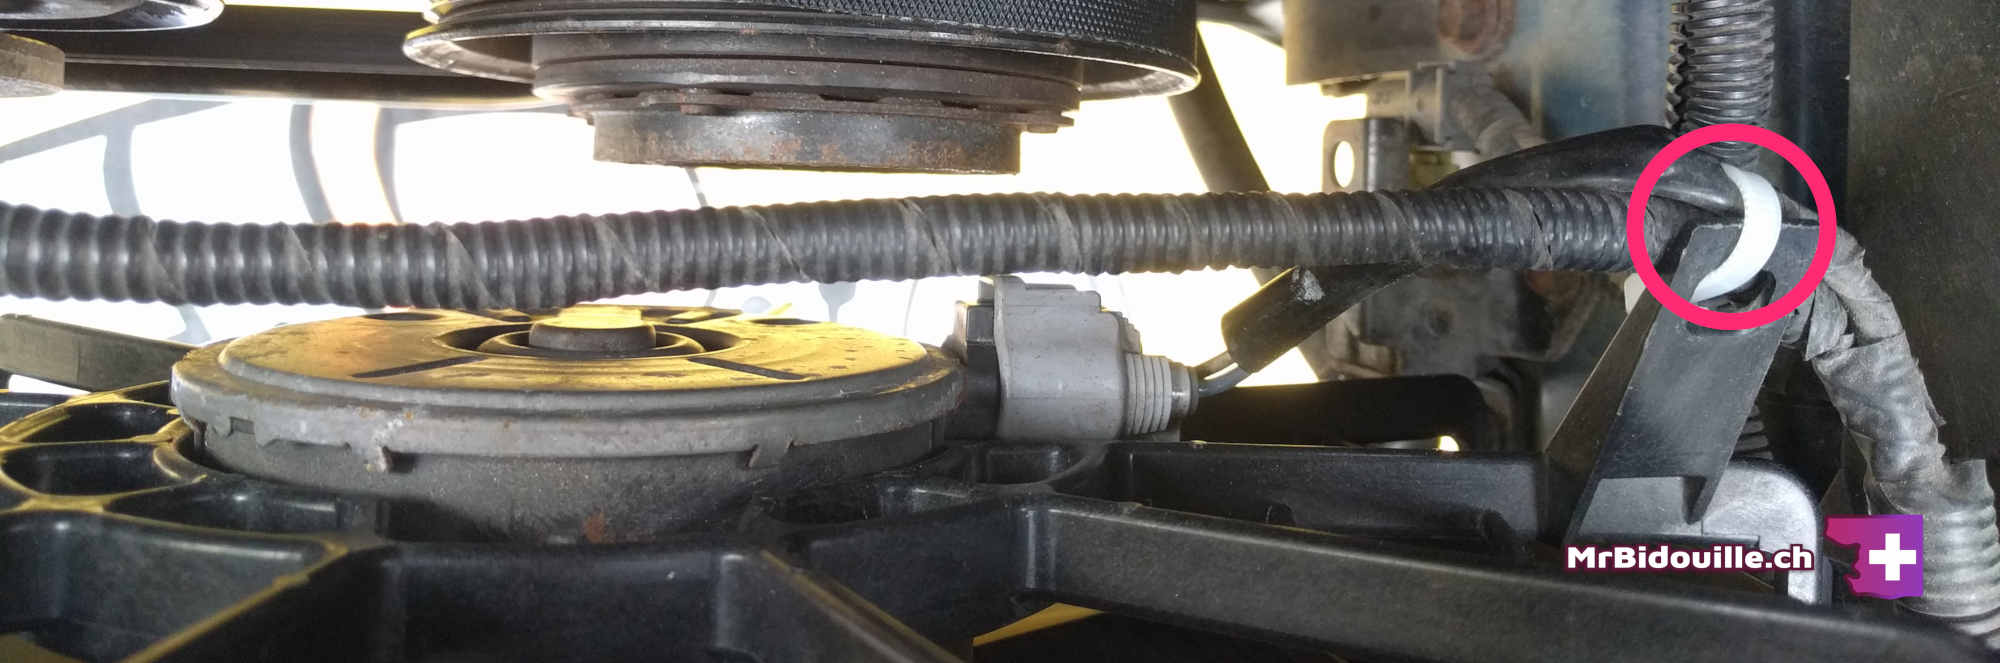
You can then remove the 2 brackets of the radiator and the air duct on the right going to the ECU. Then You'll need to cut the 3 cable ties that hold the 2 fan connectors.
Once the coolant is fully drained (a few drops still coming out is fine), you can remove the radiator from the car. To do this, you'll need to disconnect the big hose at the top right of the radiator, and the one at the bottom left, as well as the connector next to the bottom hose.

To remove theses hoses, you'll need a big plier to move the clamp further down the hose. After that, the hose can be slowly moved out by hand. When you move the clamp back in place, try to align it with the previous marks, as they leave pretty big ones.
Prepare a container under the lower hose, as an unexpected amount of fluide is still going to come out of it (I had a break here, and the coolant kept coming out for the whole night, very slowly. But if you put a container underneath, you'll be fine).
I chose to leave the bottom hose in place, because it does not block access to anything. However I removed the top hose completely.
After removing the hoses, gently move the radiator upwards, and put it down somewhere safe. I plugged the holes with paper, on the car's side and the radiator's side.
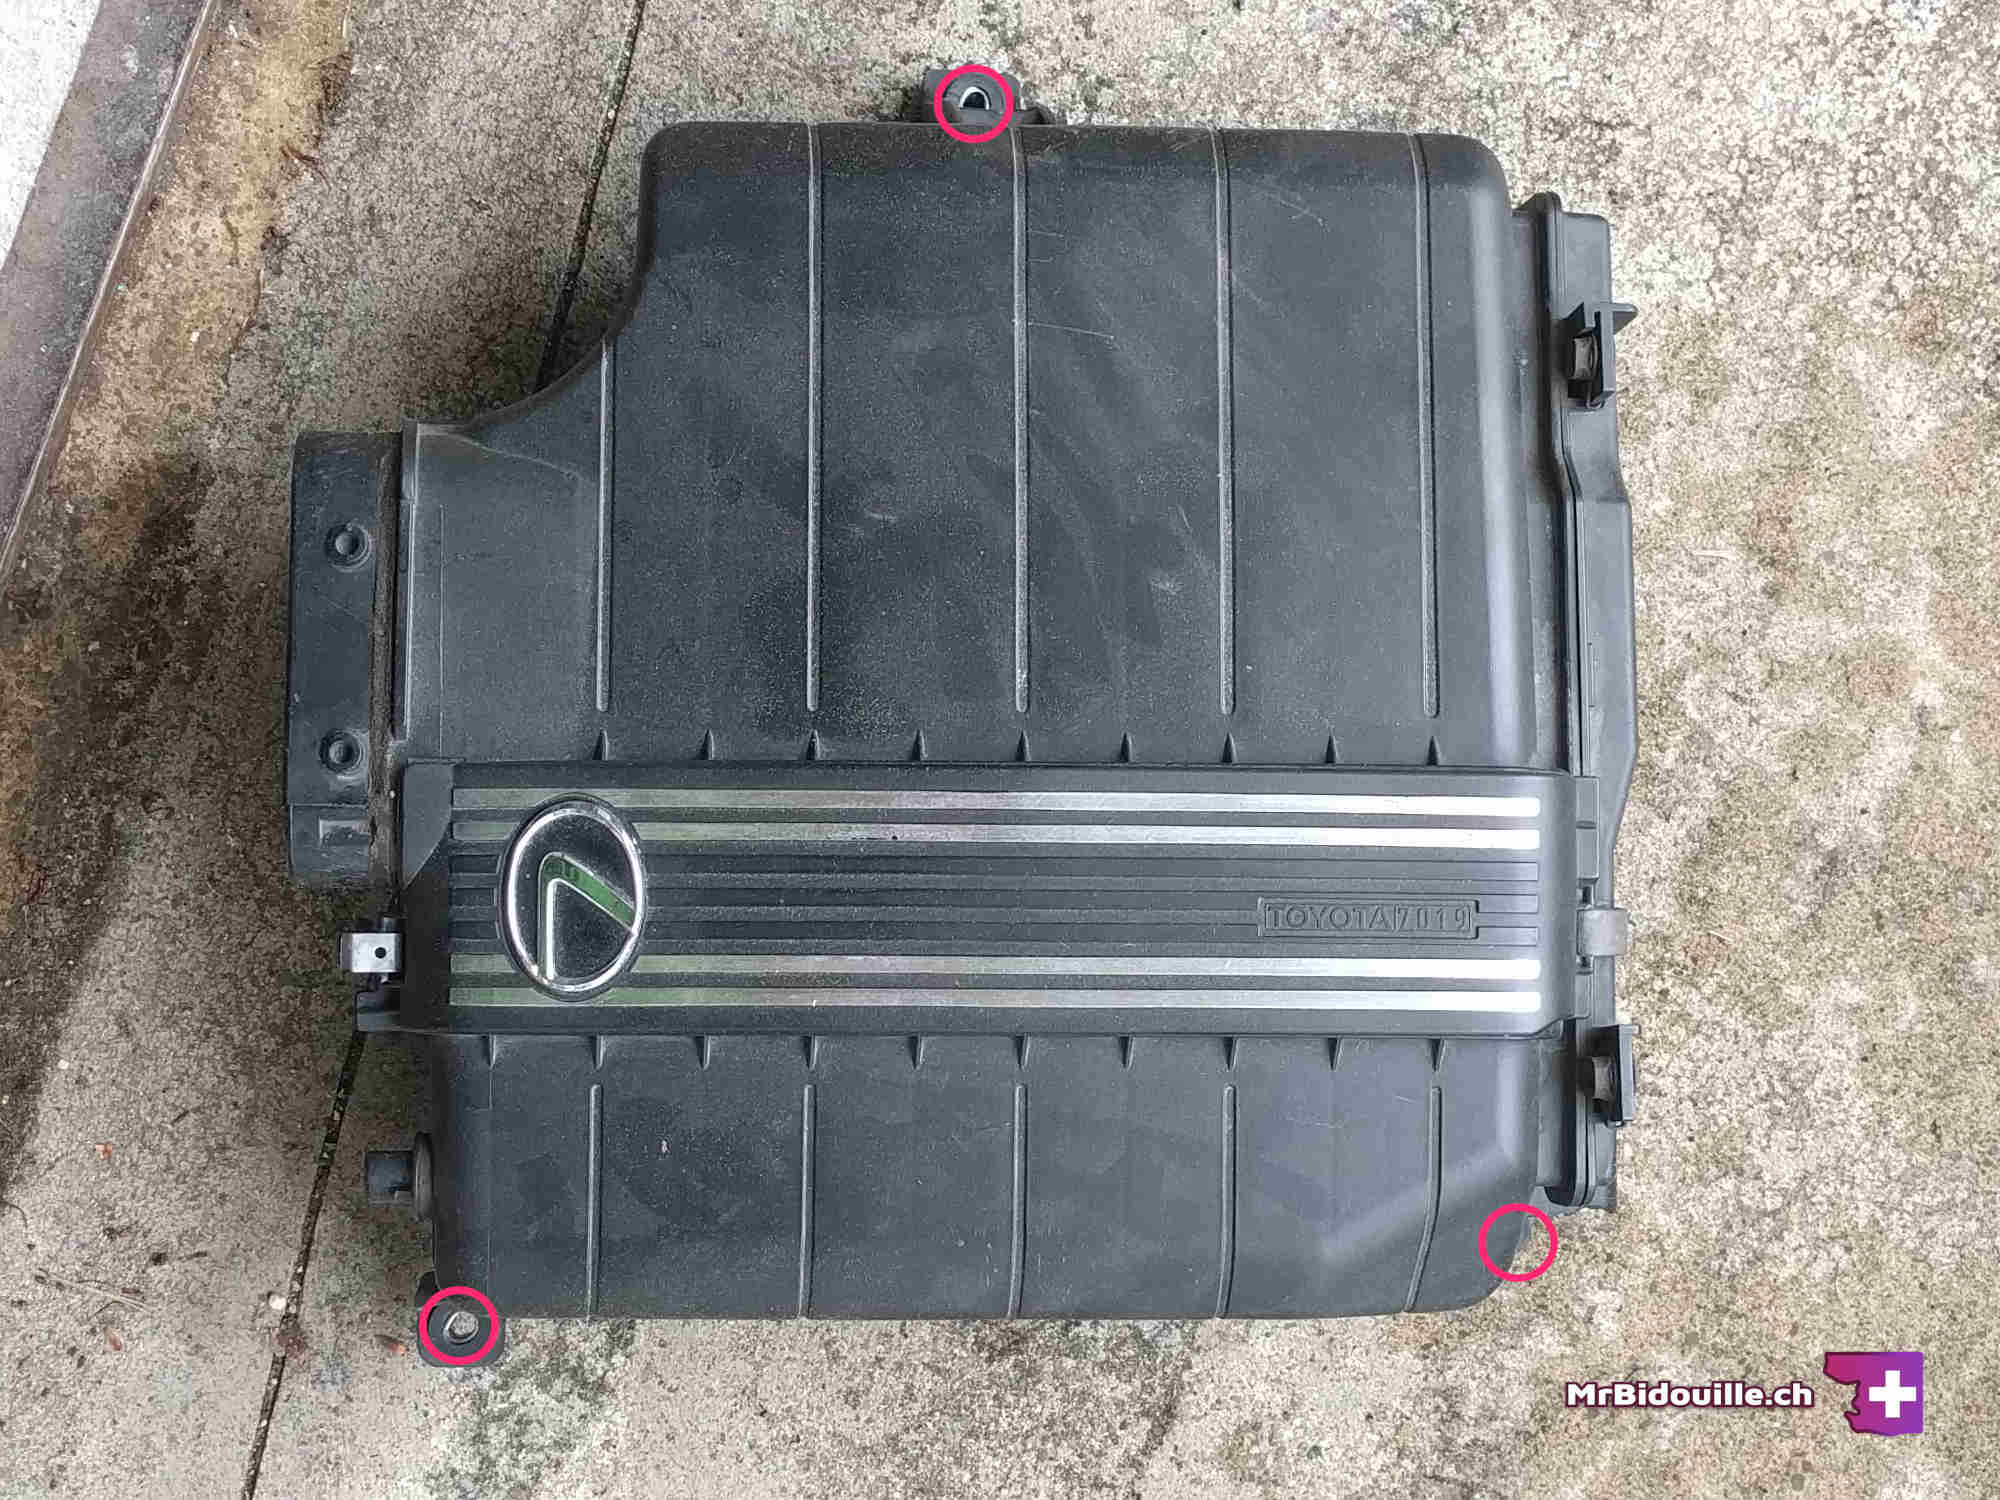
2. Remove the air box
To remove pressure of of the cylinders, we have to remove the spark plugs. To get access to them, we need to remove the whole air box.
There are 3 10 mm bolts around the main box.
I placed paper in the throttle body to prevent crap from falling in.
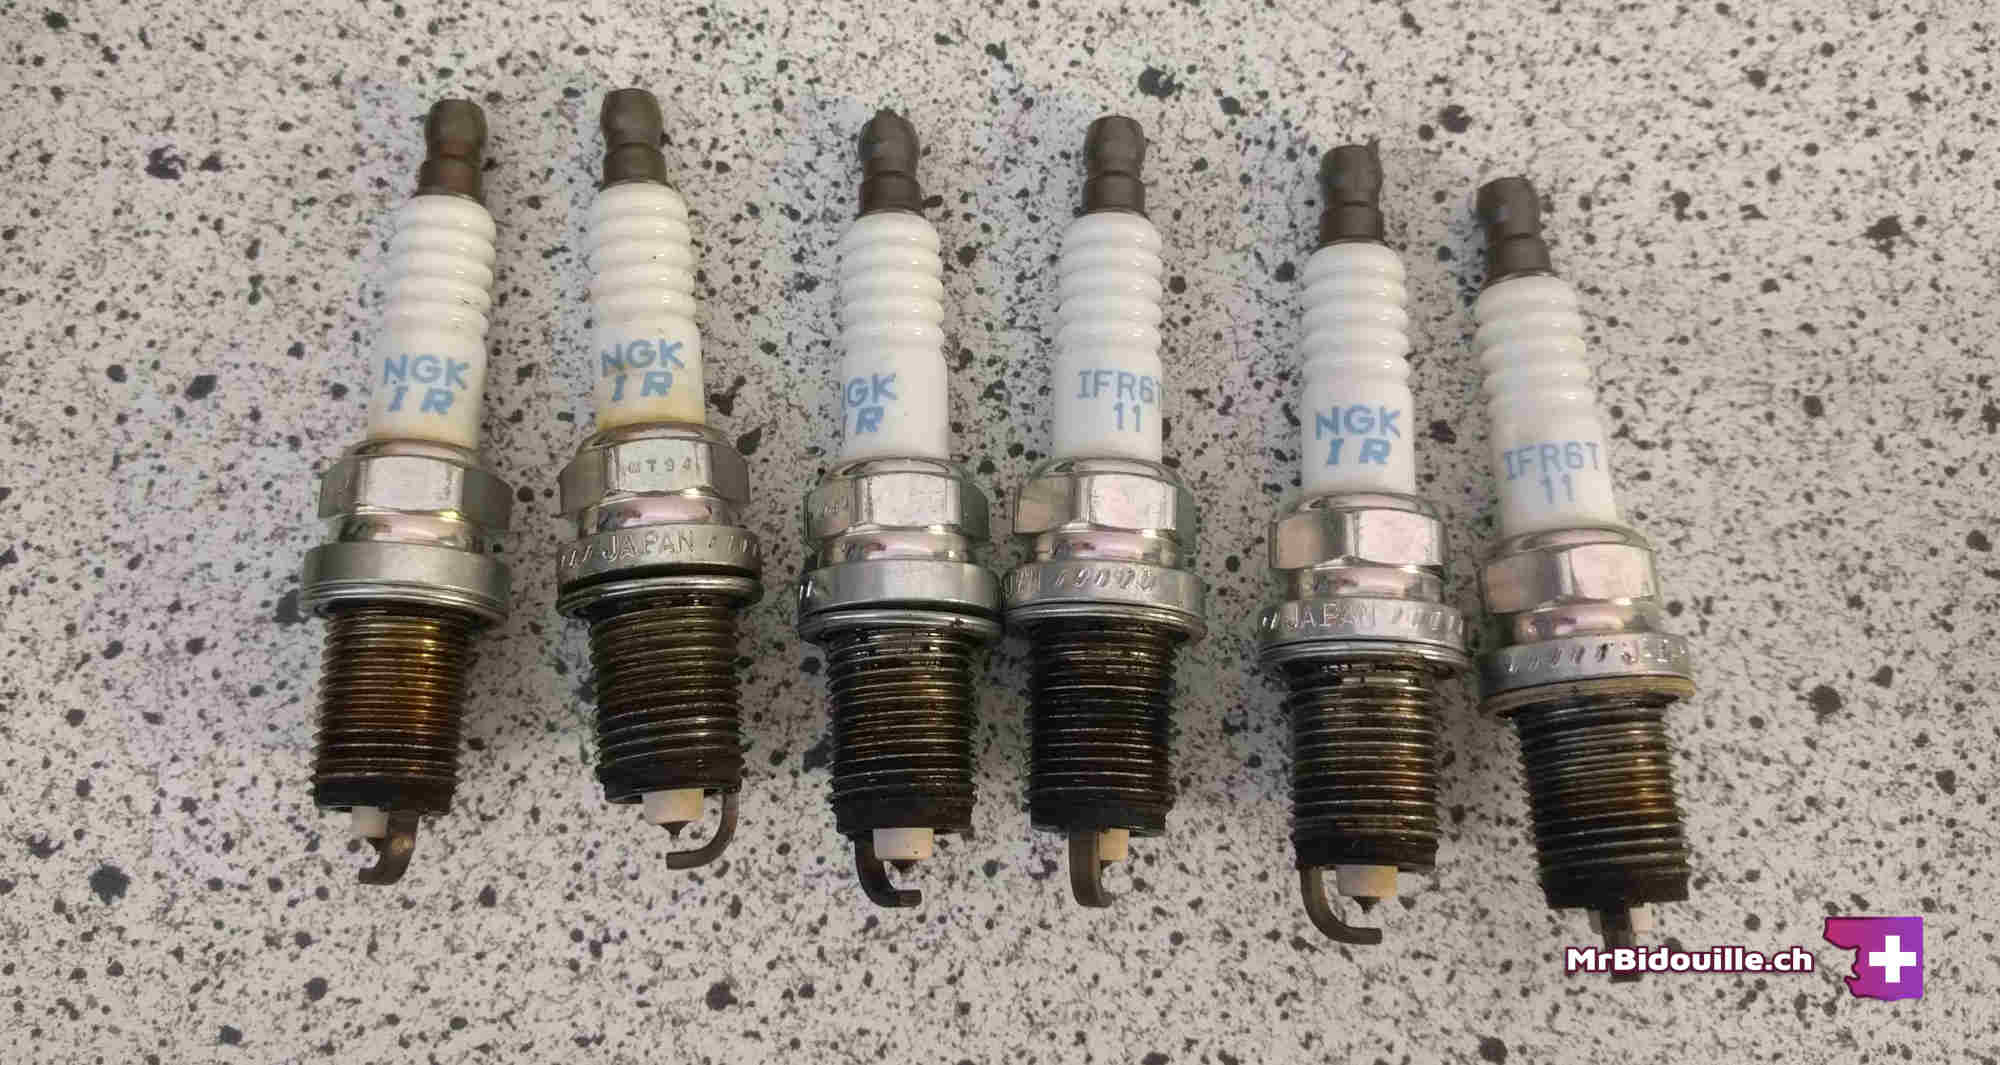
3. Remove the spark plugs
There is another cover above the spark plugs to remove, with 4 x 10 mm.
If you've got an air compressor, it's a great way to remove any crap that could fall inside the engine. If you don't have a compressor, you can use a rag, brake cleaner, etc.
Then remove the 6 ignition coils. A 10 mm and a connector holds each of them in place.
Go for another round of compressed air in the holes, to make sure there is nothing inside.
With the correct socket (see tools list at the beginning of the article), remove the spark plugs. Take your time. You'll have to turn them a lot more than you might expect, but you don't need to apply a lot of force.
Place the coils and plugs in a safe area. We will resintall them later. Or take this opportunity to replace them, if they are bad.

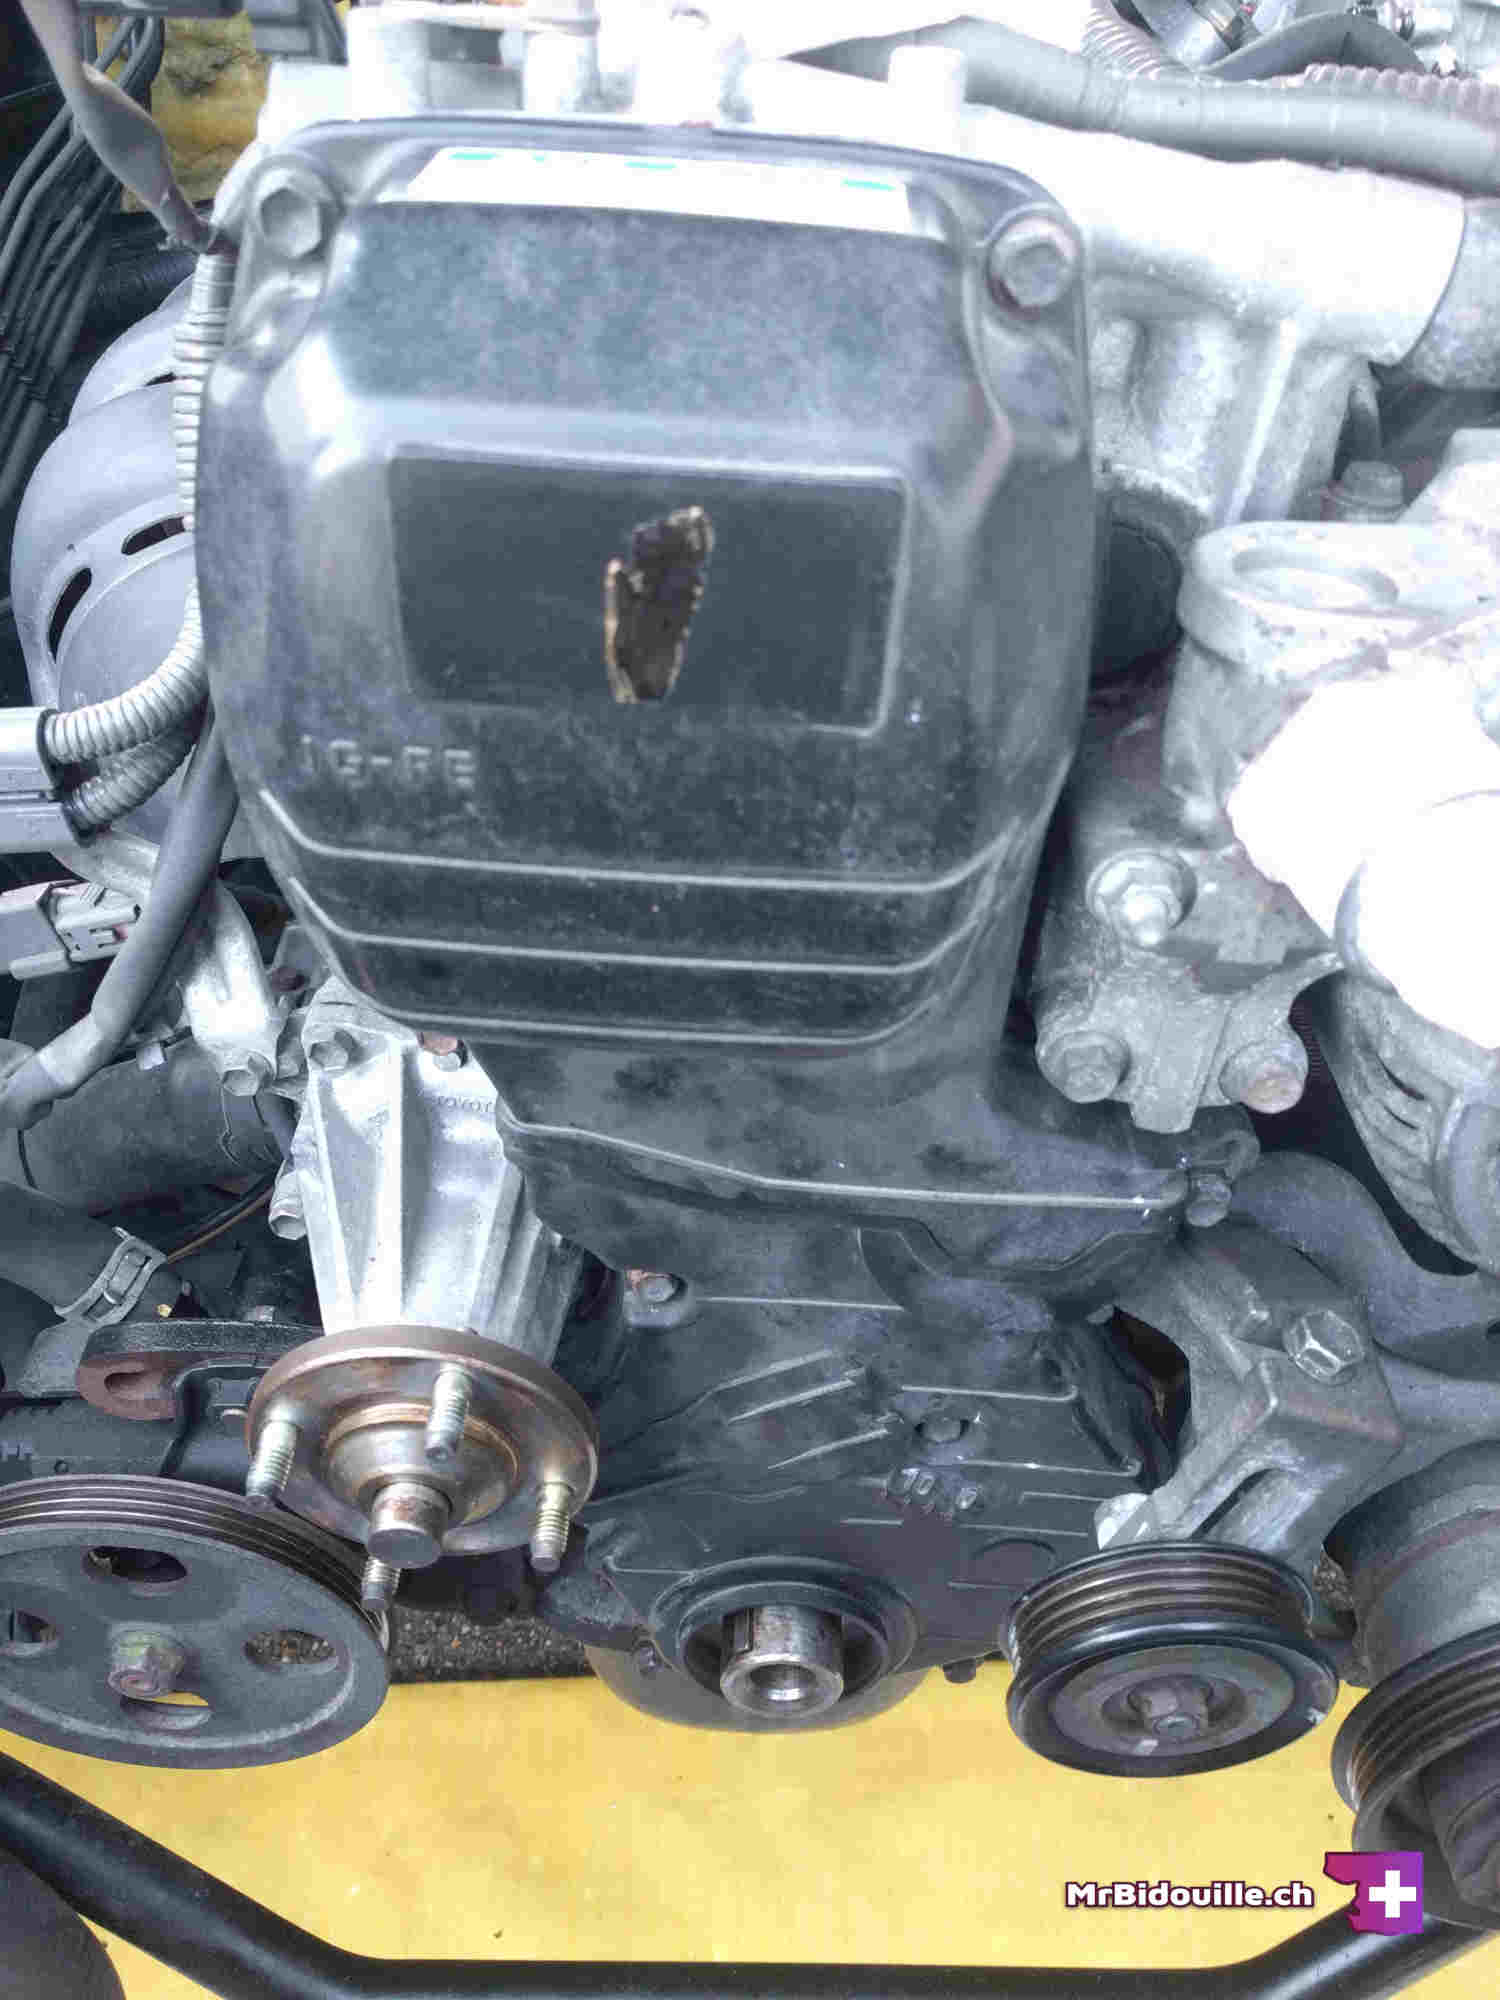
4. Undo the auxiliary belts
Here we are ! We will now attack the belts.
There is one more cover with 3 x 10 mm above the alternator. You can remove it now (I did it later, but now is a good time).
We are going to remove the auxiliaries starting from the one closest to the front of the car, moving to the back.
All the bolts we are going to encounter are either 12 mm or 14 mm.
I suggest you lightly press on each belt to get a feel for it's tension. It will help later when we tighten the new ones.
First auxiliary
Start by untightening the center nut a little, in the center of the pulley, then the long bolt.
By playing with the tightening, you can remove tension from the belt, and finally remove it.
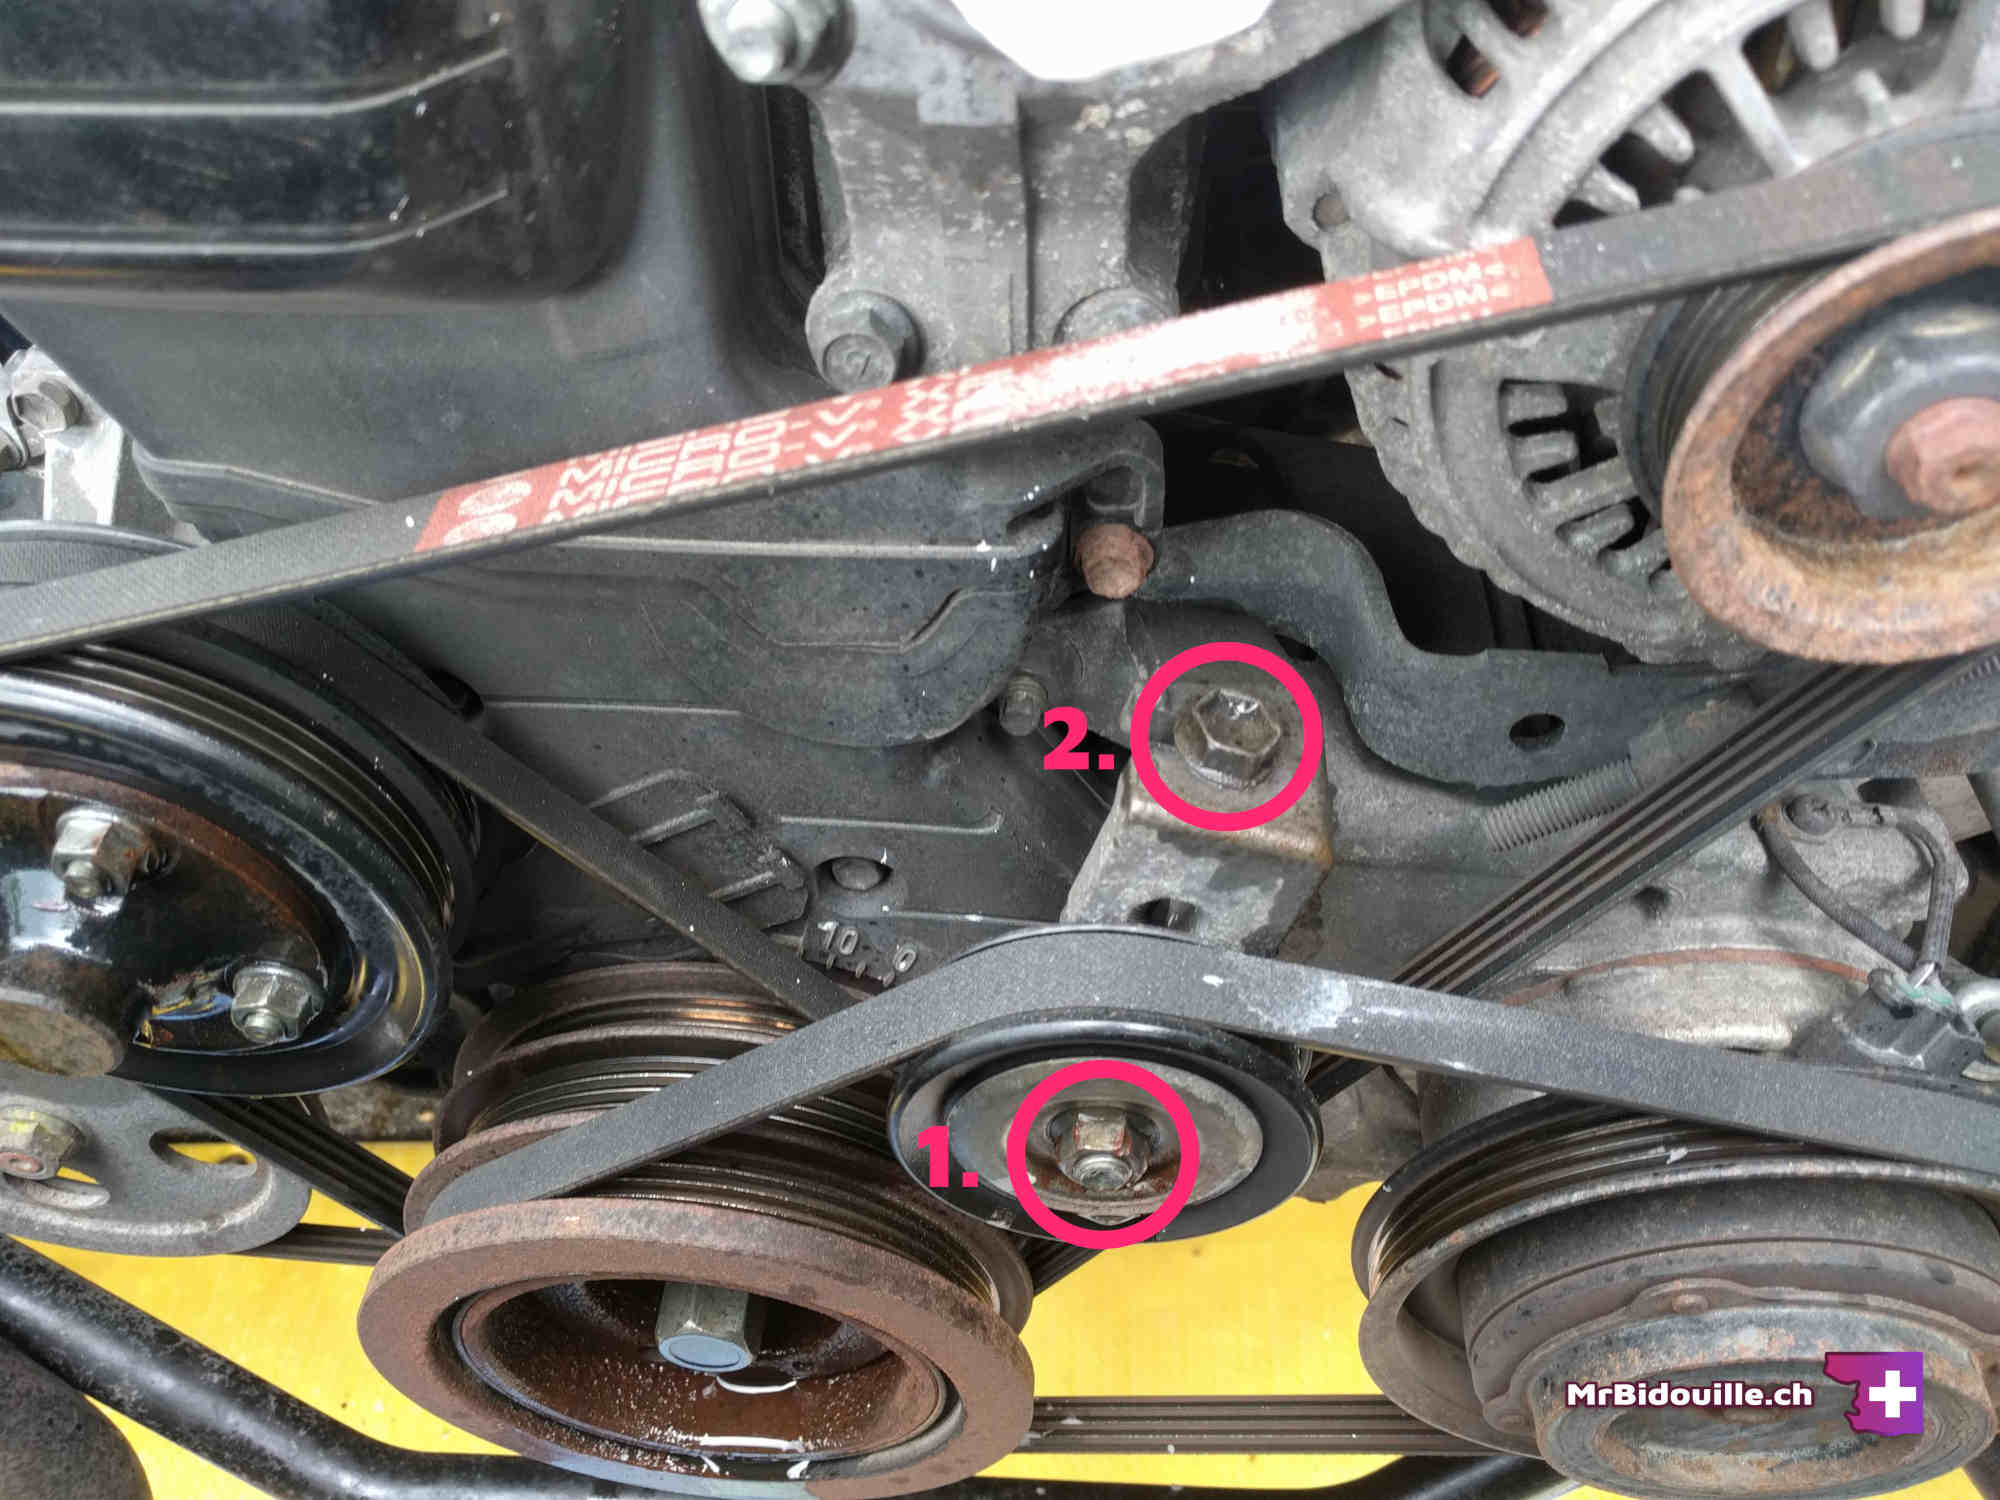
Second auxiliary
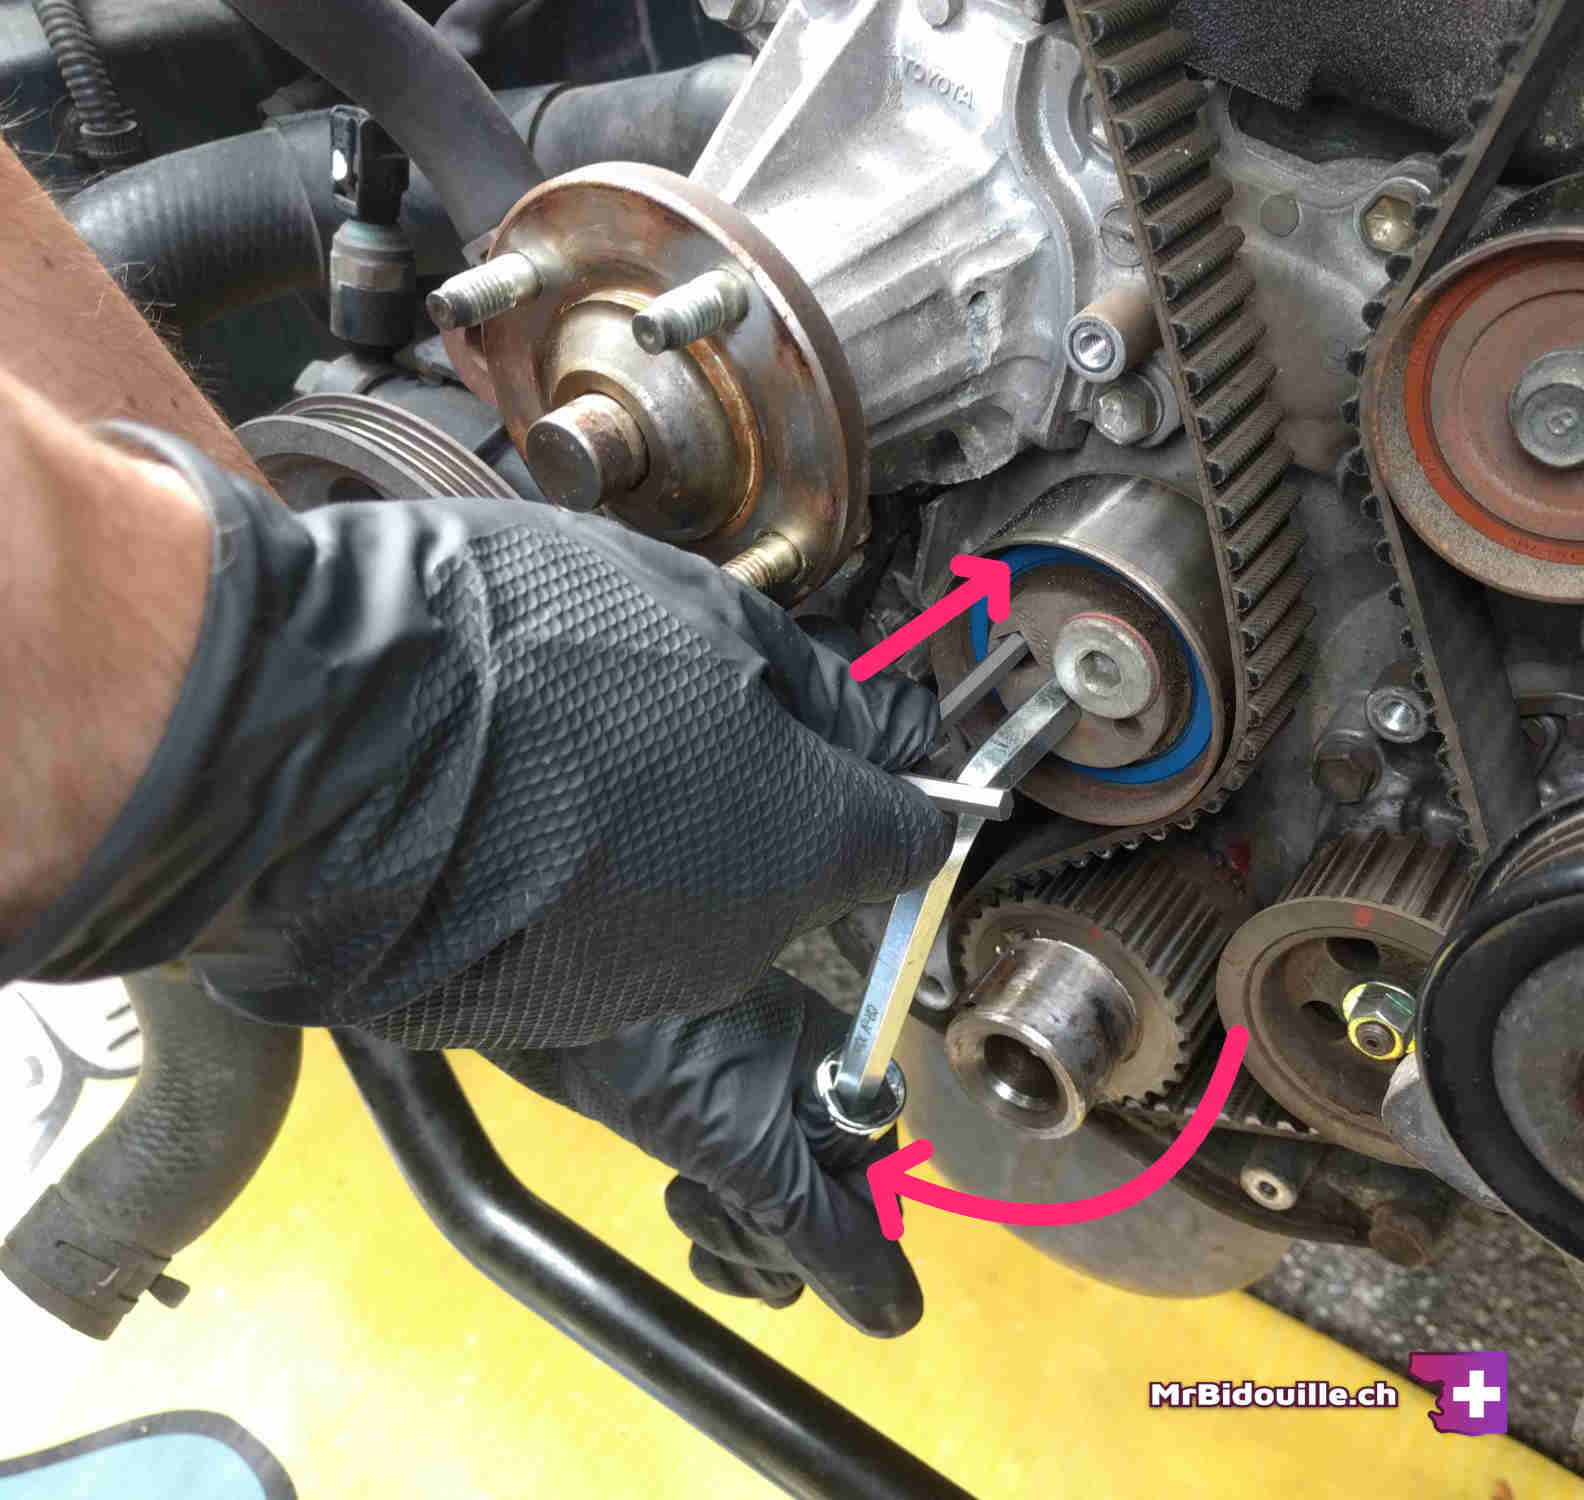
This one is going to be a little special, because after removing it, we are goint to reuse it to untighten the famous crankshaft pulley bolt. We are even going to reuse it one last time to tighten back that same bolt.
To remove tension from it, there are 3 bolts to untighten using the same technique as before. See the two pictures. Note that on the second picture, I had not yet removed the cover on top of the alternator.
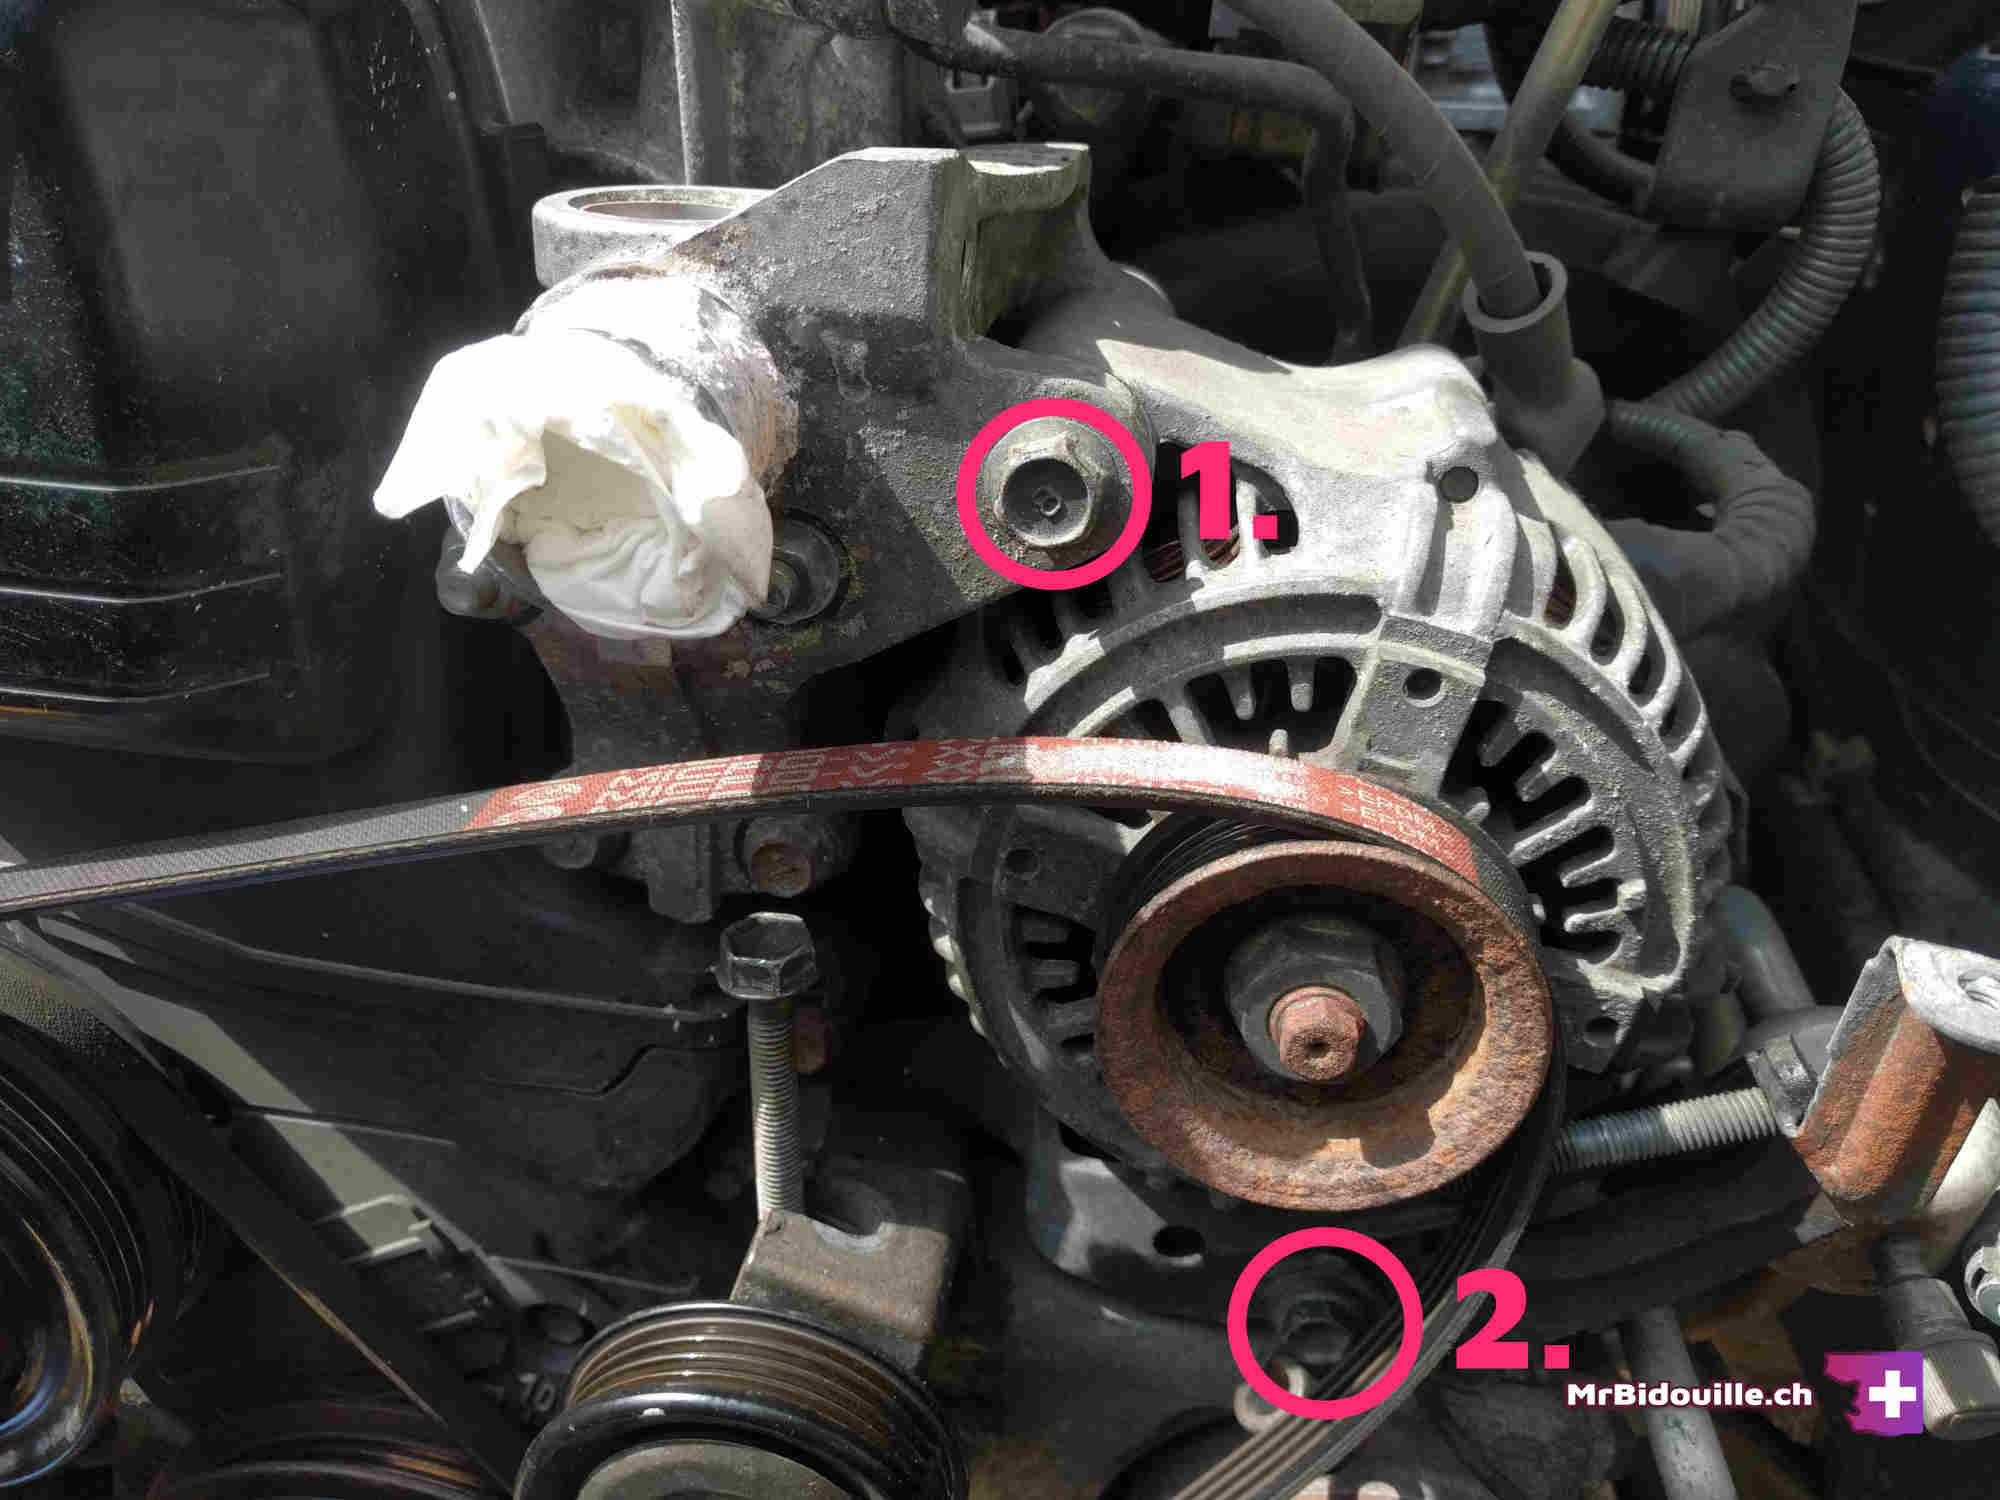
The whole alternator will rotate slightly to the left (see first picture), and the tension will be gone.
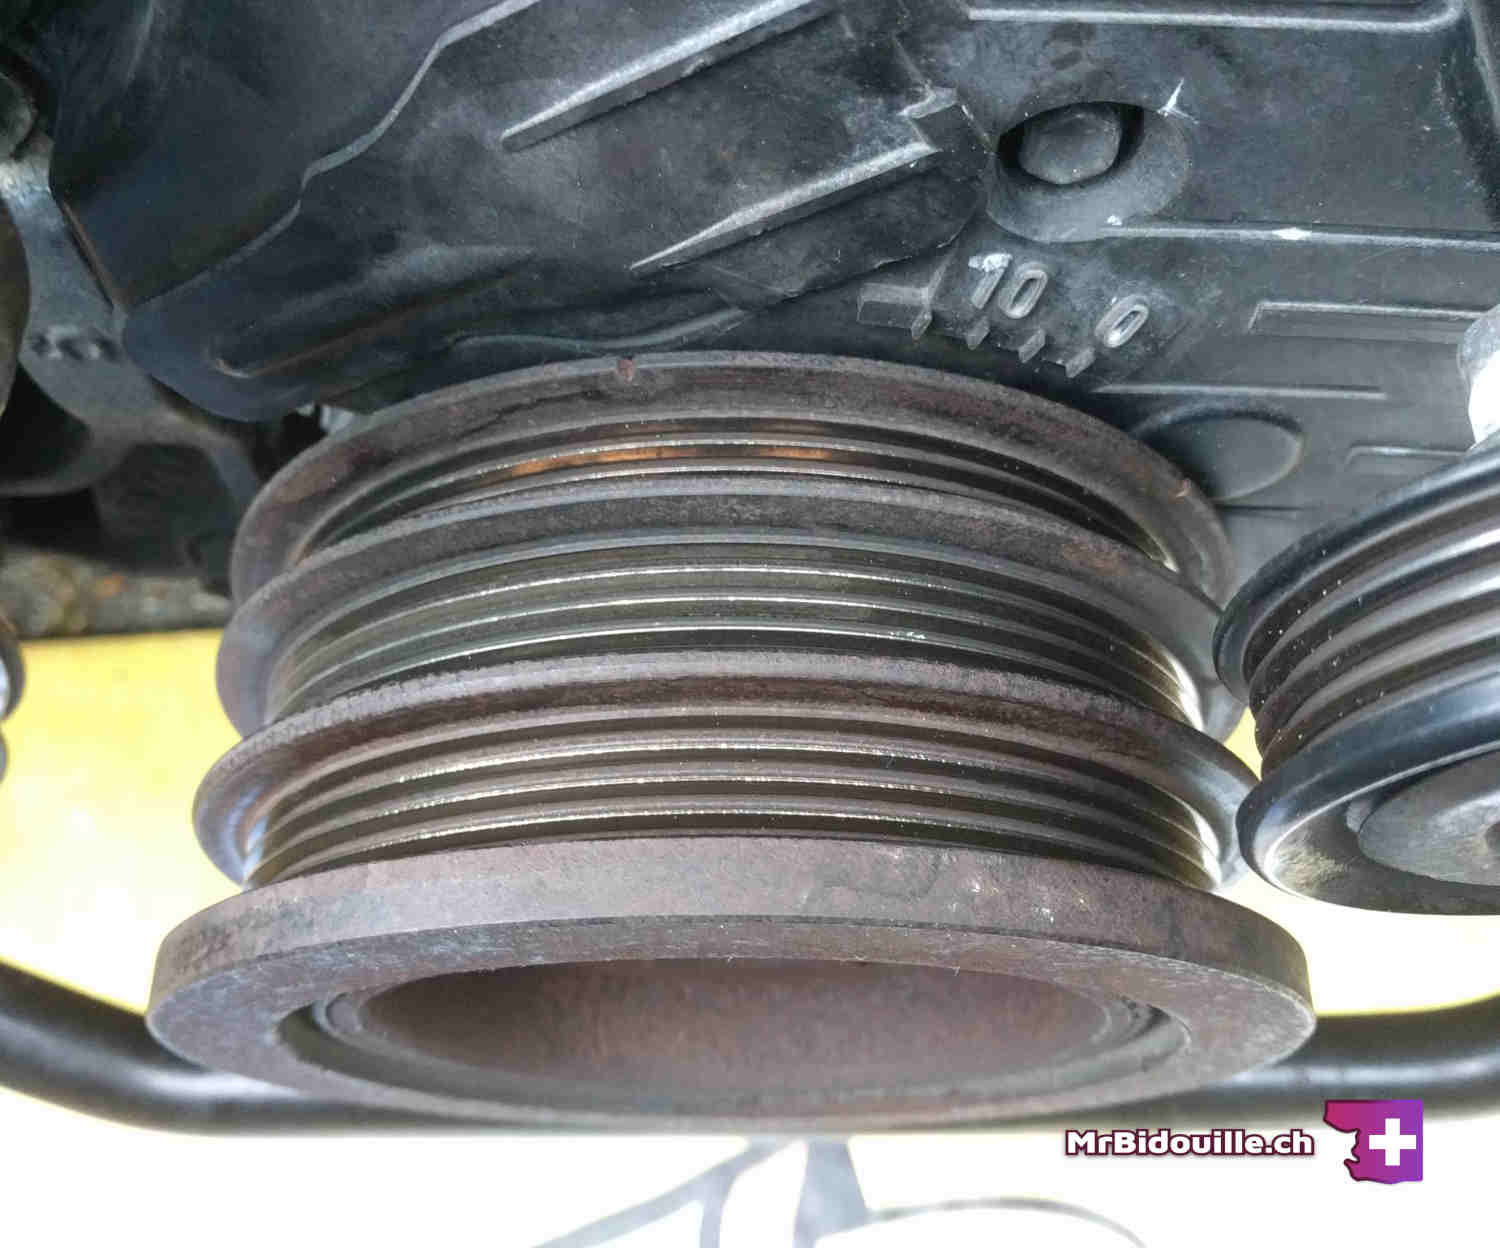
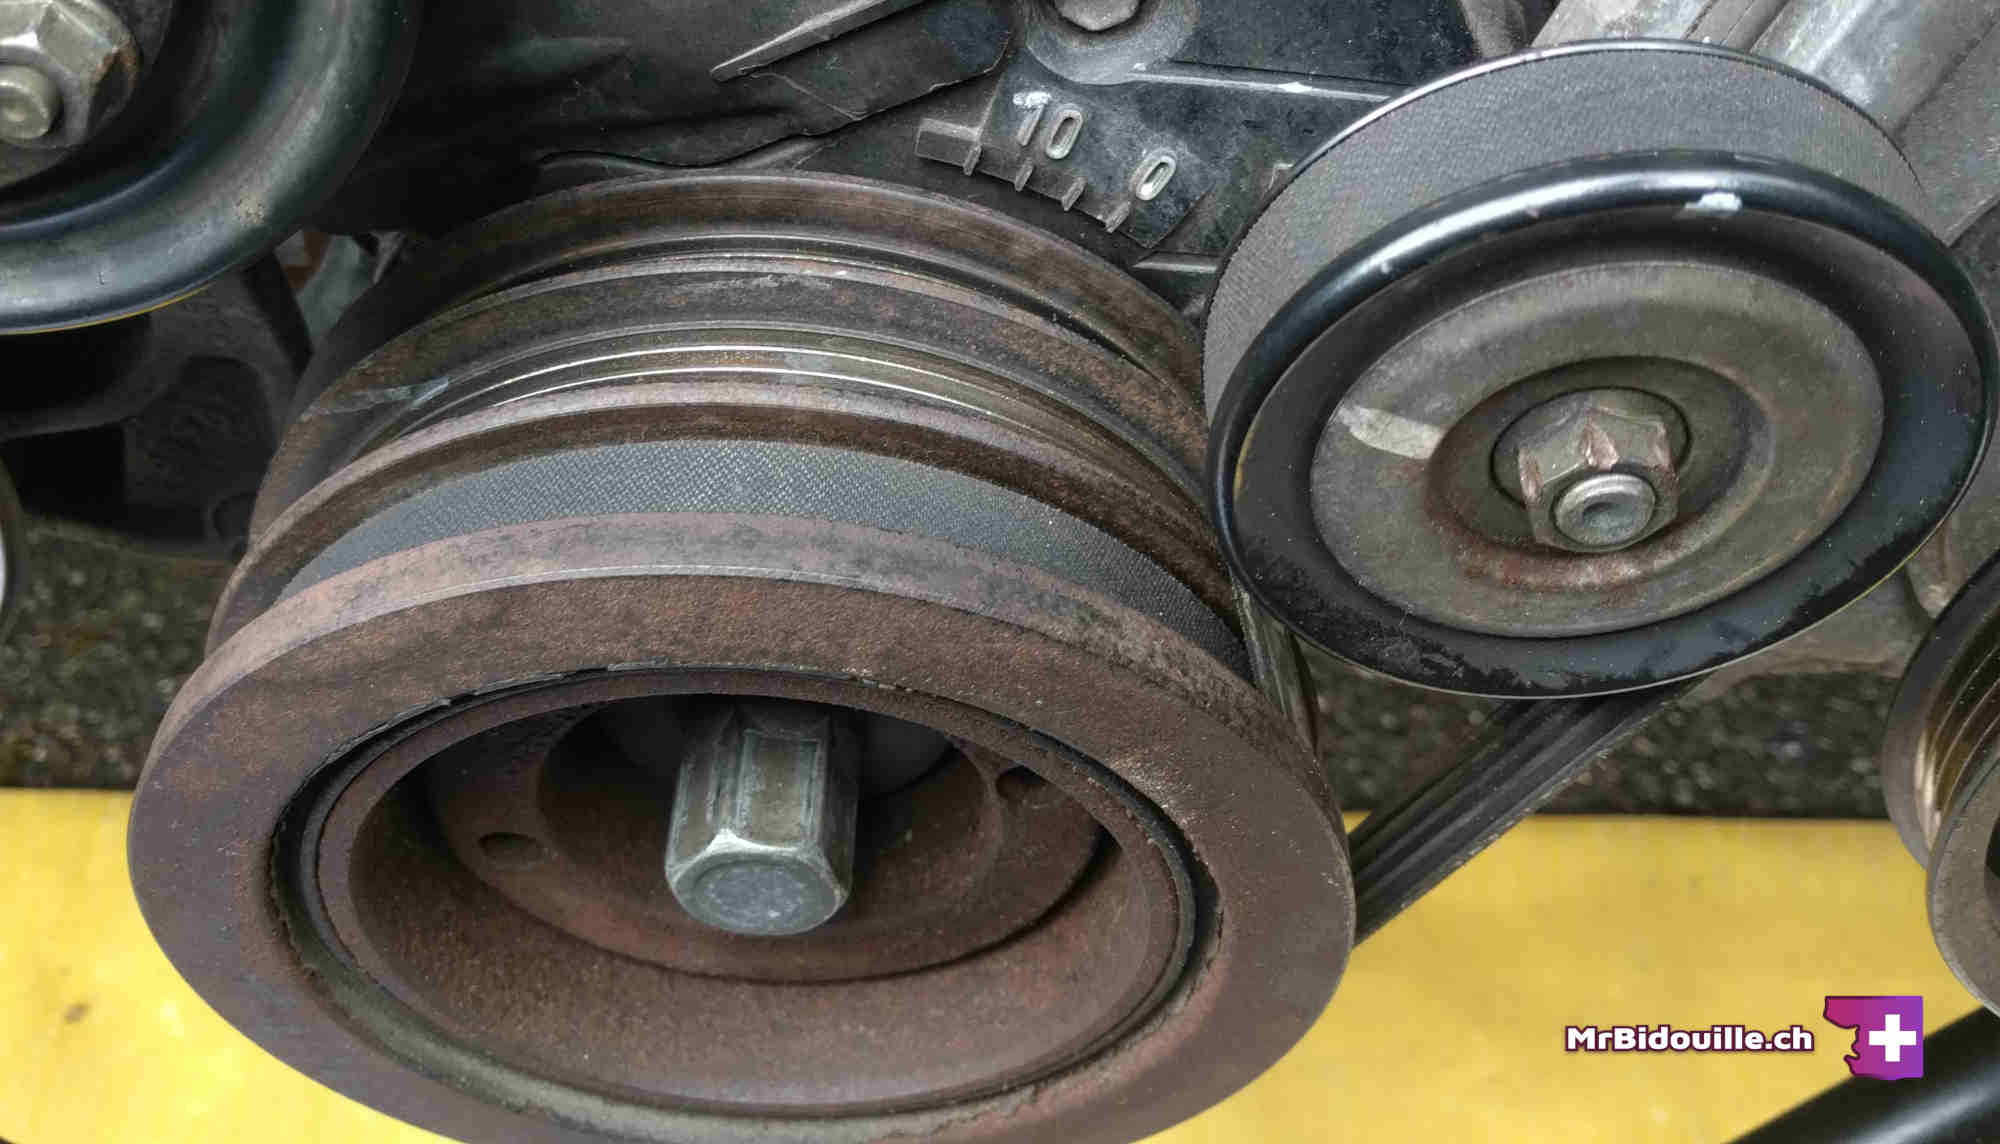
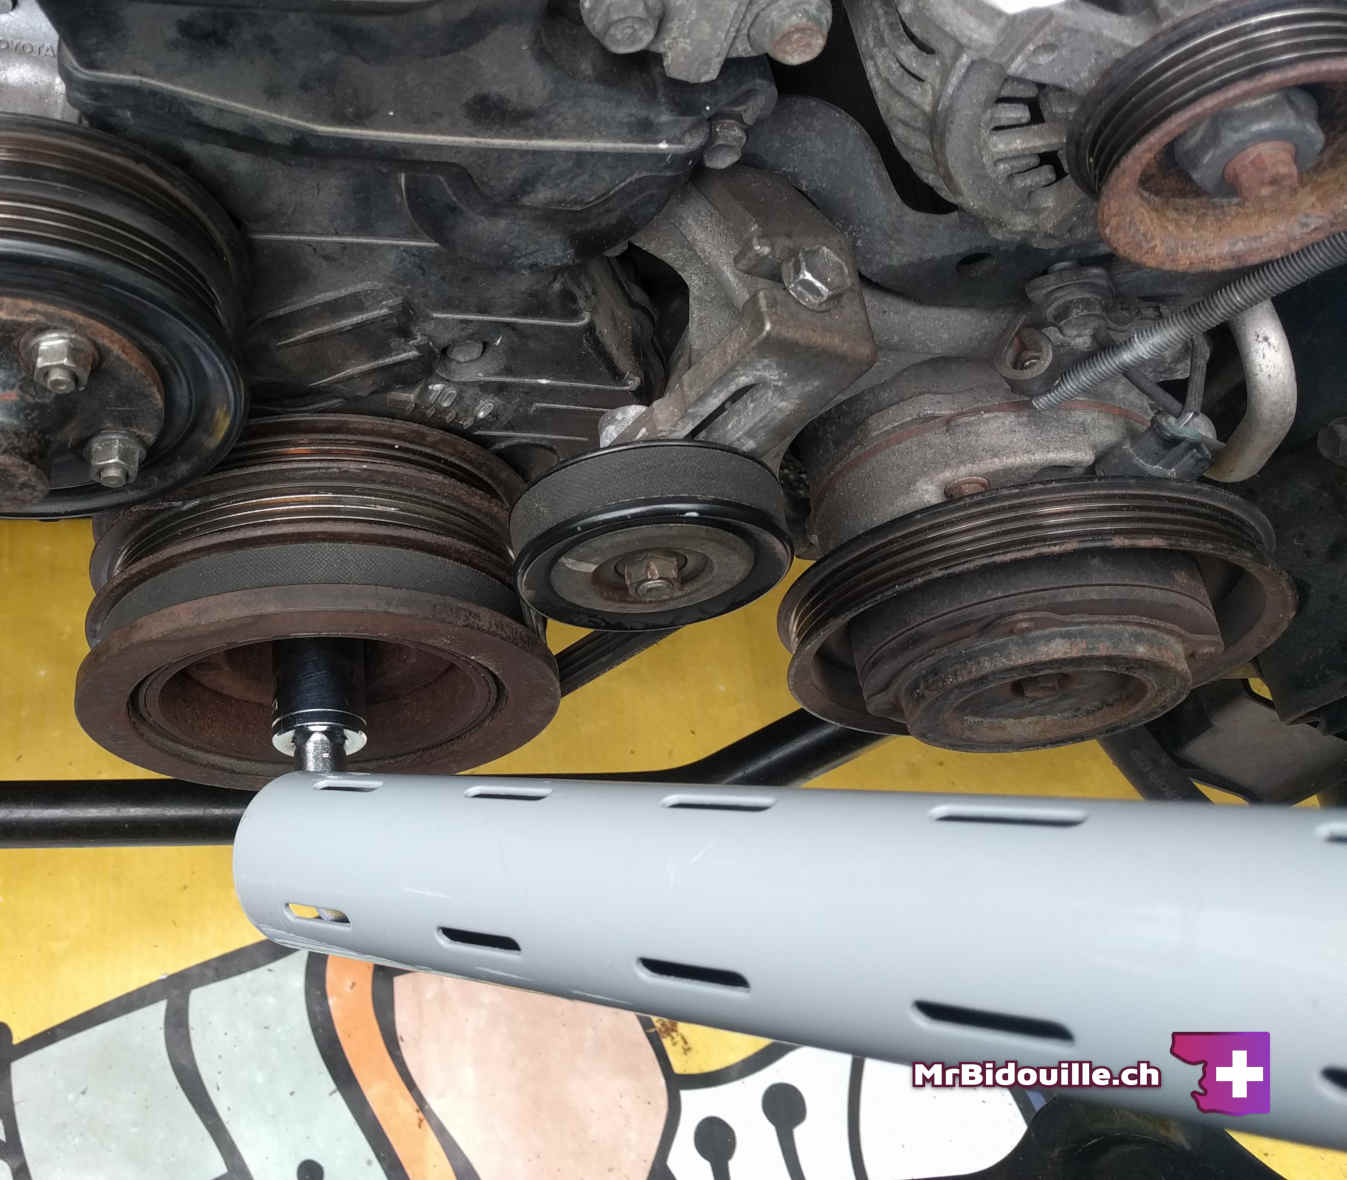
5. Remove the crankshaft pulley bolt
Using this belt, we are going to lock up the engine in order to untighten the crankshaft pulley bolt.
There are a few methods to remove it. Here I will show you the method that worked for me and doesn't require any special tools. It is inspired by the method shown on various YouTube videos, such as this one https://www.youtube.com/watch?v=h2clQi8clQw.
I'll draw a diagram for you to explain the position. But basically, we are going to wrap the belt on itself, so that when we turn the crankshaft pulley to the left, it tightens and pulls on itself, locking the engine in place. Here is what it looks like.


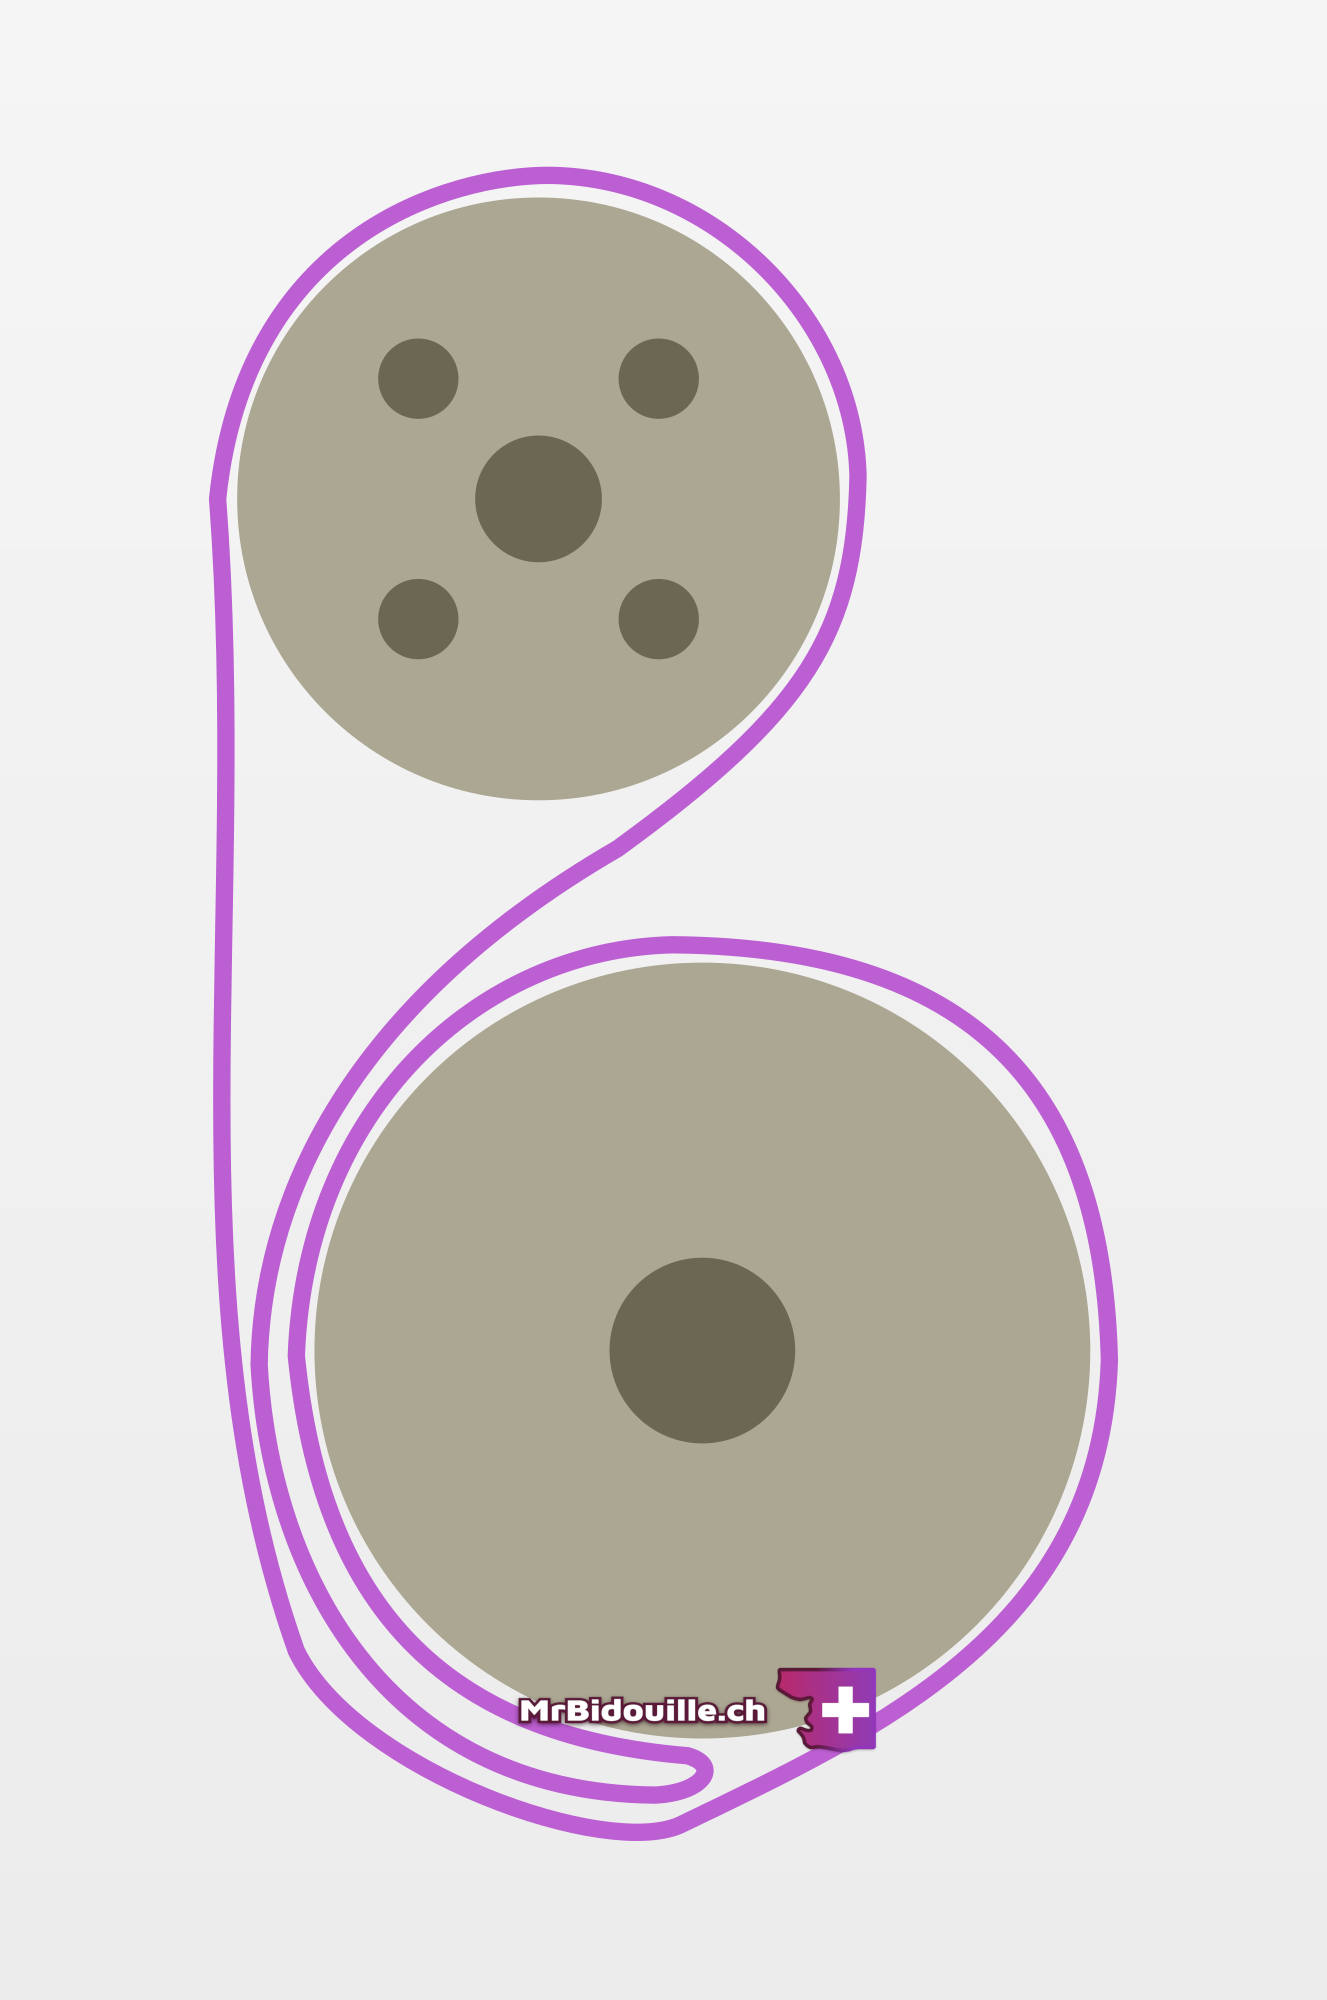
You should avoid at all costs turning the crankshaft pulley to the left, as it could damage the engine. Try to put as much tension on the belt by hand before trying to turn the pulley.
Make sure the loop is below the pulley, otherwise she won't tighten on hereself. To tighten by hand, once you're pretty much set, lift the belt on the top pulley to gather as much play as possible, then push all that play underneath the bottom pulley.
When you think you can't tighten further by hand, it is time to remove the bolt. You risk turning the engine the wrong way just a little bit to finish putting tension.
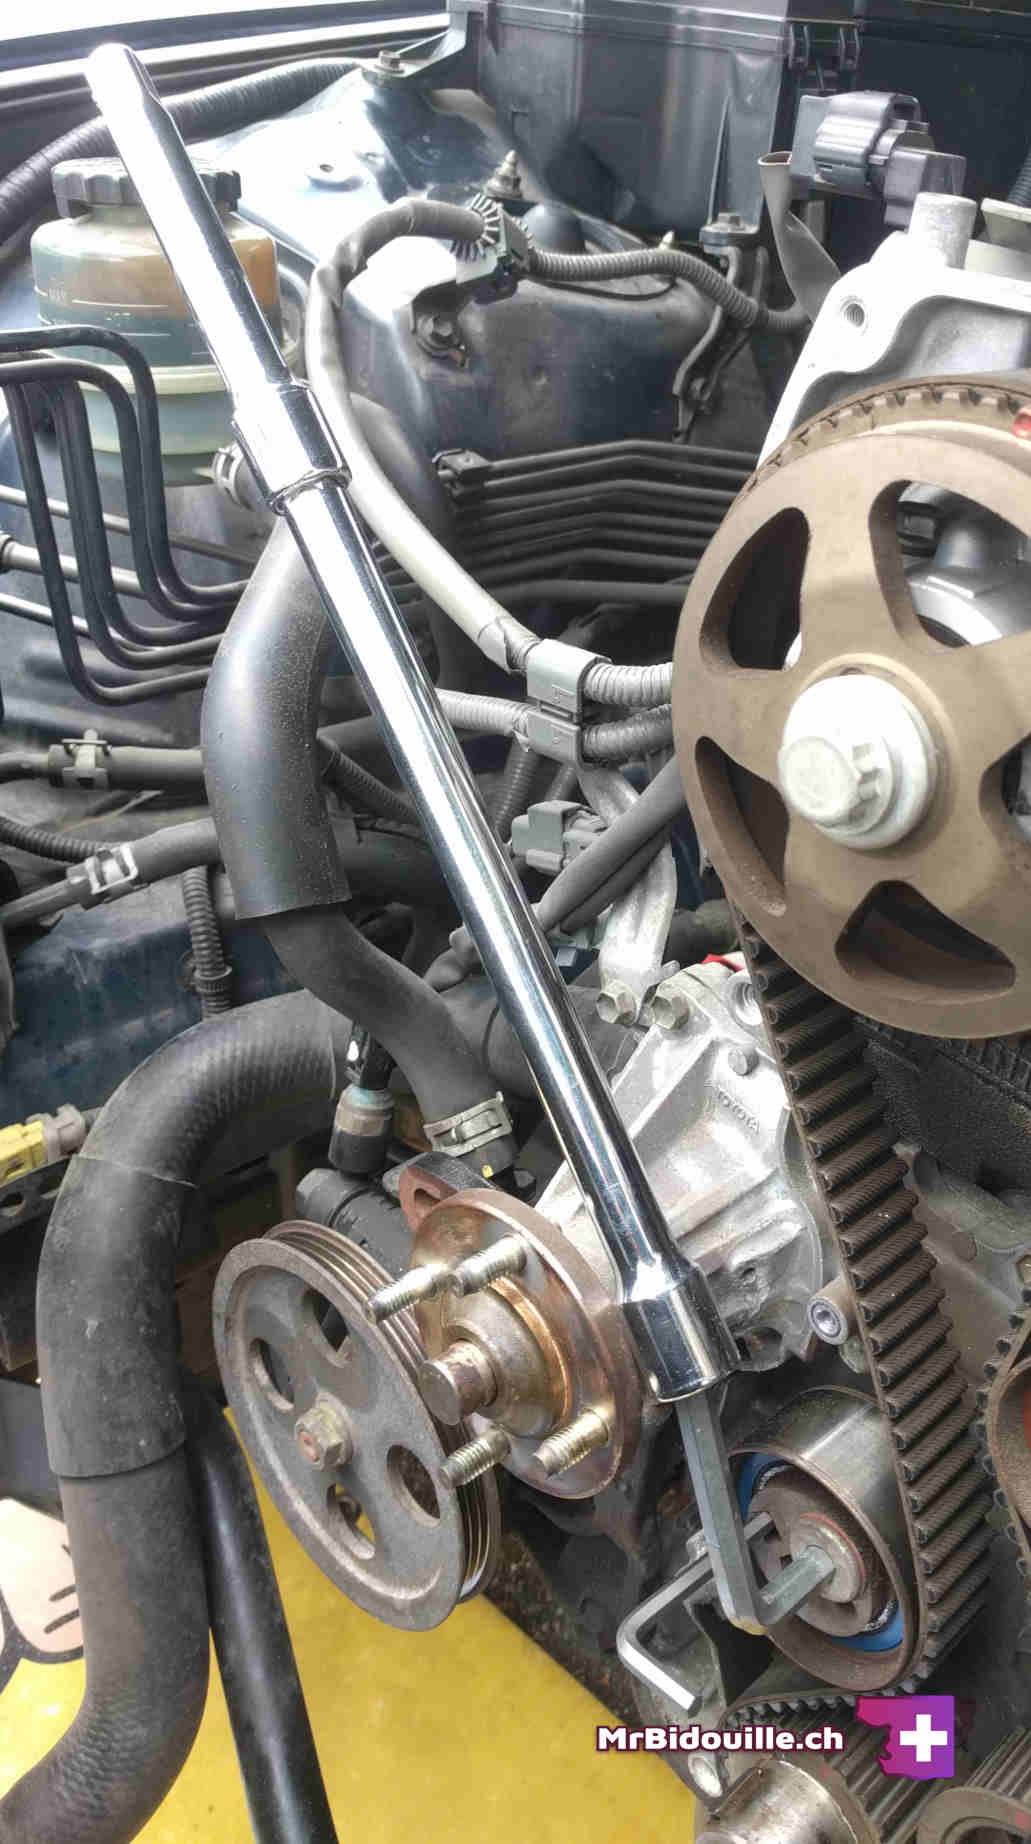
Now that the tension is set, place your breaker bar on the bolt, add your extension, and push as hard as you can. Be patient. It can take a long time. After all, that bolt is tightened with 220 Nm of force and probably hasn't been removed for the past 10 years.
Here are the tools I used (say hi to Johnny, the character on the incredible scrap tarpaulin I'm using).

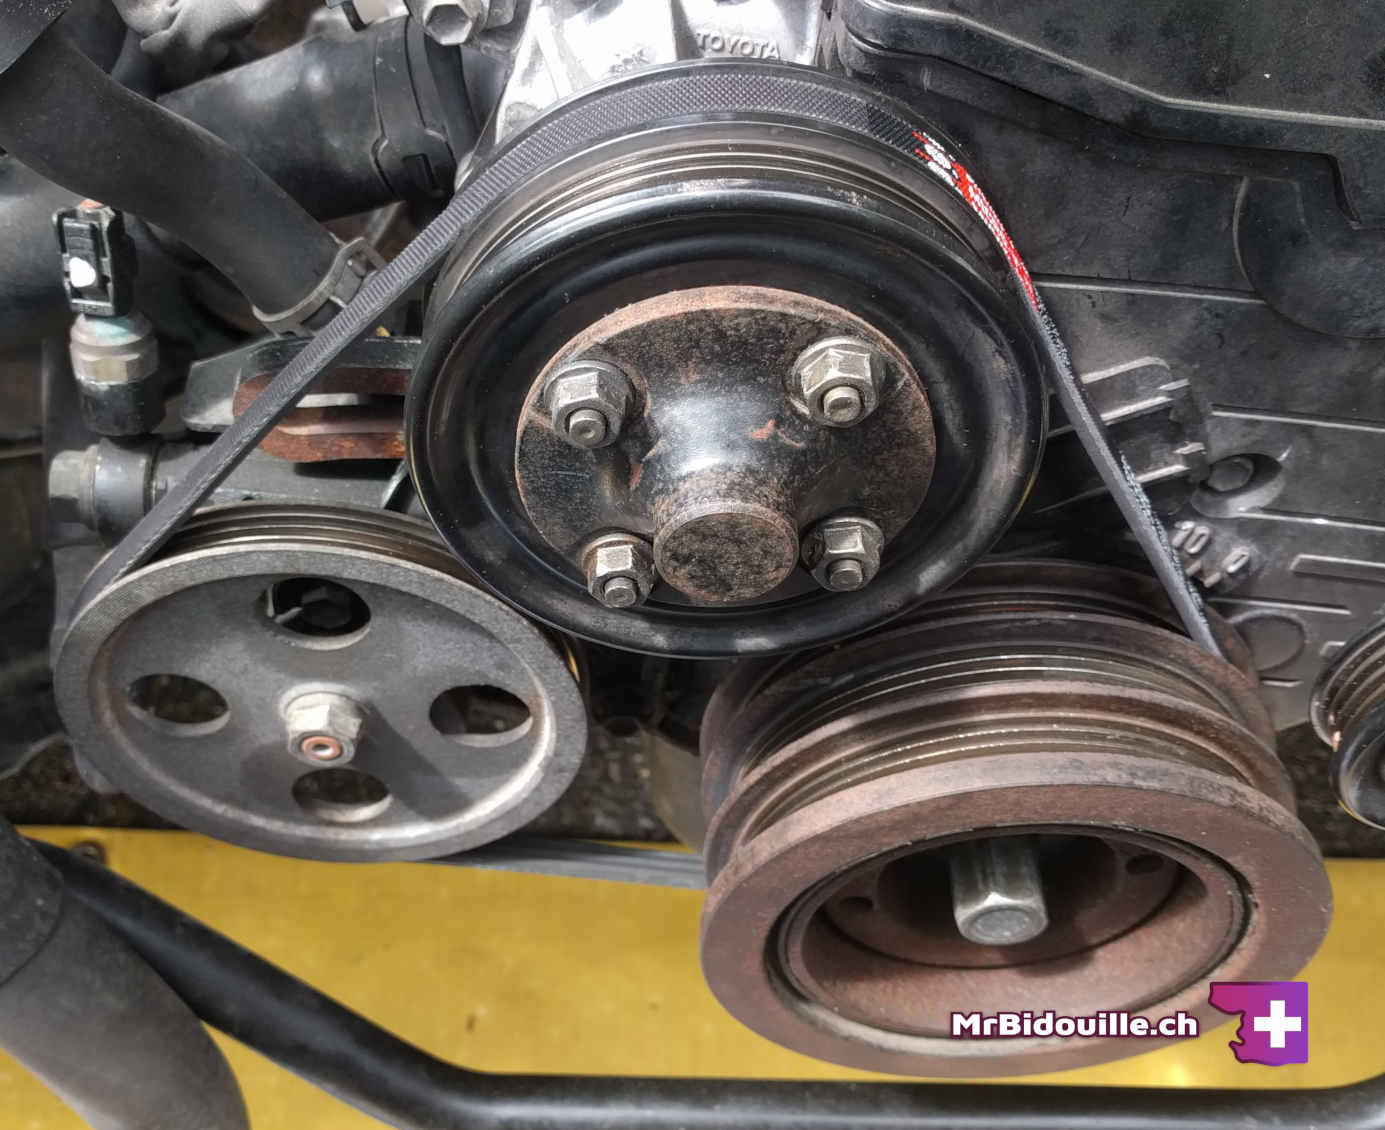
Once untightened (finally), leave the bolt on the pulley. We will still need it.
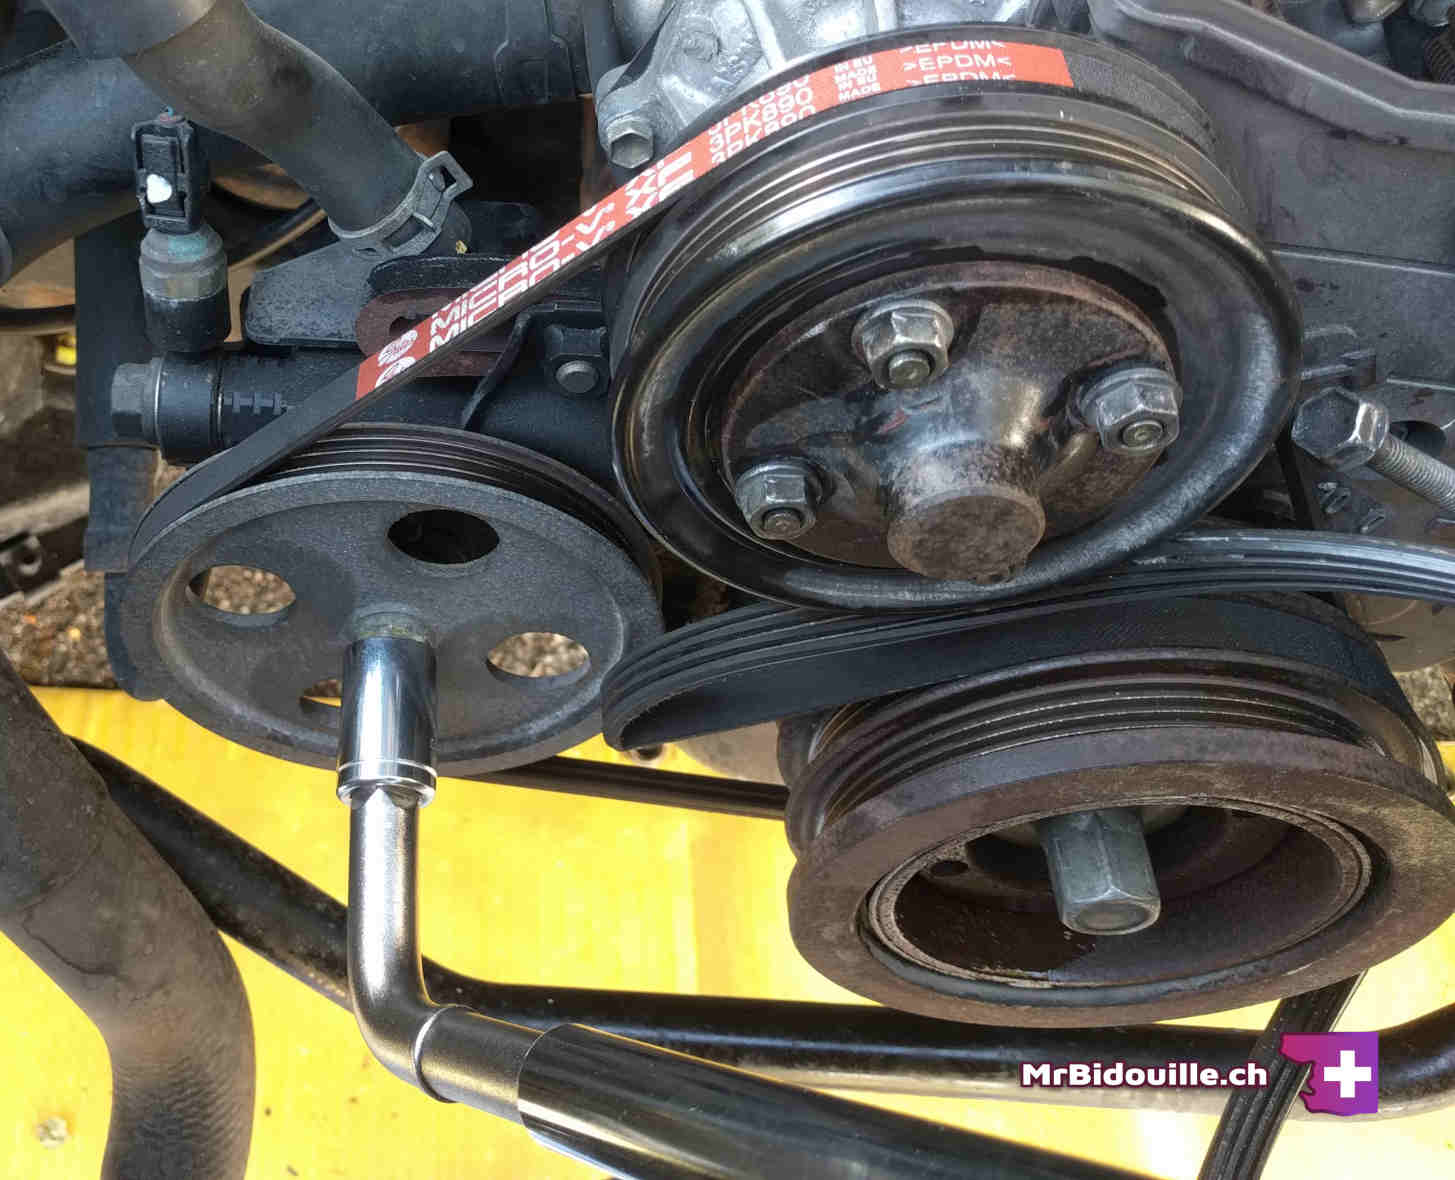
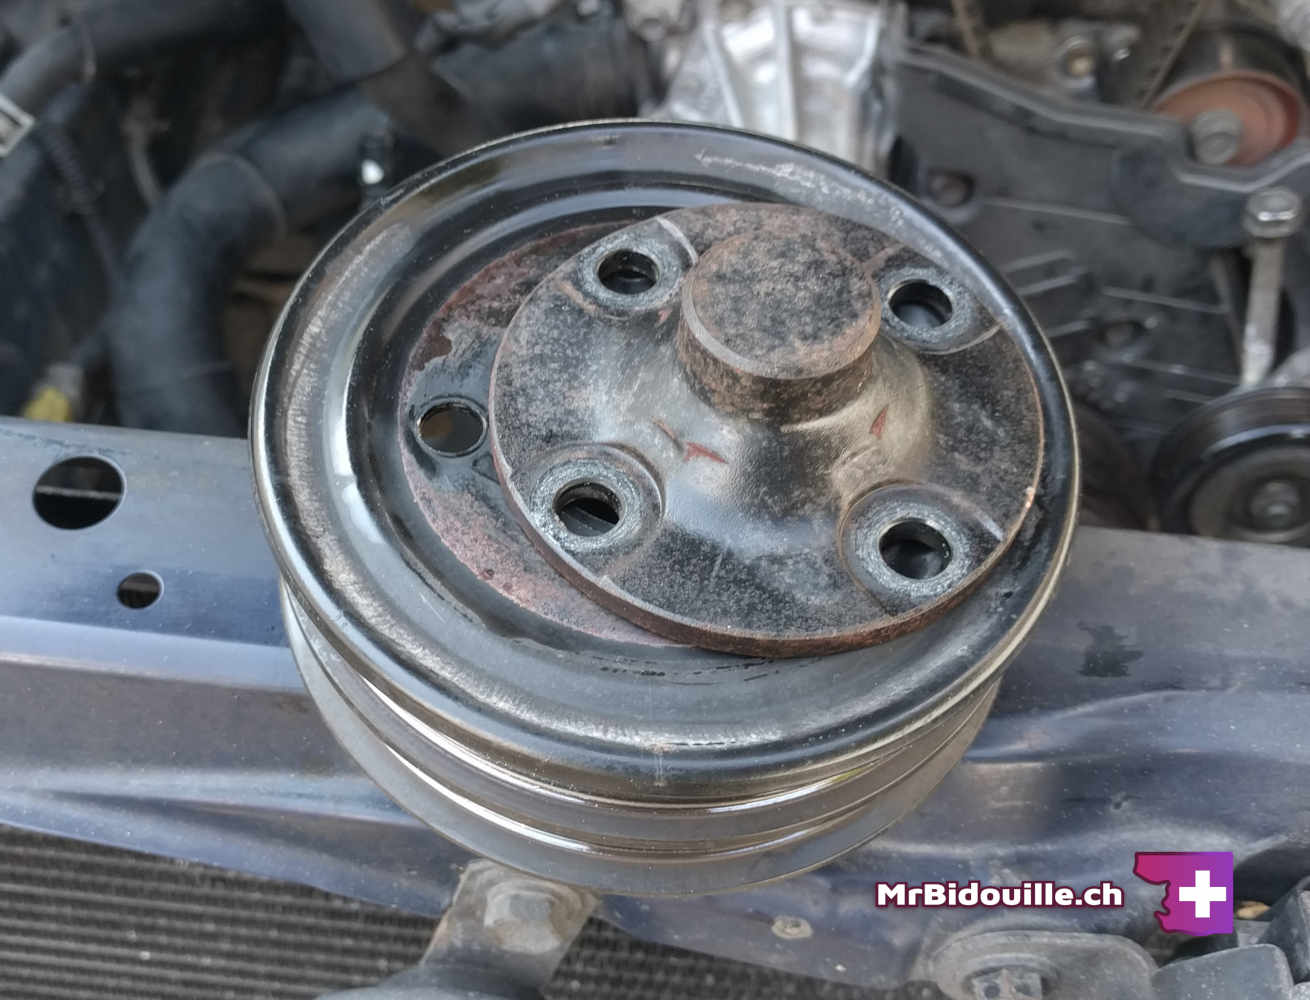
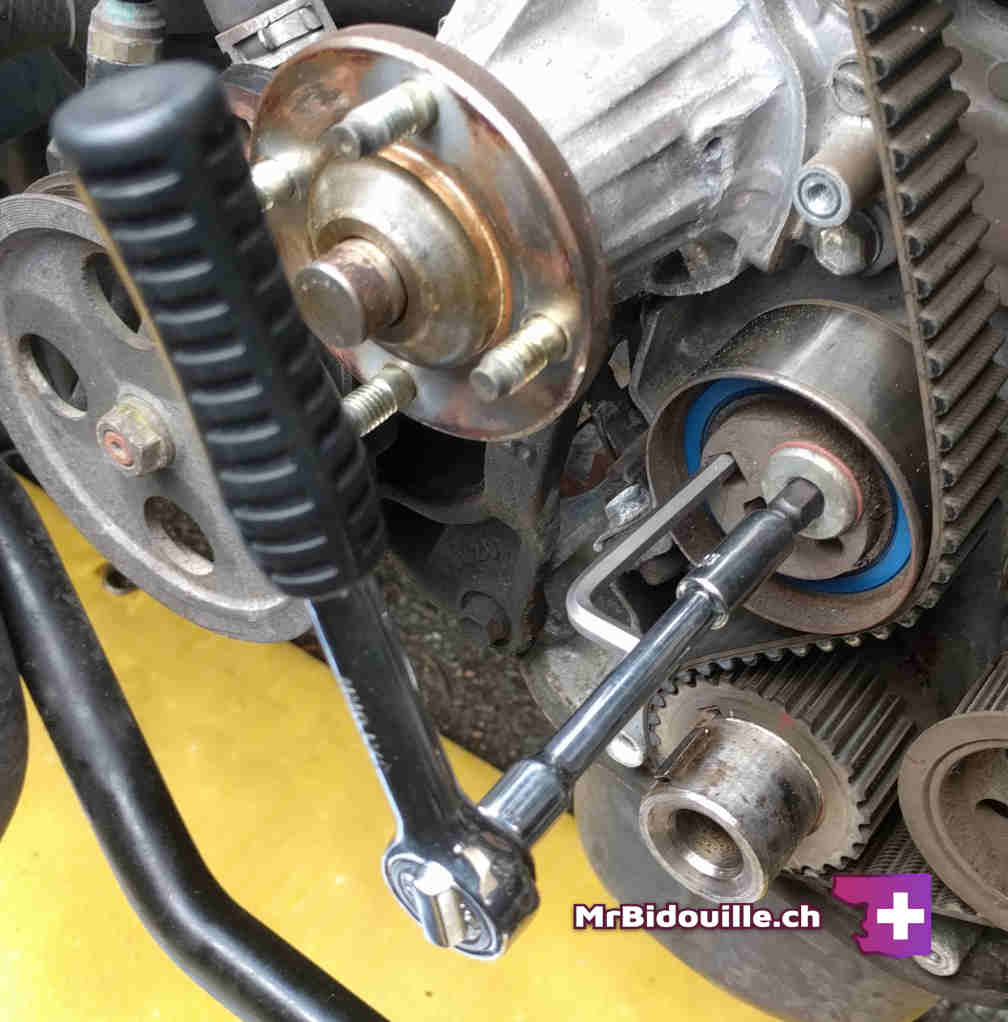
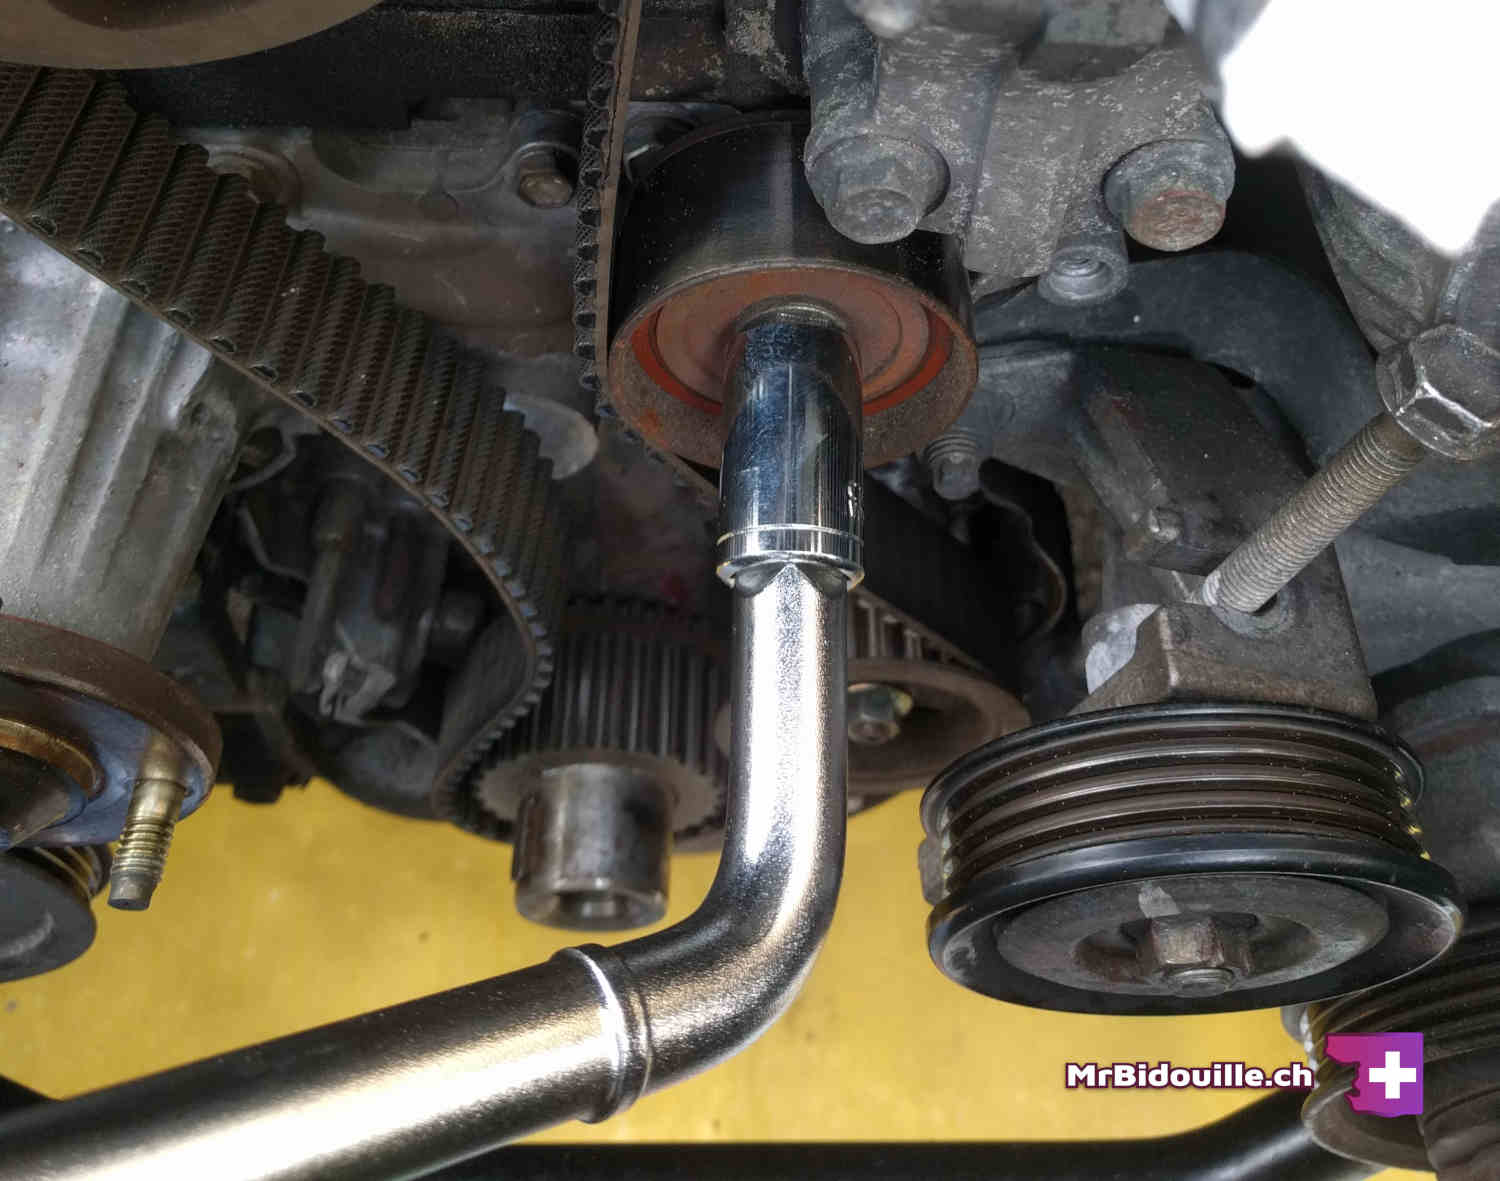
Take this opportunity to untighten the 4 nuts on the water pump pulley. On my car, I could not get theses off before, even after using WD-40. But with the tension we put on it, it's child's play. Untighten them, but leave them in place for now.
You can now remove tension from the belt, by turning the engine clockwise. To do this, since we juste removed the bolt that allowed use to turn the engine, I put my breaker bar on the small left pulley (see picture) and I gently turned to the right. I had to hold the belt by hand, because it was still slipping a little.
Victory. This belt is dead. But we were going to change it anyways, so that's not too bad. Don't throw it away just yet, as we are going to do a similar trick to reinstall the crankshaft pulley bolt later on.
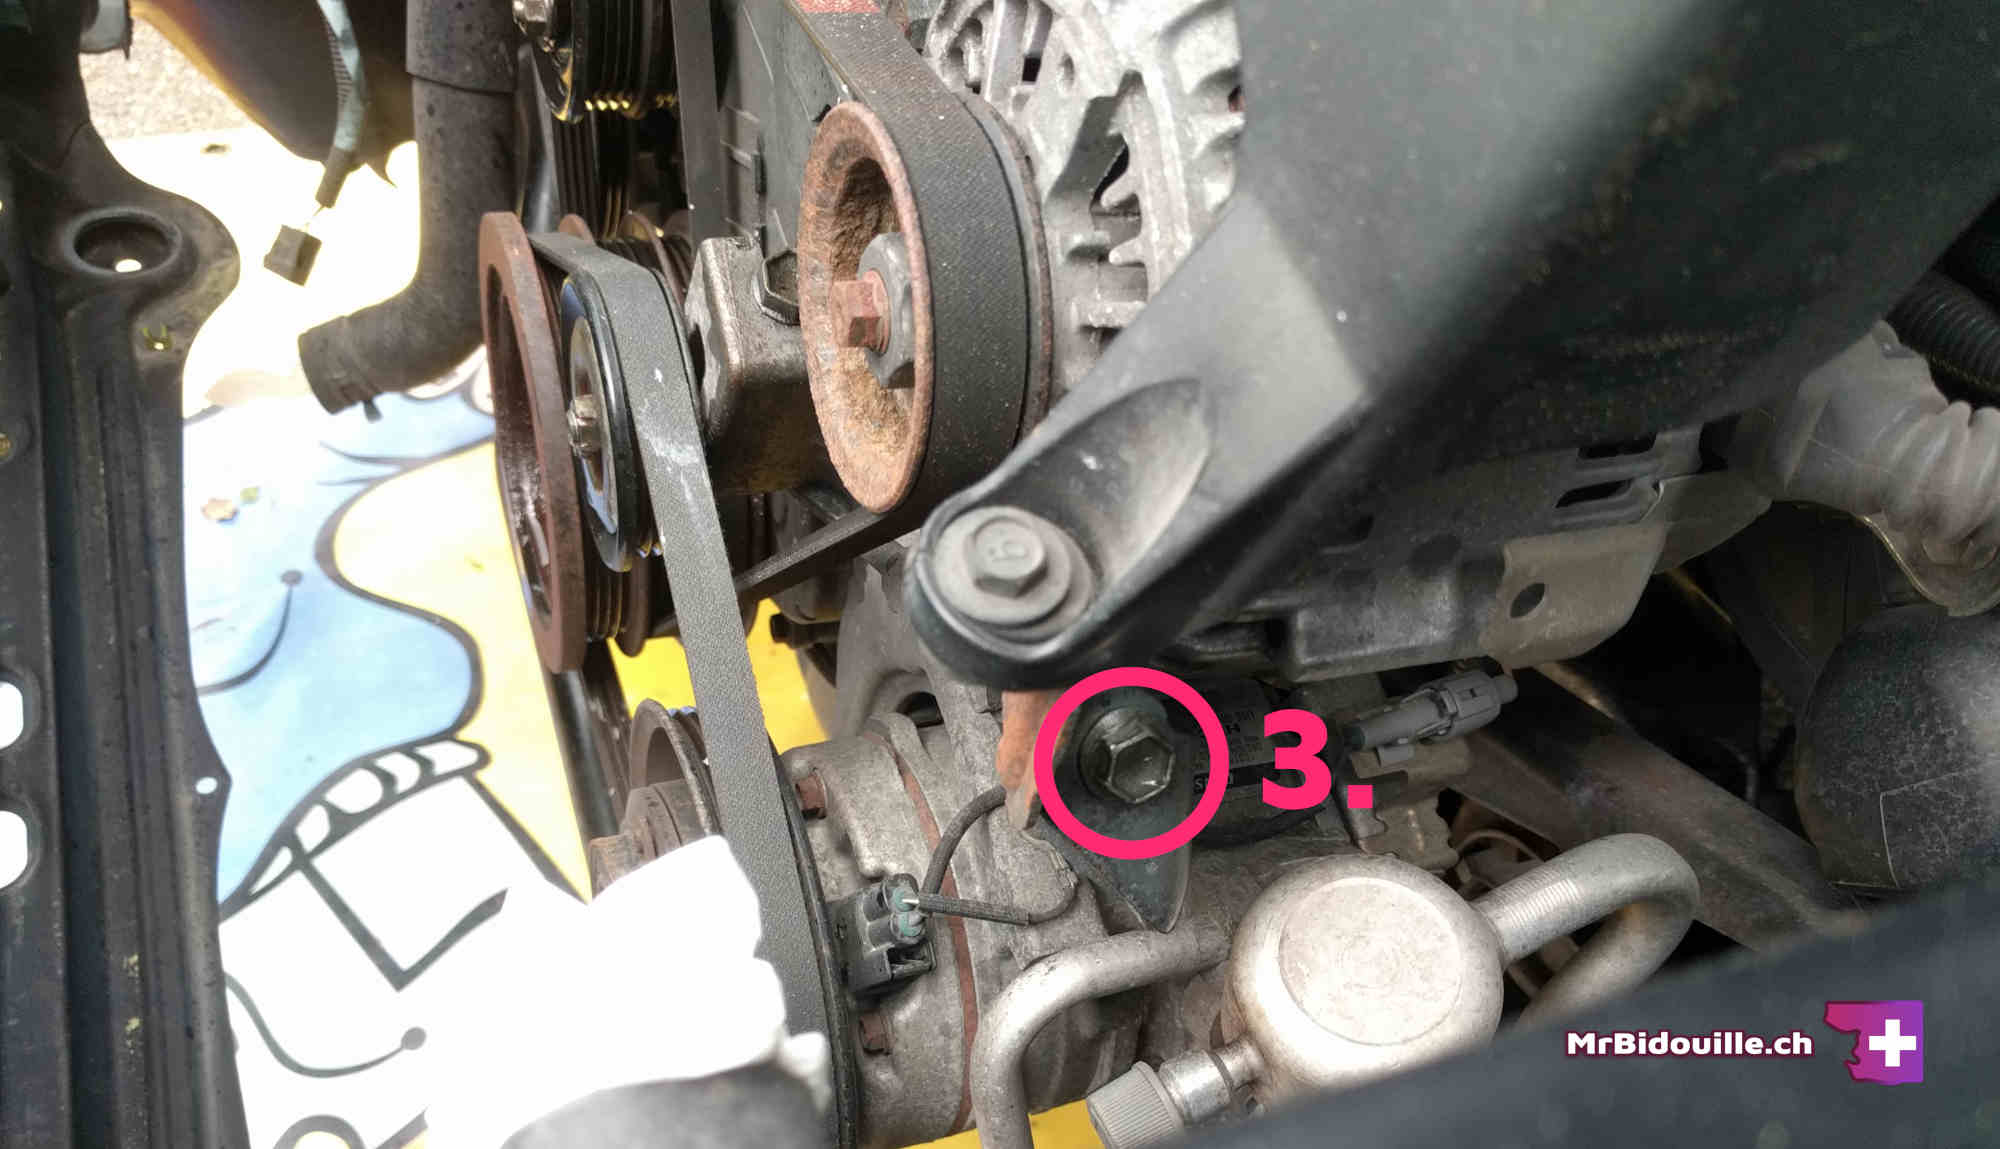
Third auxiliary
Time to remove the last auxiliary belt. This requiers untightening 2 bolts, from under the car. Here is the first one. I first used my breaker bar to break it loose, then my ratchet with an extension to access it from below.
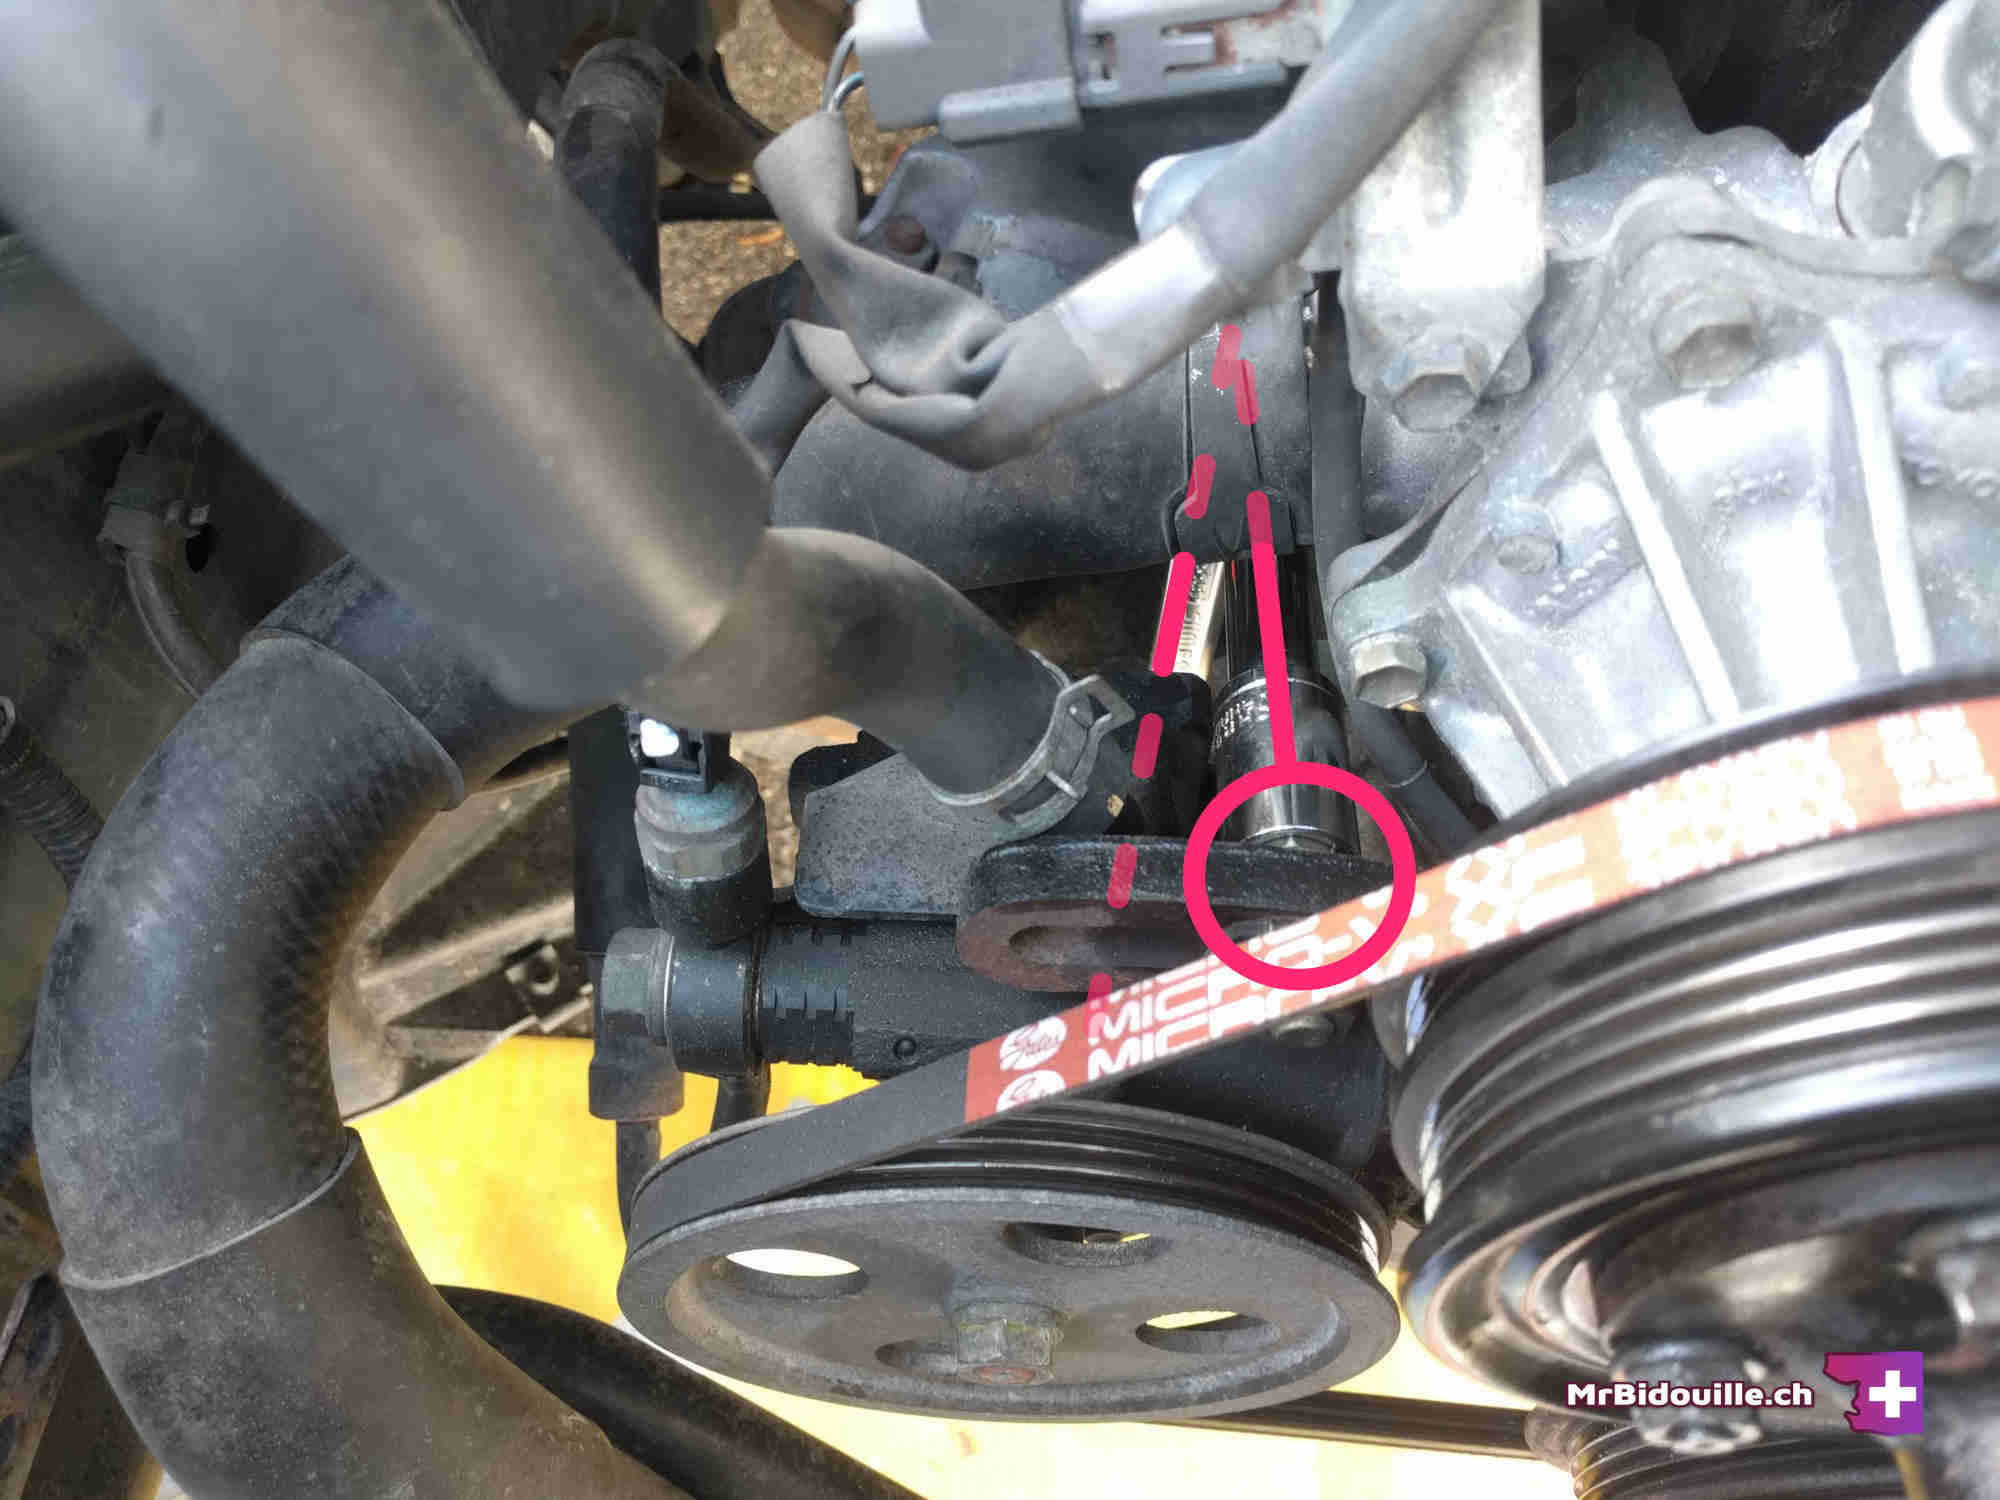
And here is the second one. Same idea (seen from under the car).
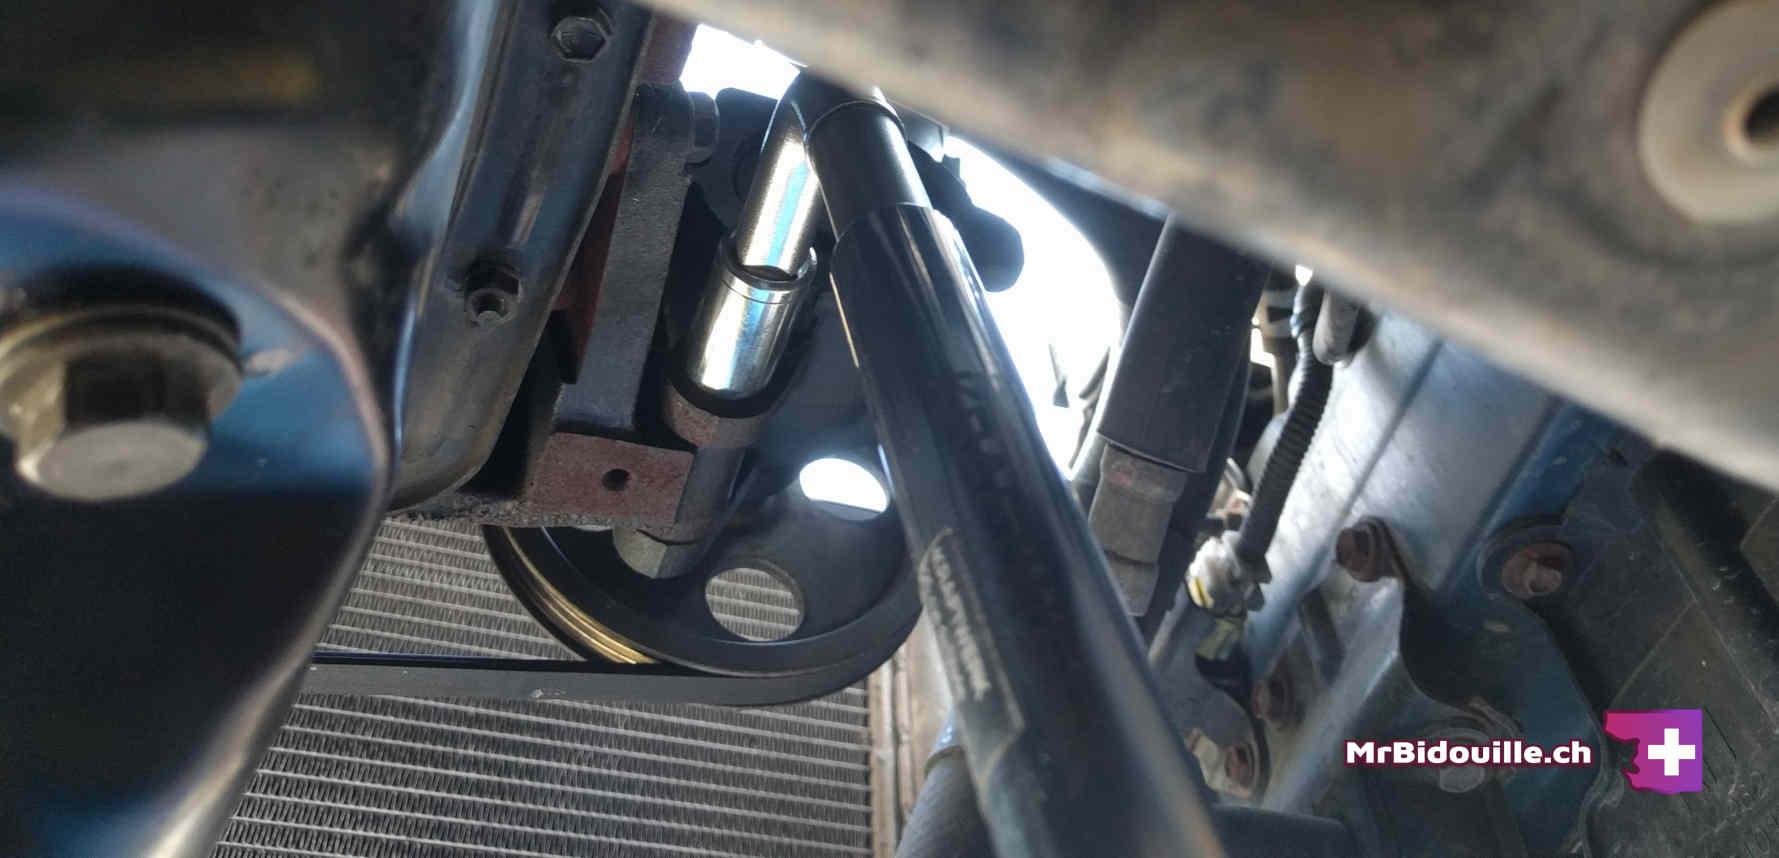
Once both are untightened, you can push the pulley upwards, which removes tension from the belt.
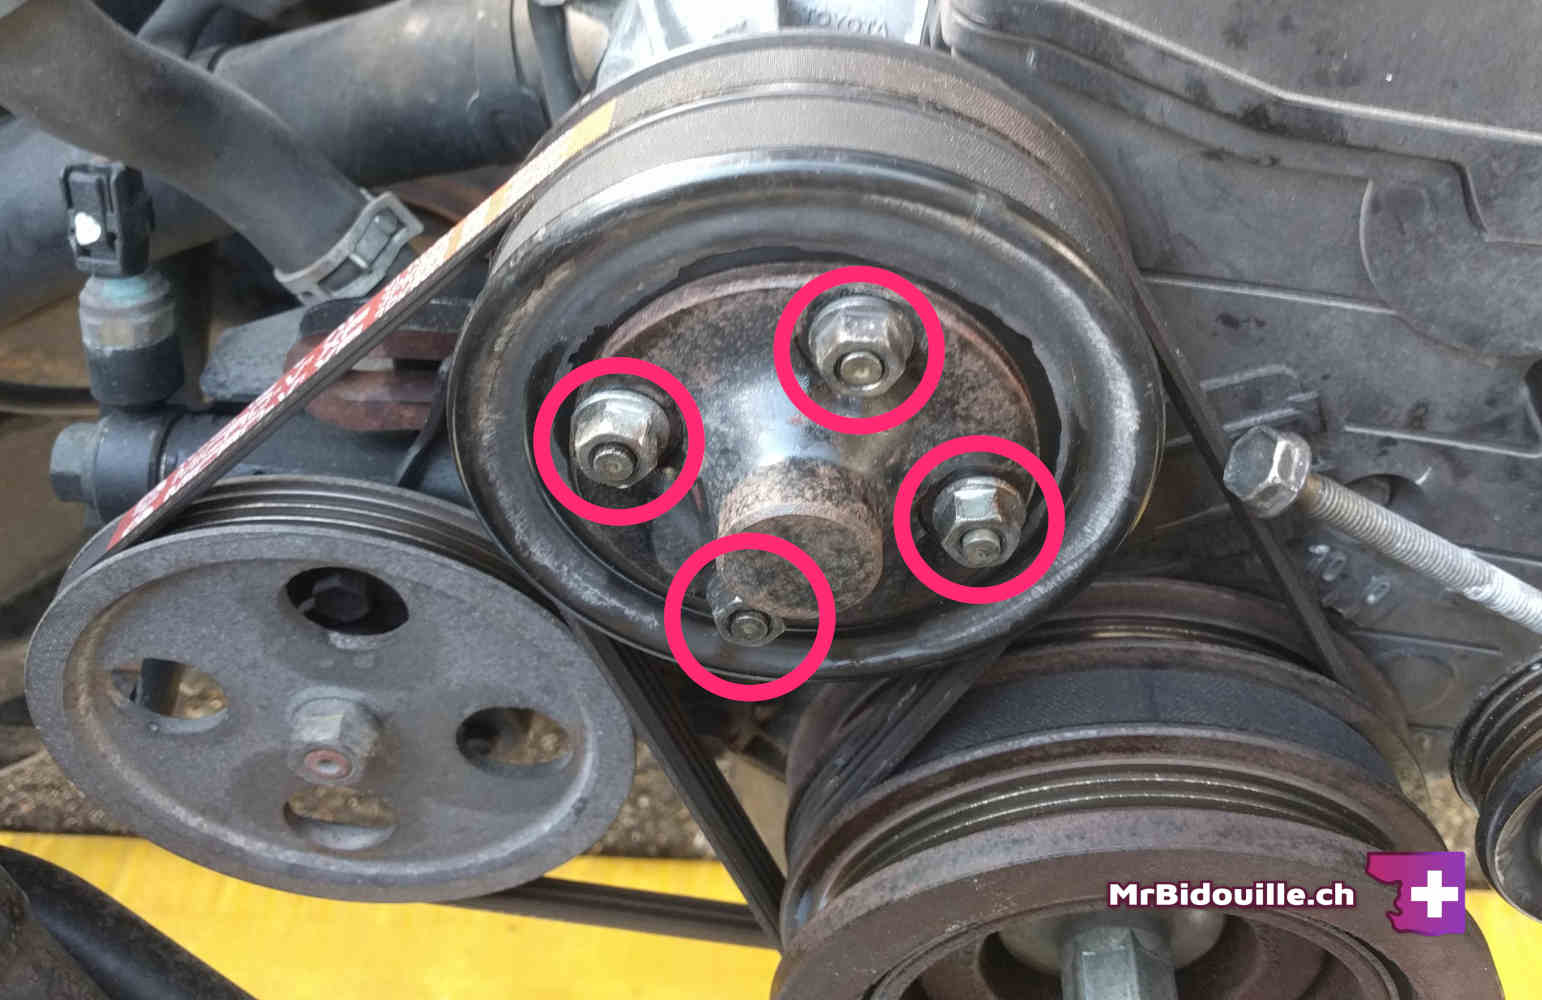
Finally, we are going to remove the water pump pulley by finishing the 4 nuts.
Be careful, as it is actually two pieces that are likely to fall when you are trying to remove them.
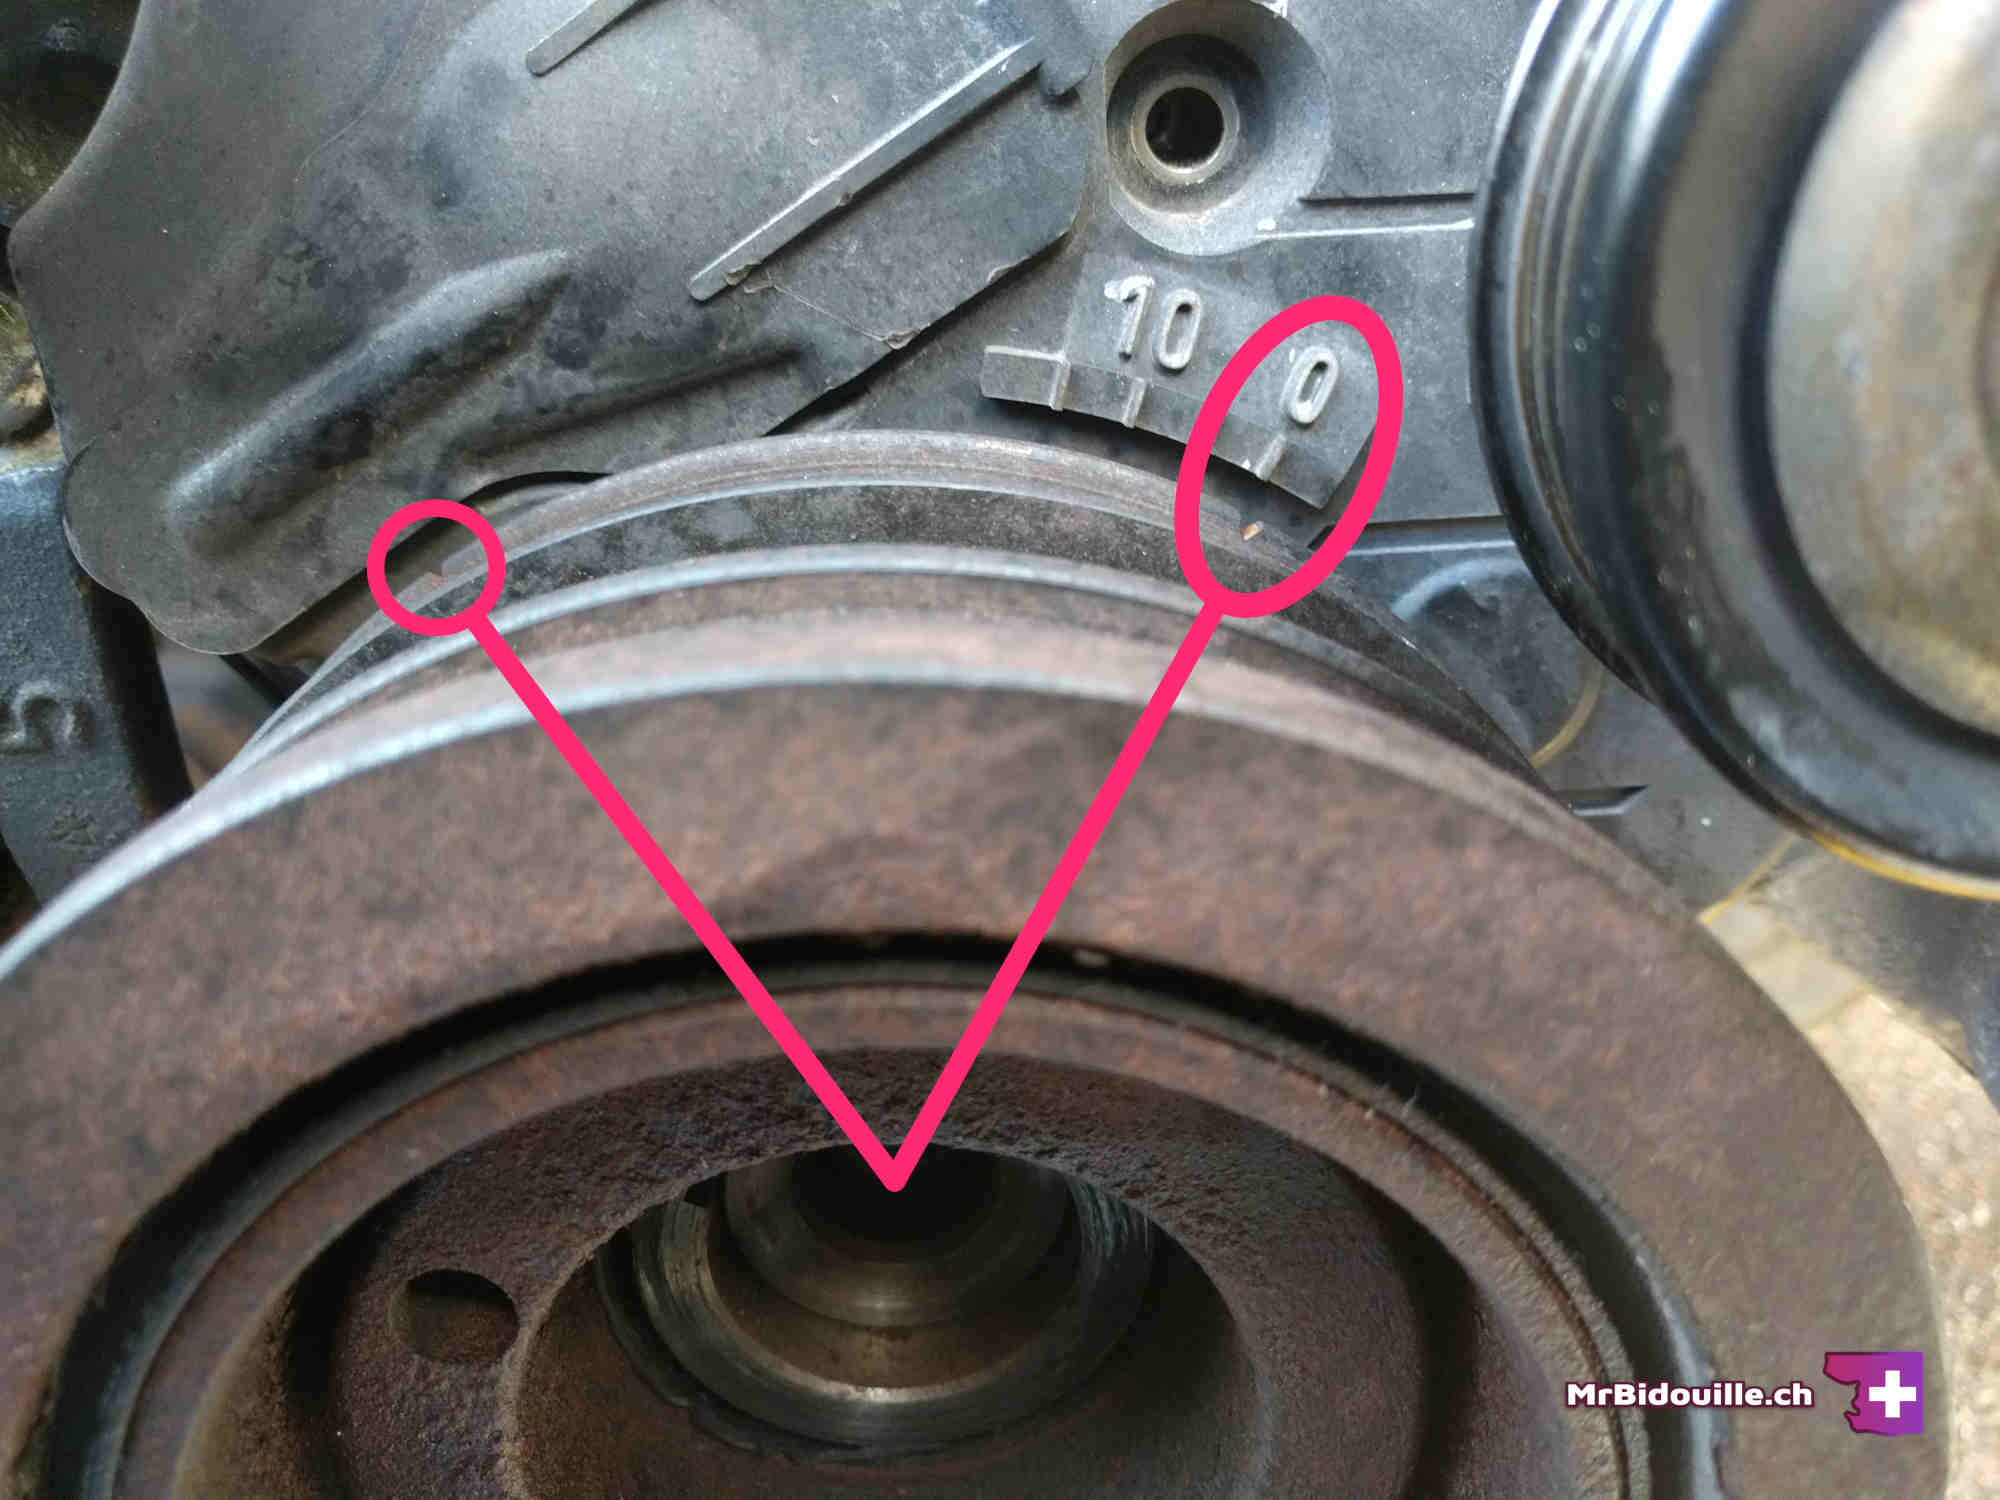
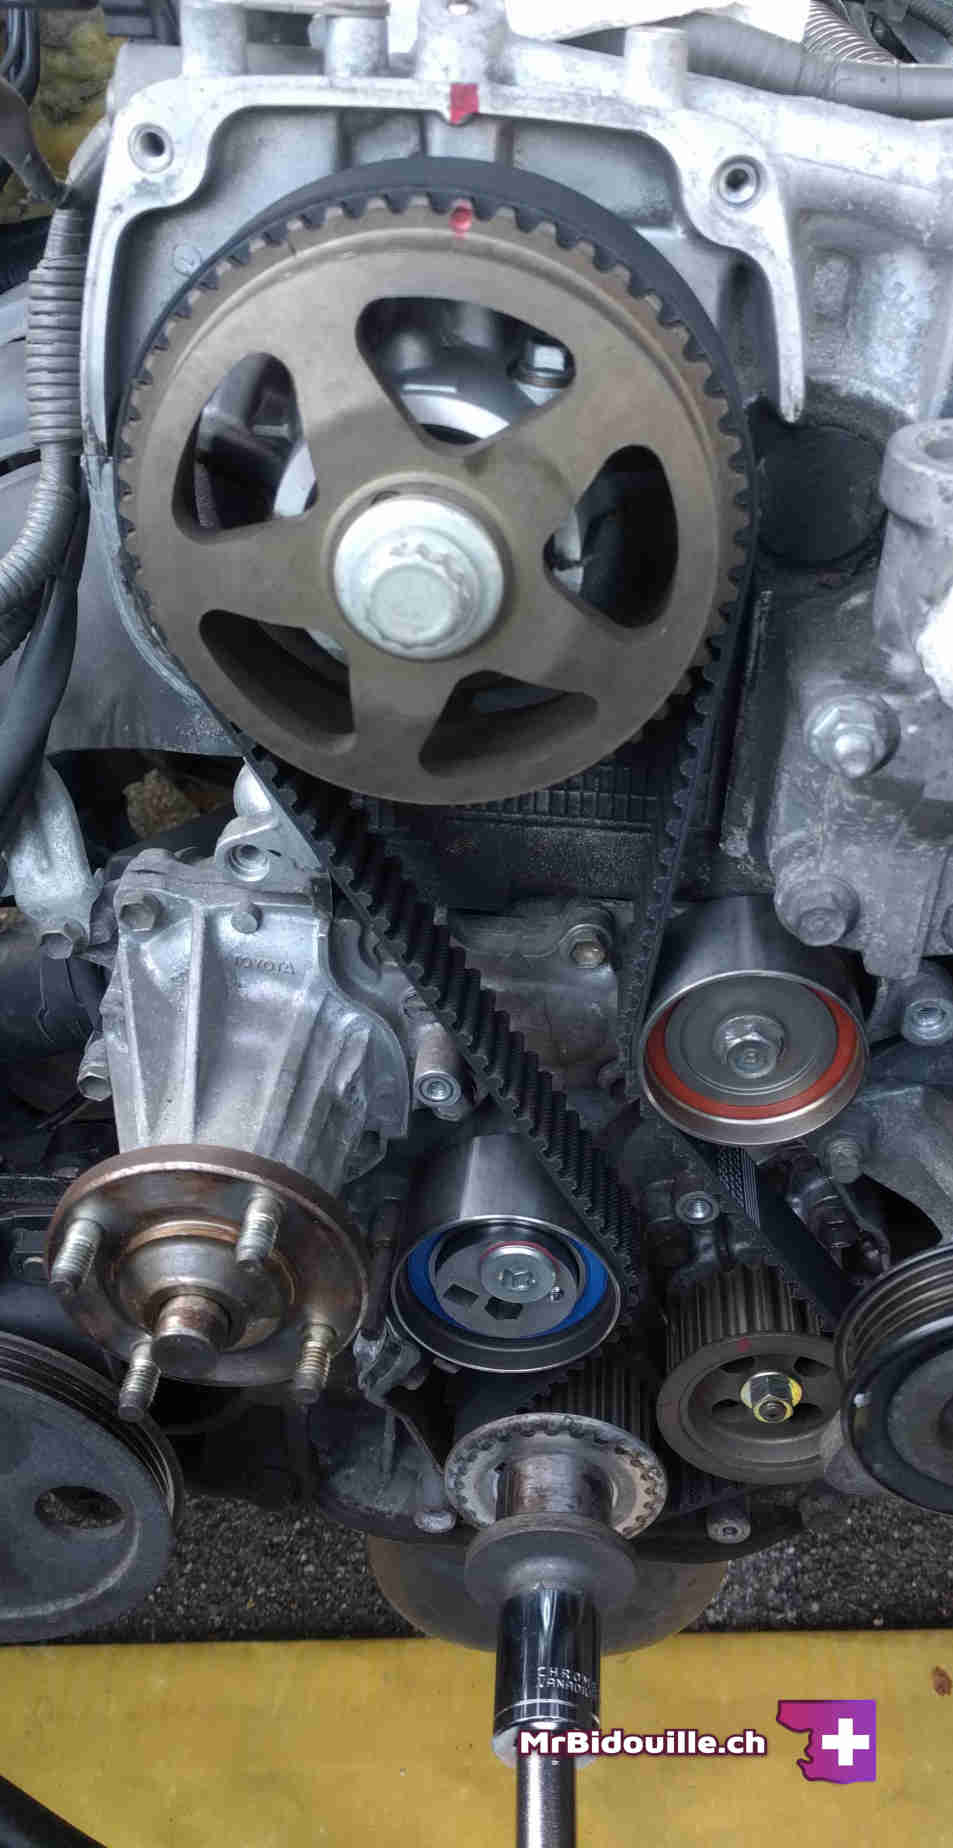
6. Mark the timing
This step is very important. We are going to remove the timing belt covers, then mark the timing in a few places to avoid damaging the engine when we remove the timing belt, and to verify the timing after installing the new one.
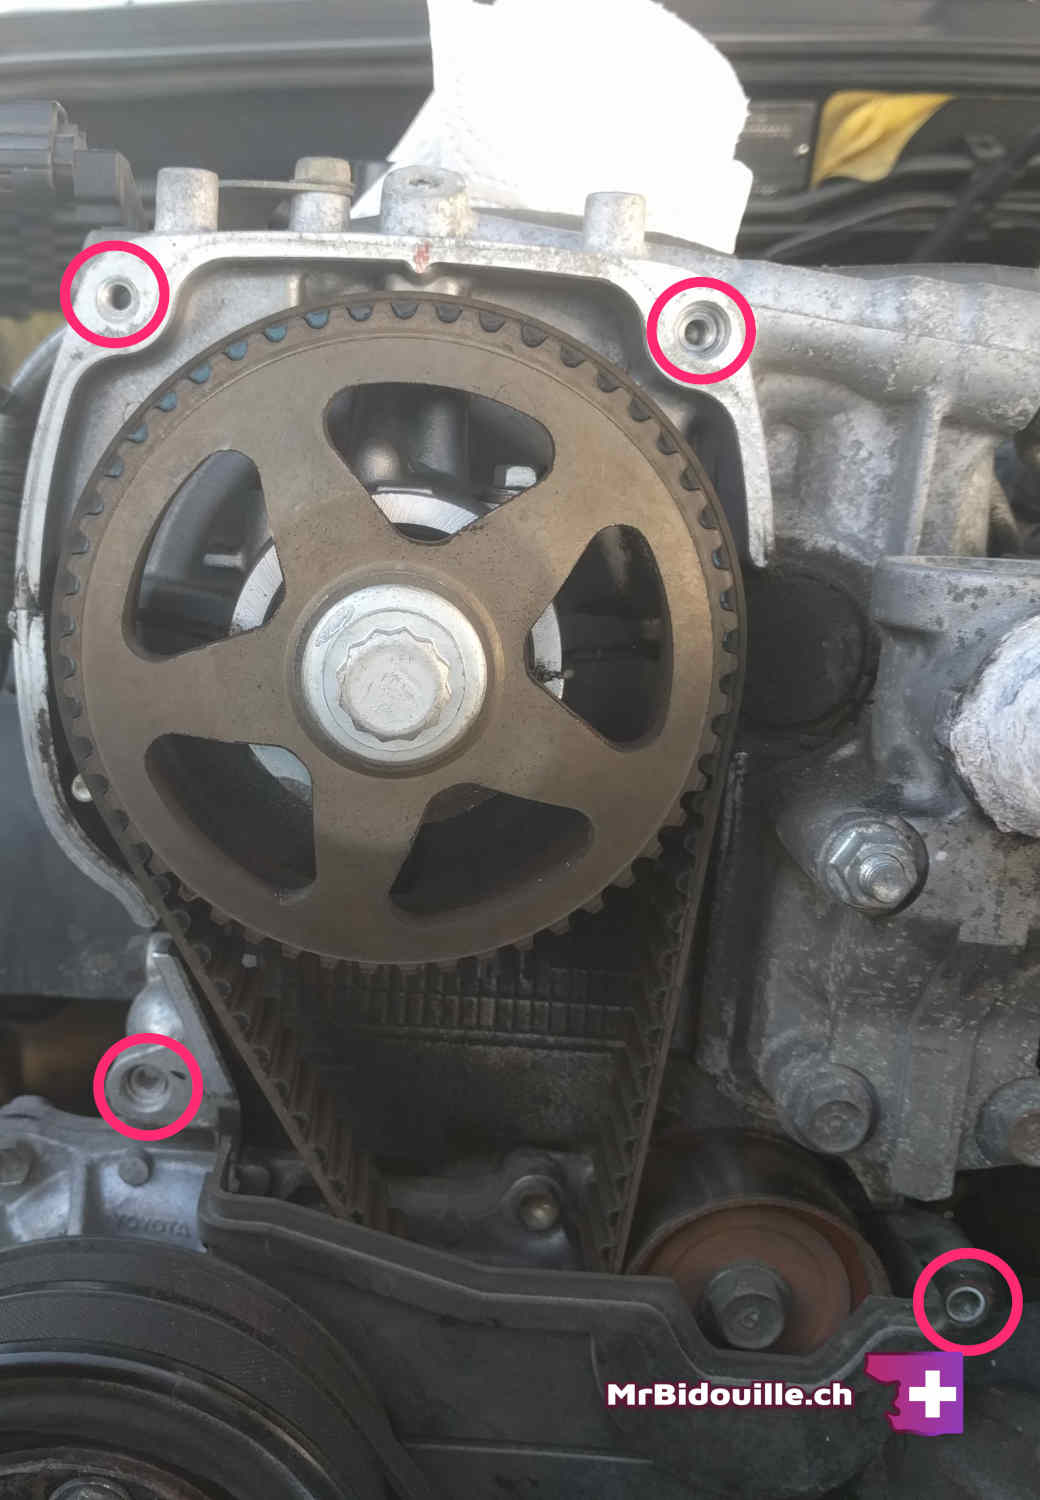
Start by removing the upper cover. There are 4 bolts.
We are now going to rotate the engine (always clockwise) until the right notch of the crankshaft pulley is lined up with the 0 on it's cover, and the small notch on the upper pulley is visible on the left. If you are at 0 on the bottom pulley but don't see the notch at the top, rotate everything 360 degrees. See pictures.
To turn the crankshaft, there are two methods.
Either with a 17 mm wrench with 12 sides, turn the big white bolt at the top, visible on the first picture. This method is not recommended. This bolt seems to wear out very quickly. Tak it easy.
Second solution, temporarily reinstall the crankshaft pulley bolt (yep, that one we had such a hard time removing, I know) and turn it gently.
Using the second method, put as little force as possible to not tighten the bolt back. When the alignment is good, turn as extra ~5 °, then give the breaker bar a few shocks to the left to undo the bolt again. It shouldn't rotate back more than 5 ° before the bolt is loose again.
When the alignment is good, mark the tooth of the top pulley that is vertical with a thick pen of visible color (see first picture, I had already marked the timing). If your timing belt was changed before, you might see the remains of the previous marks. It is one more way to know you are correctly aligned.
You could also take pictures of the alignements, just as additional references for later.
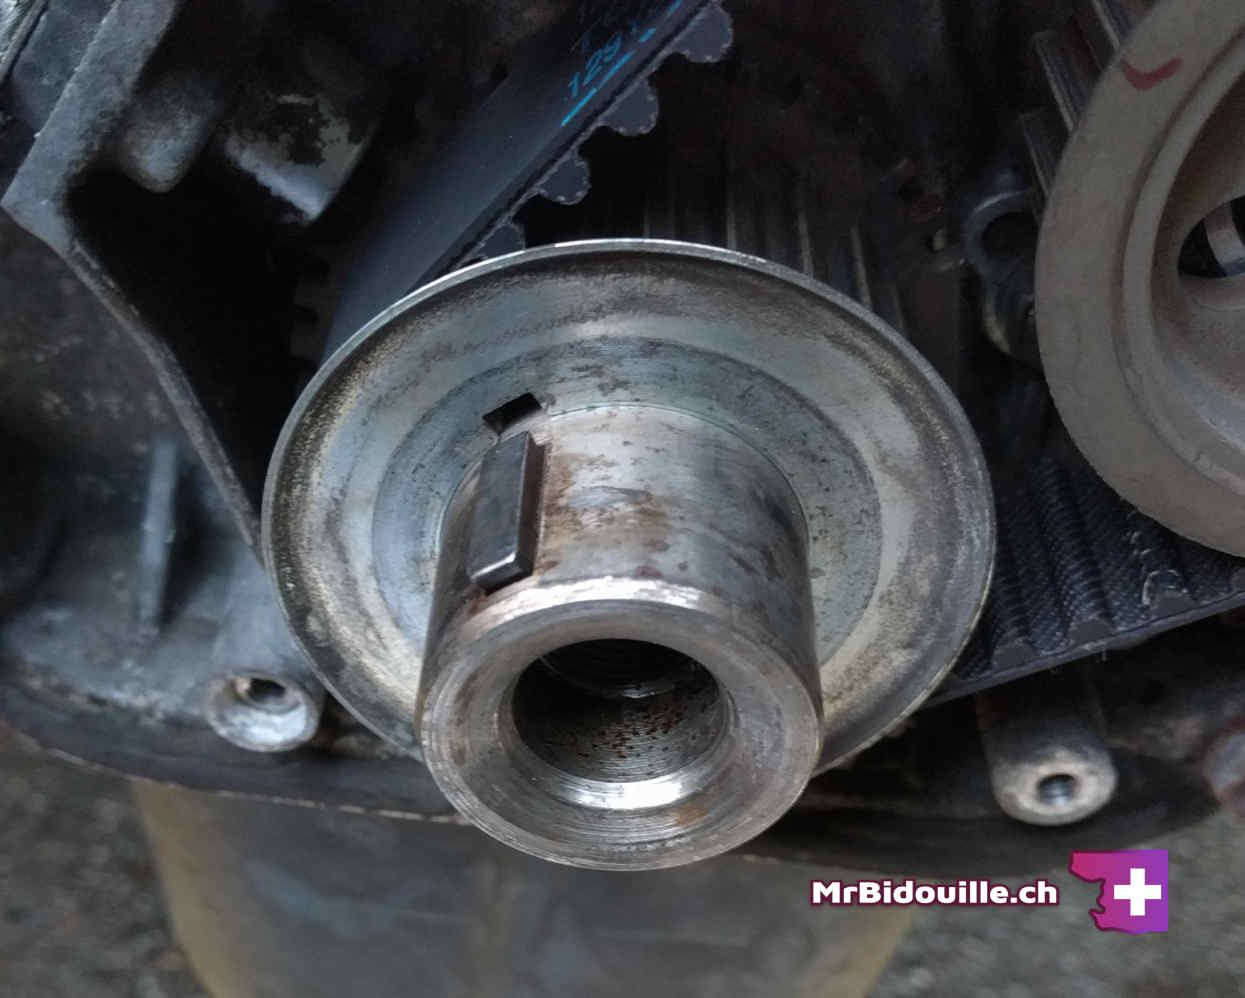
7. Remove the crankshaft pulley
It is time to remove the crankshaft pulley. What a mess this was ! I finally did it, and I'll show you how.
But first, know that there are specific tools made to remove theses pulley. So if you really couldn't do it after giving it your best, consider trying the tools. They are called "bolt puller set".
The issue for me is that (in Switzerland) they are very expensive to get. But if you live somewhere else in the world, it might make sense.
Here is the issue: the pulley is "just there". However, it won't come out easily. There is nothing left to unbolt, but you won't be able to just pull it out.
Here is the method that worked for me:
From under the car, at the most exposed part of the pulley, I used a hammer and a block of wood (to soften the impact and prevent damage to the pulley) to create a small amounf of vertical play in the pulley.
Never try to rotate the pulley ! It's rotation is fixed.
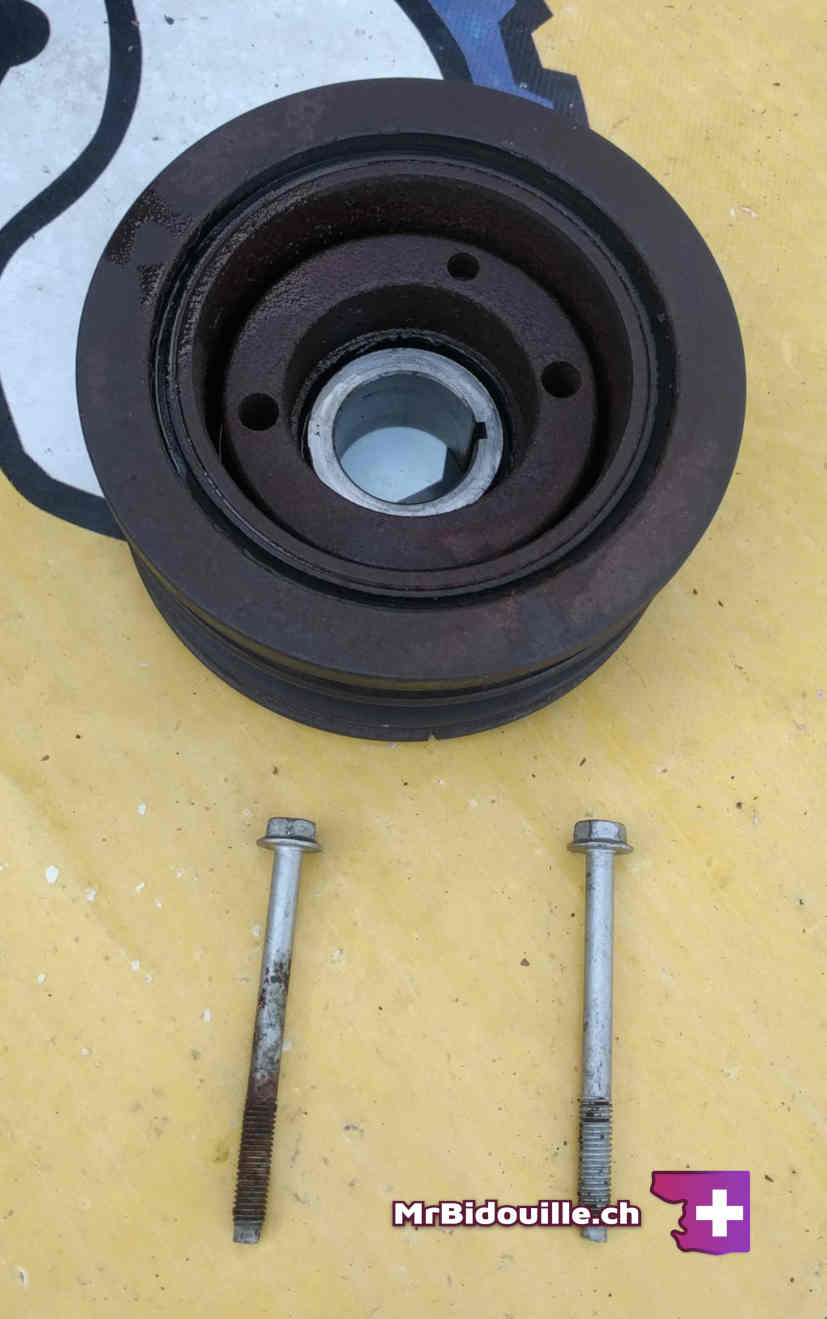
I could not get any horizontal play, but I think that's normal. With that very minimal play, I then bolted 2 long bolts in the holes of the pulley (see picture). Theses bolts actually come from the throttle body, so you can very easily get them (it's the two bolts that hold the throttle body, on it's left).

Then, for at least 5 minutes straight, both my hands anchored on the bolts, I pulled the pulley towards me, while wiggling it vertically. After a while, I realised it was slowly moving towards me. The amount of play never increased, but it moved closer and closer to the border.
Be careful when you'll finally get it out. It is quite heavy !
It's about time to clean all of the WD-40 I threw at it. After writing the article, I realized that the WD-40 most likely didn't help at all, that is why I don't recommand you use any. But if you did, brake cleaner is the perfect thing to remove it. I then wiped the product and oil with paper.
8. Remove the main belt
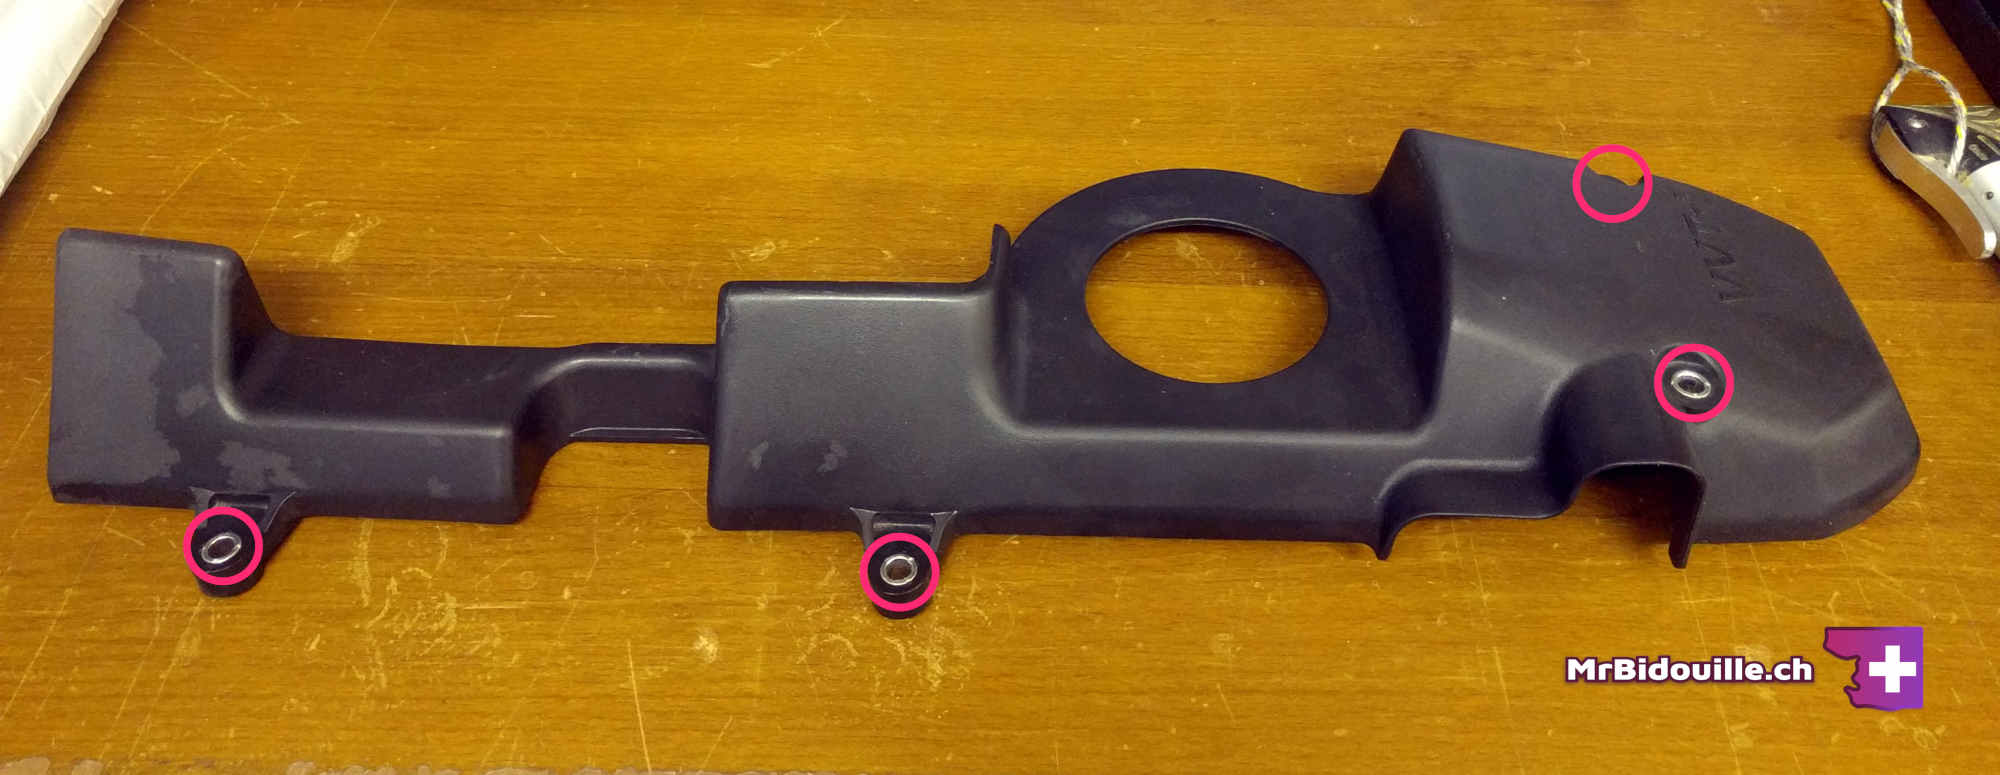
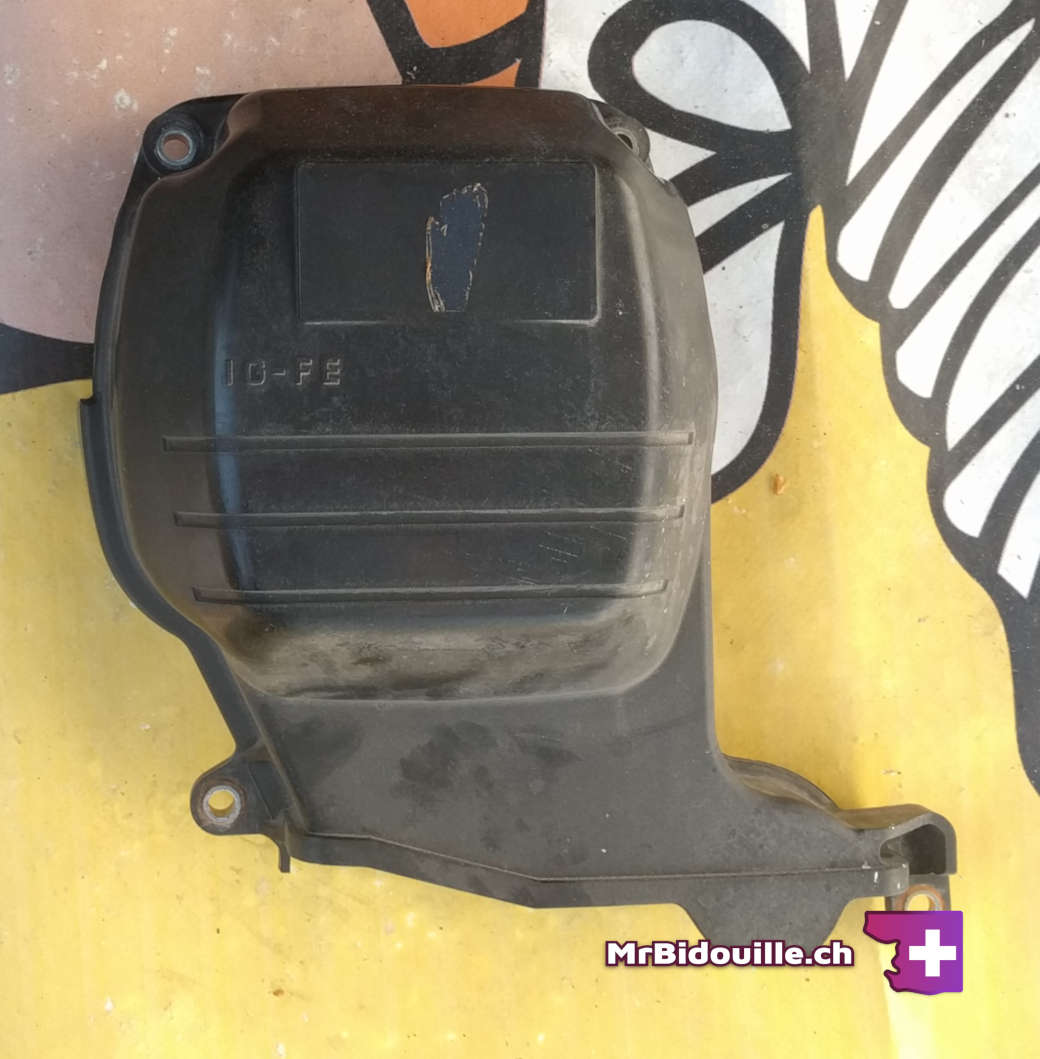
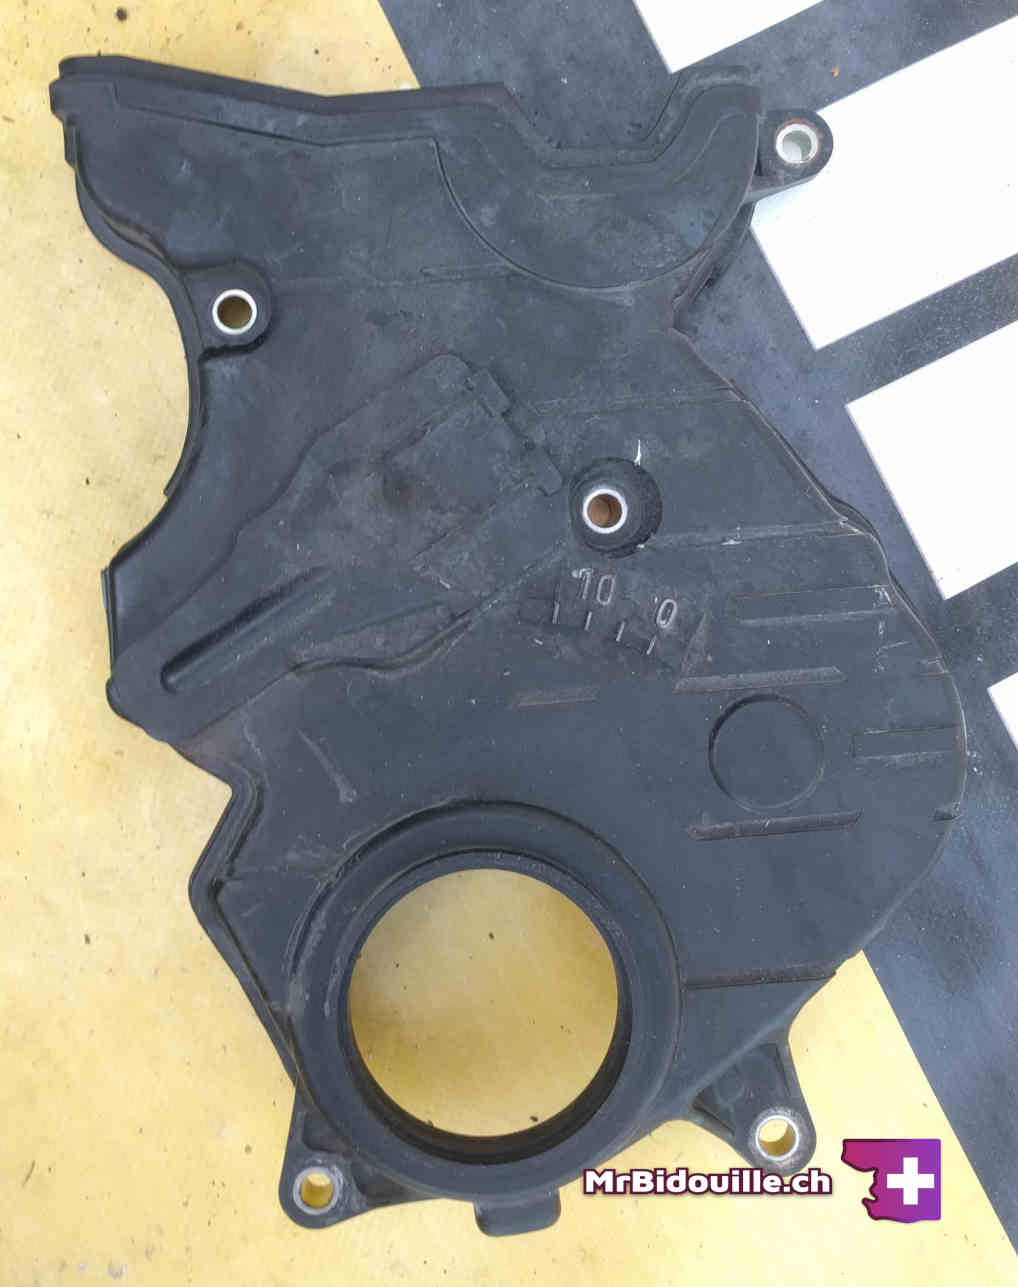
Second cover
There is a second cover left that can now be removed. There are 4 bolt left of various depth. The one at the top right was already removed, as it goes through both covers.
Behind this cover you will find a small cup like guiding plate. Remove it and keep it safe (already removed on the picture).

Mark the timing, again
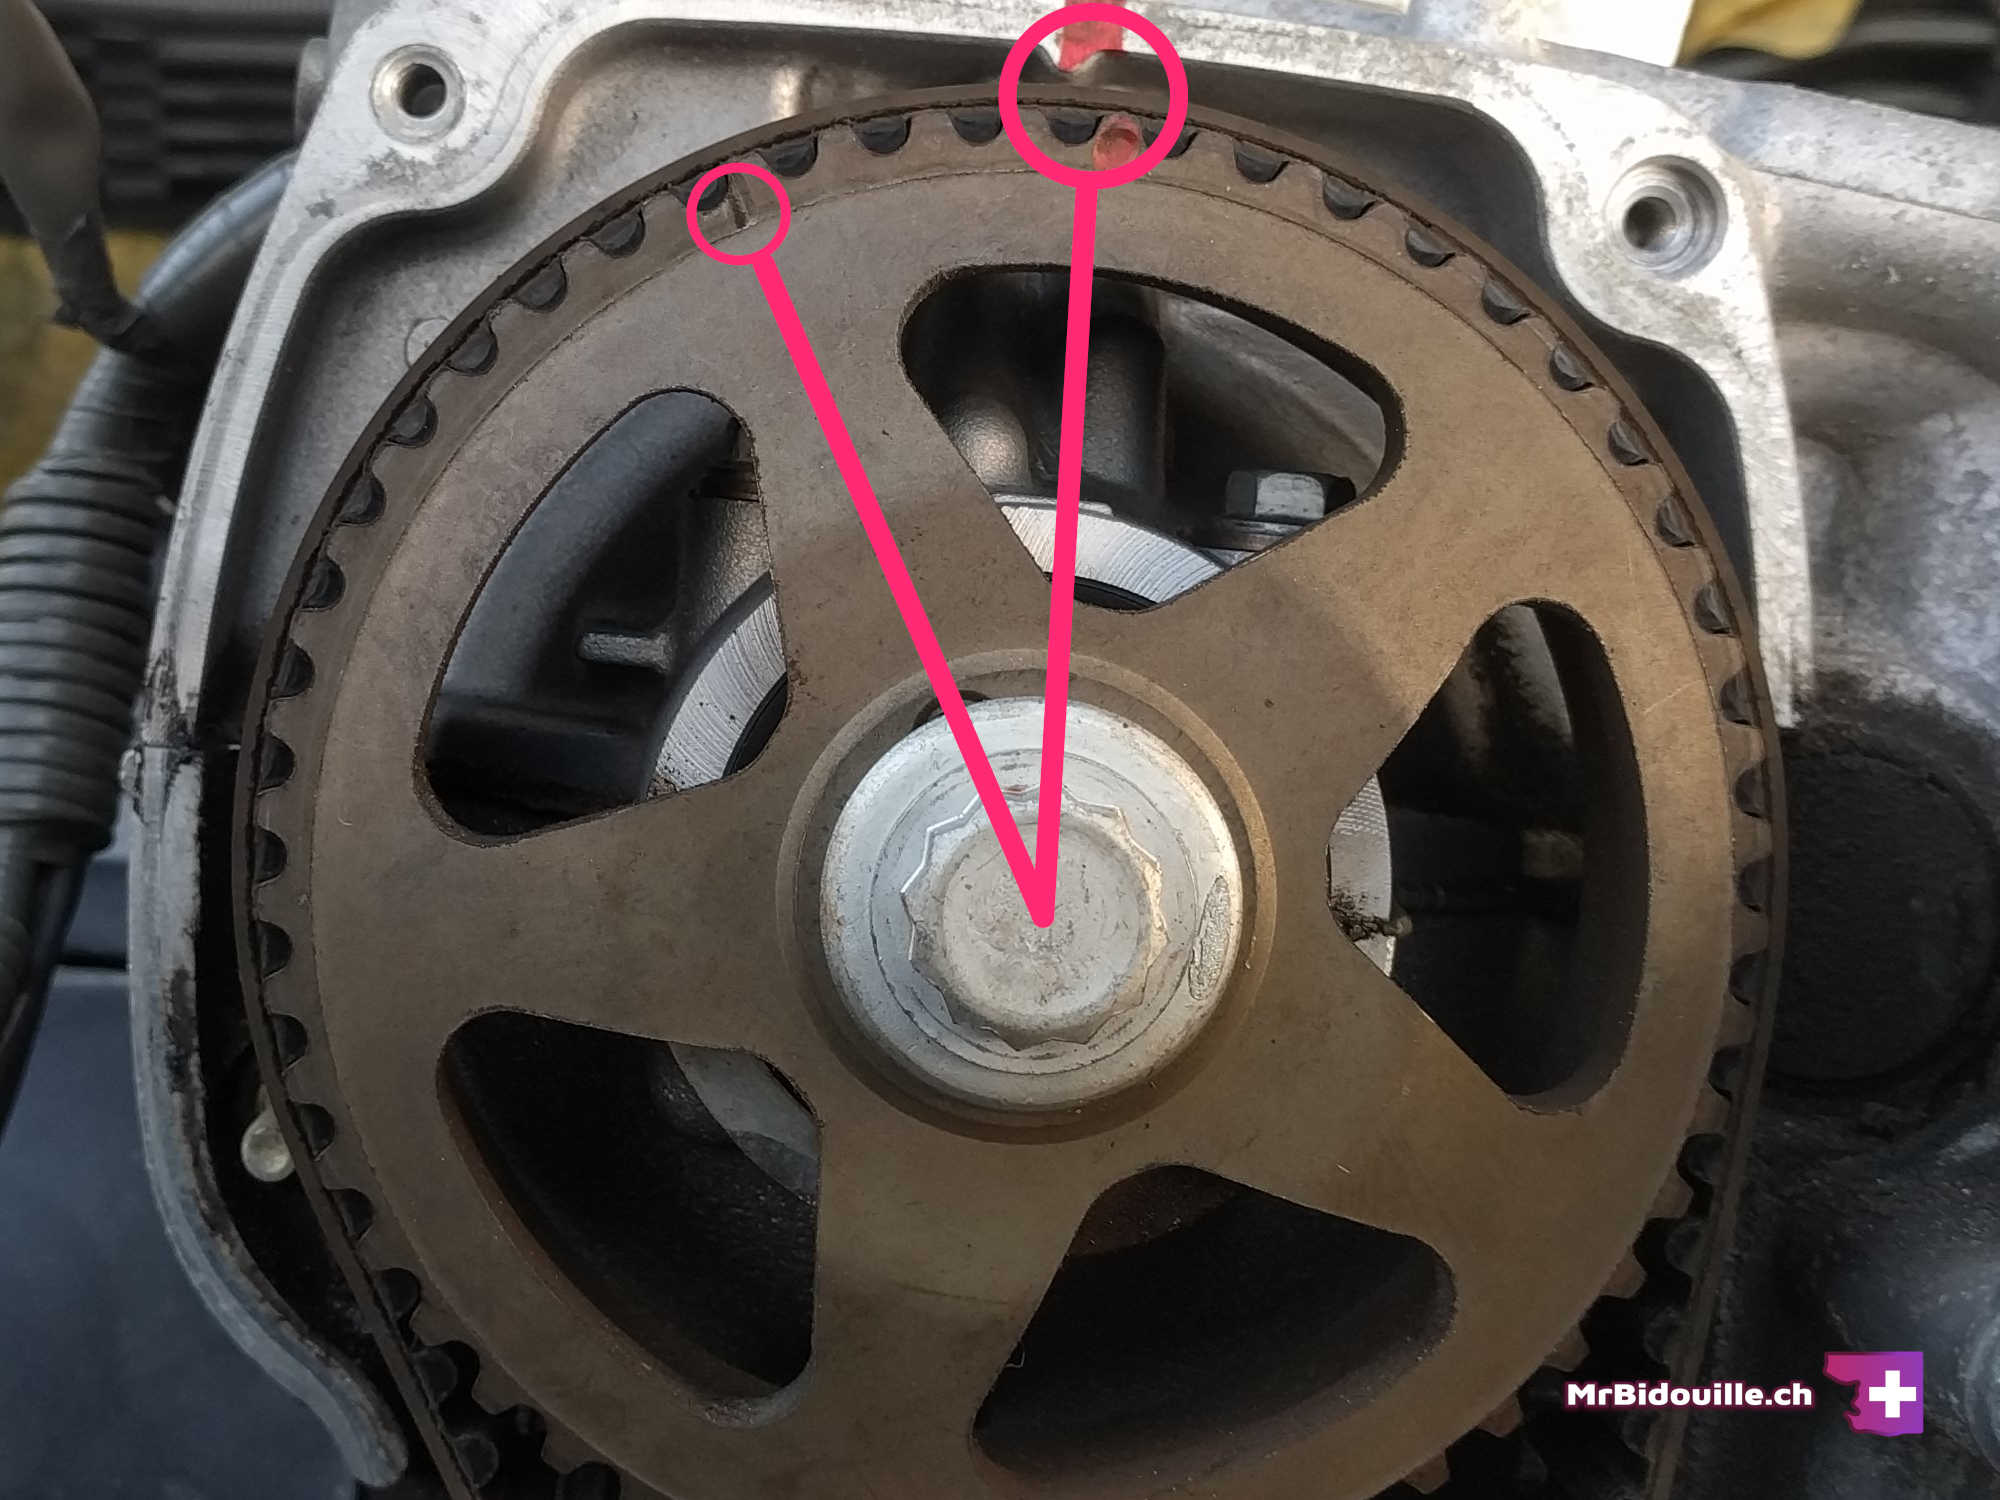
I found out that a mark was previously made on the bottom right pulley, aligned with the black metalic piece on the engine block. It's a great way of realigning that pulley, but the manual doesn't mention that it is an important alignment. So I left it the way it was, but more importantly, I added my own mark on the bottom pulley. A mark between the theeths and the block (see pictures).
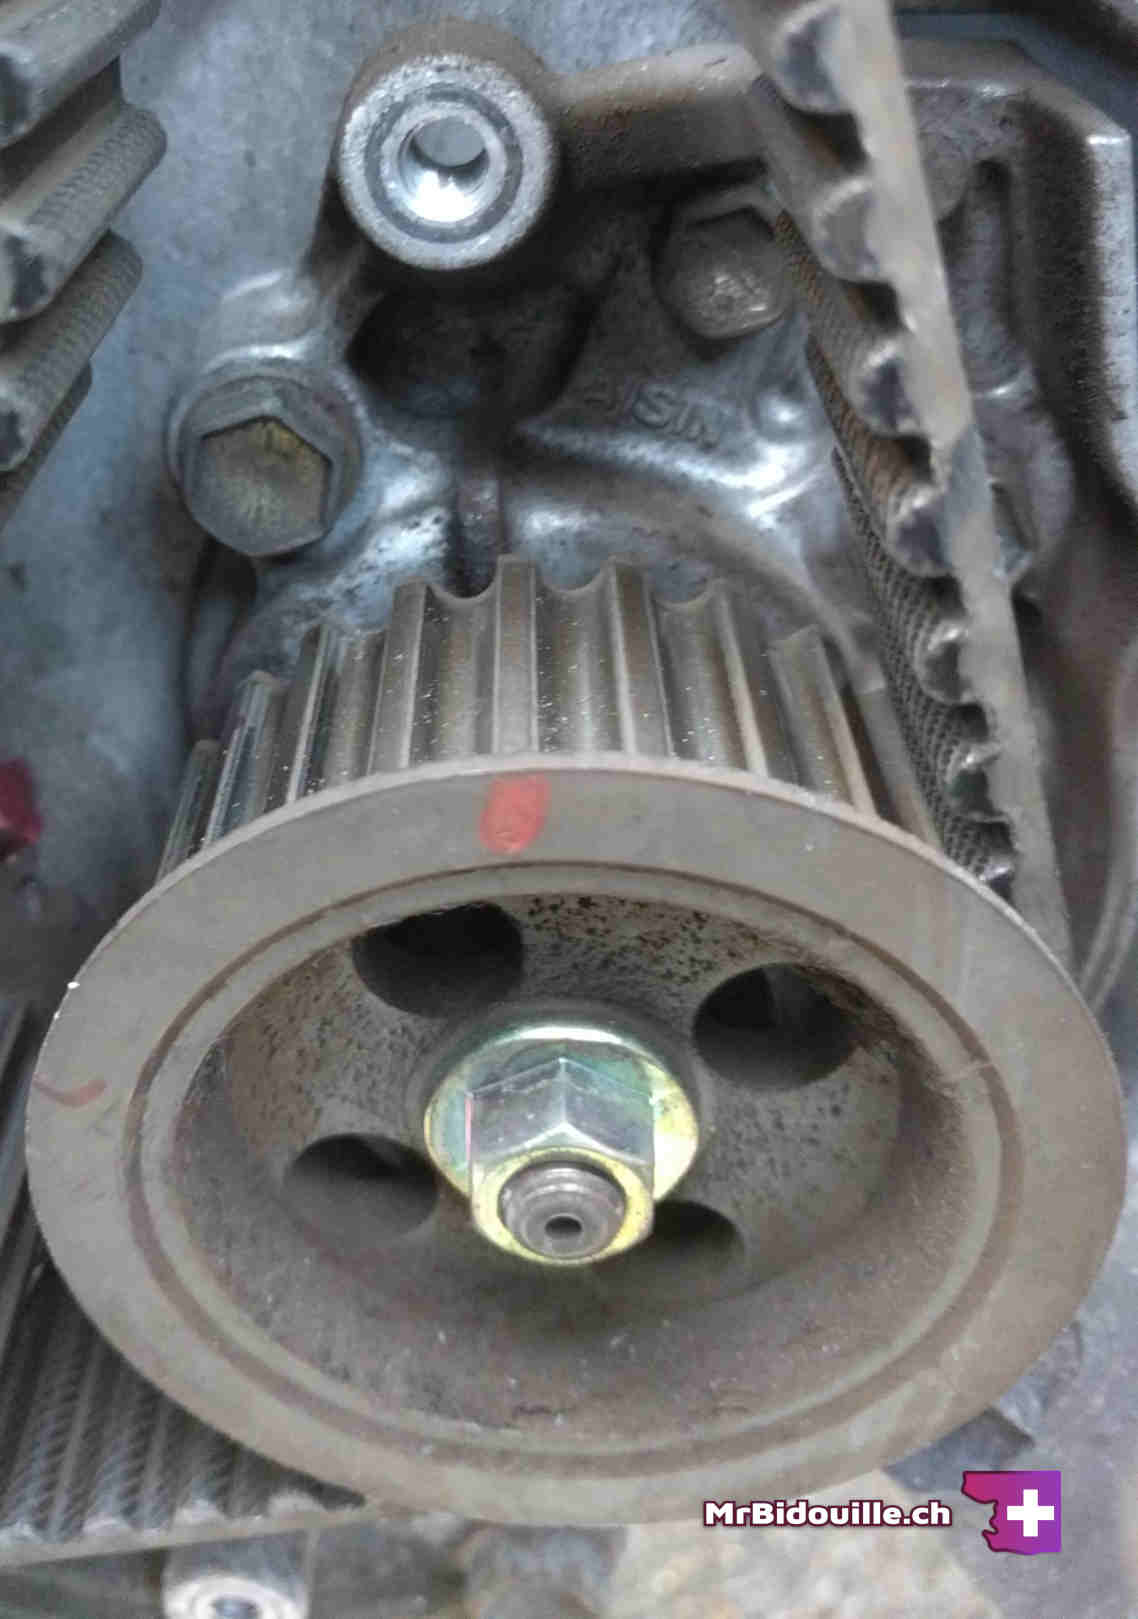
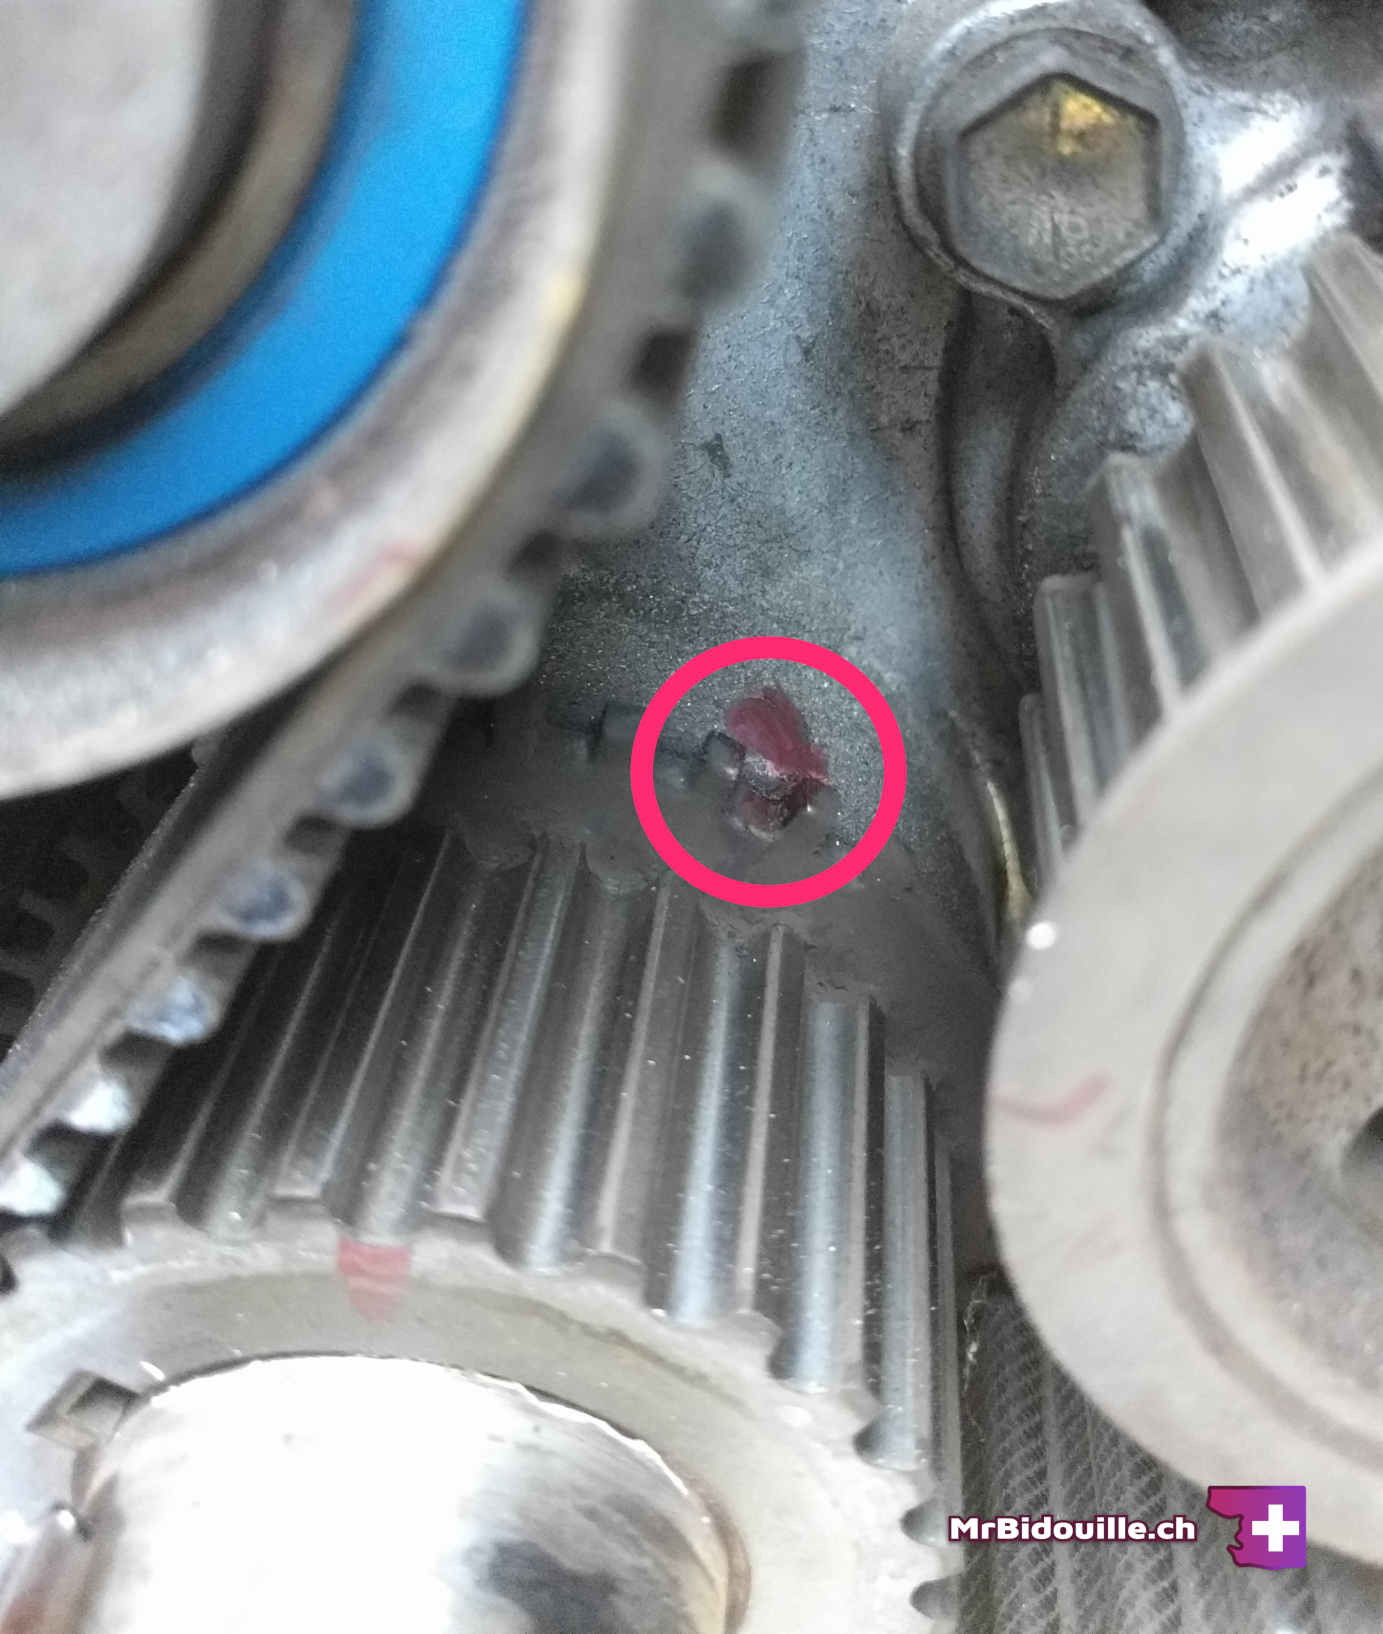
The place where I chose to make the mark wasn't very accessible with the marker, but this will do. I took pictures, for this article, but also to later know what the timing was.
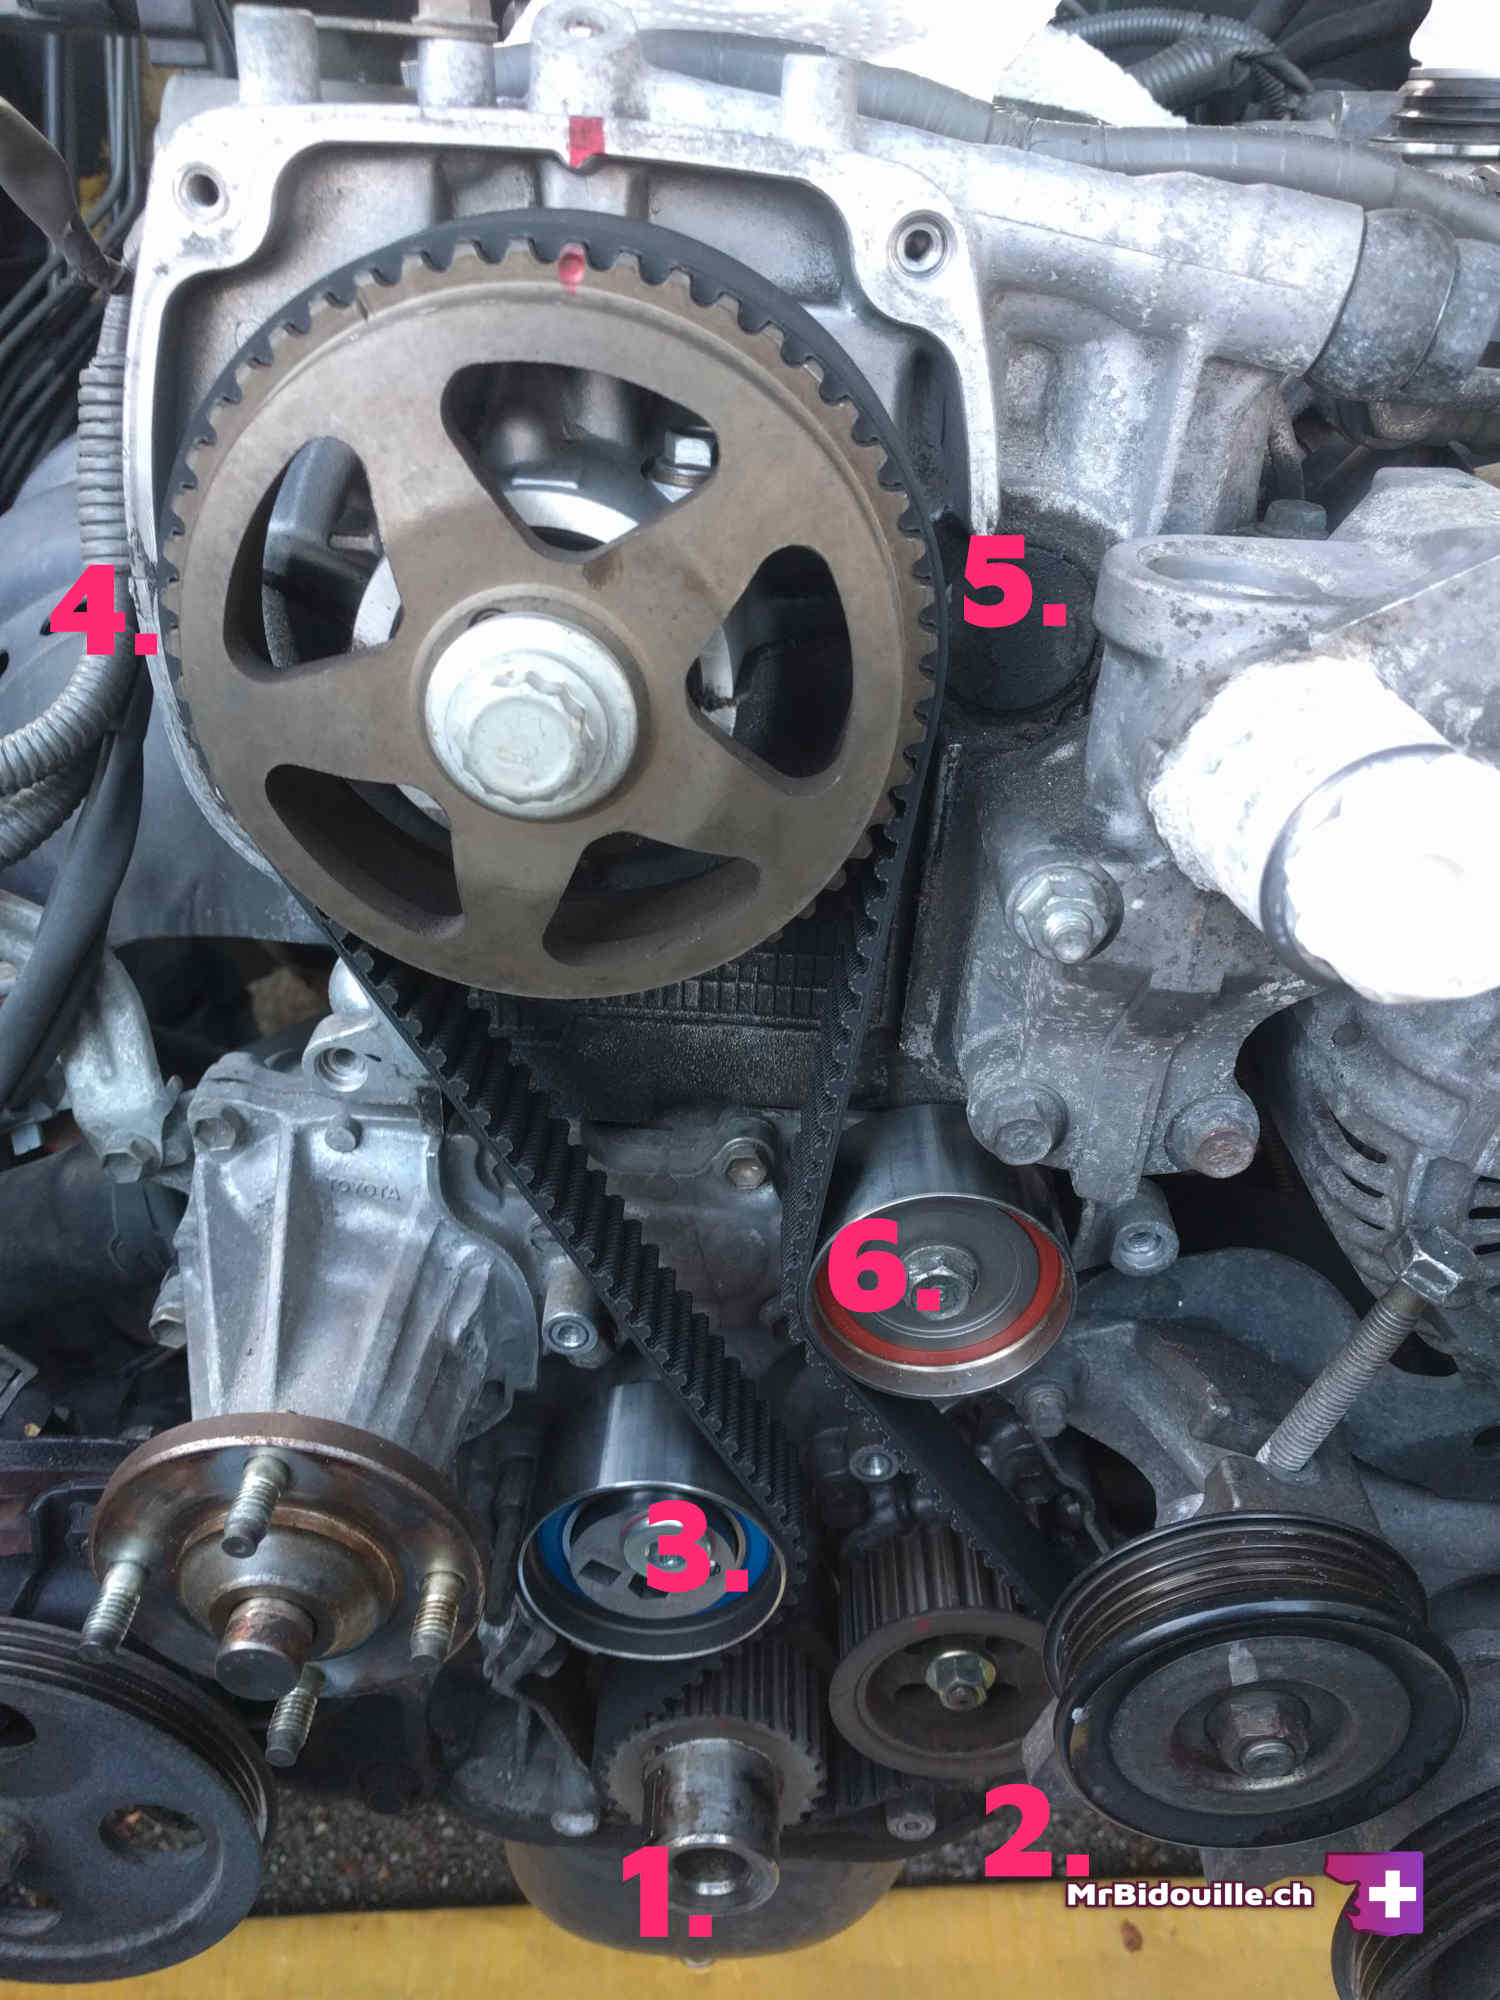
Remove the tensioner pulleys
This first pulley has a very intimidating mechanism, especially because of the manual in which, in my humble opinion, it is badly explained.
A first manipulation allows for the tension to be removed. A second manipulation locks the pulley in it's non-tension state. Then finally a third manipulation removes the pulley. Let's begin.
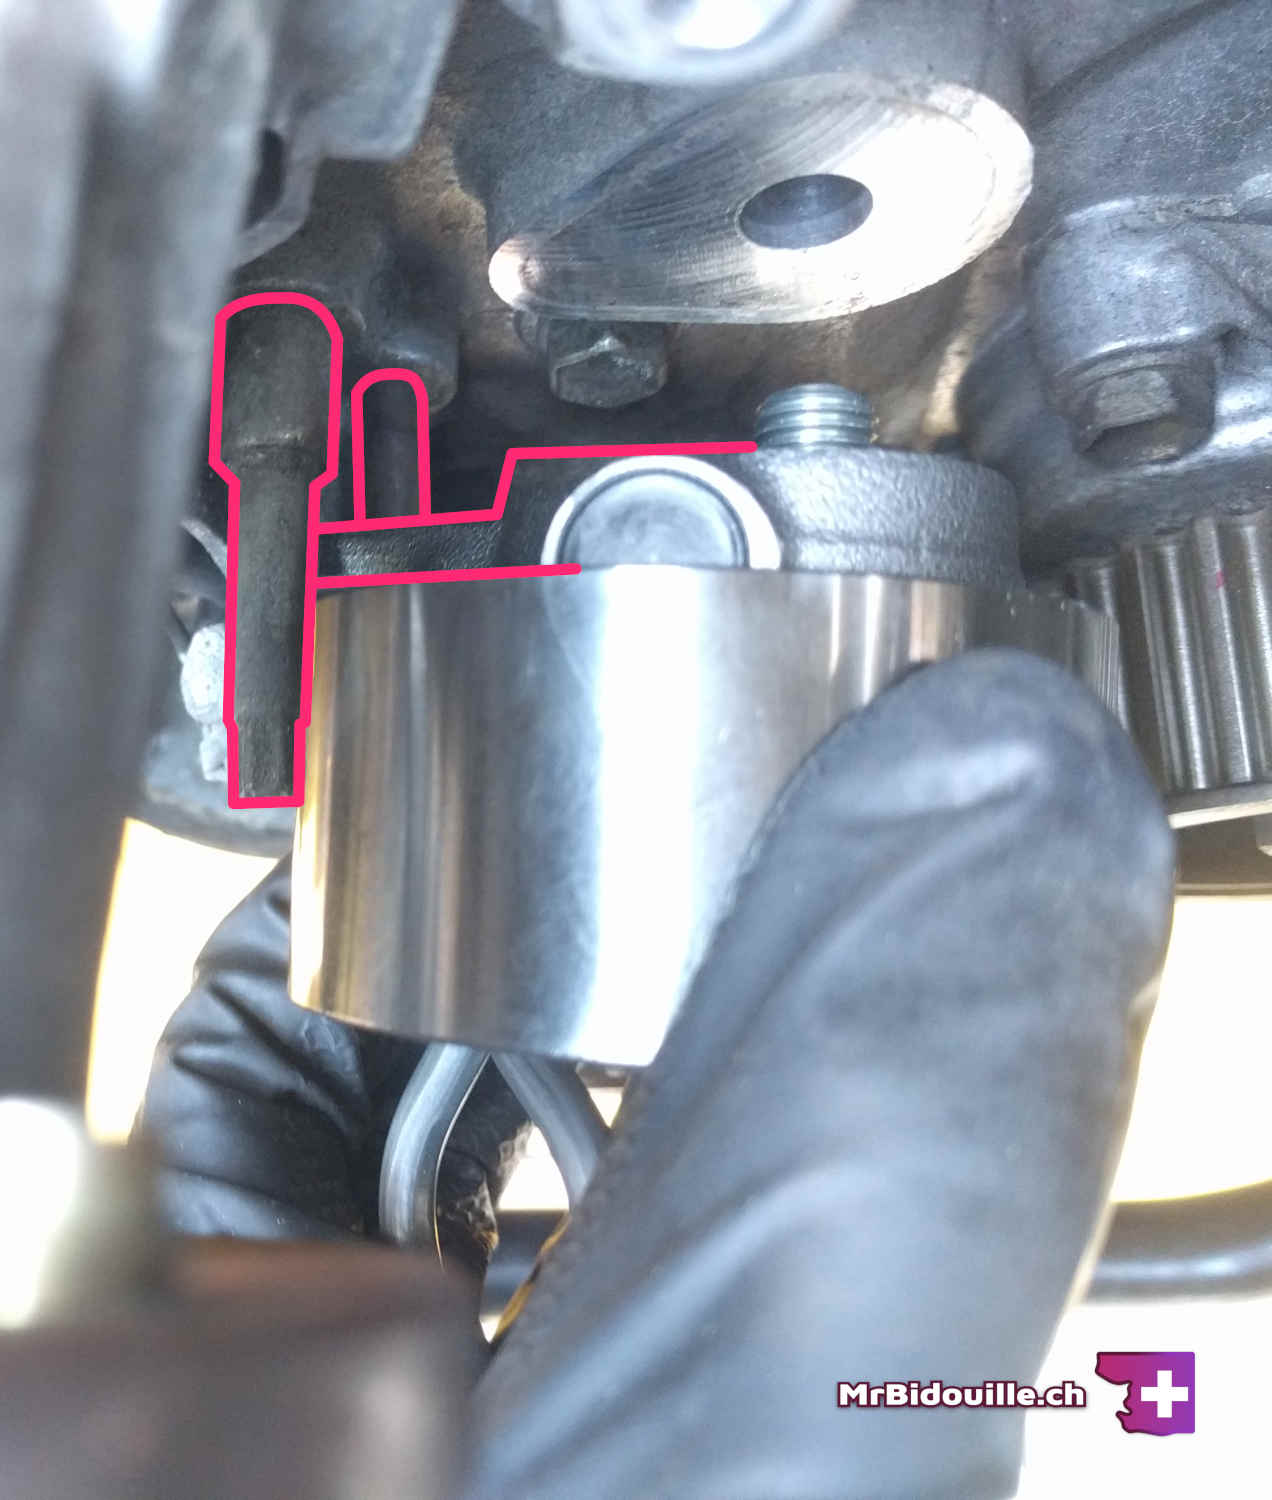
Put a 10 mm hexagonal key in the big hole. Turning it clockwise will remove tension from the belt. Yes it's a little confusing, but you actually have to turn it clockwise to "undo". Here I used a solid key with an improved extension from my 1/2 in ratchet.
To maintain the position of non-tension, you have to use your second hand and a 5 mm hexagonal key. The key doesn't actually go in a hexagonal hole, but a round hole of 5 mm.
When you turn the 10 mm key, the hole becomes accessible, and you just have to gently push the 5 mm key inside. After that, if you release pressure on the 10 mm key, the pulley won't come back in it's tensionned state.
You can also let go of the 5 mm key, but obviously, you have to leave it in the hole until the end.
Then, with an 8 mm key, you can unbolt the whole pulley from the third hole.
I started with a solid key and an improvised extension (by fear of breaking my ratchet, as this bolt is quite tight). I then switched to my ratchet with an 8 mm hexagonal socket that (luckly) was in my toolbox.
Back to classics here, turn anticlockwise to untighten.
Now that the pulley is out, you can recover your 5 mm key if you want to. This pulley will be replaced with the new one anyways.
Now on to the second pulley. Nothing special here. Just one bolt to untighten. I sill used my breaker bar, because it was quite tight.
Removing the timing belt
That's it ! We can just take it out. You'll see that there are quite a few guides here and there on the engine block holding the belt in place.
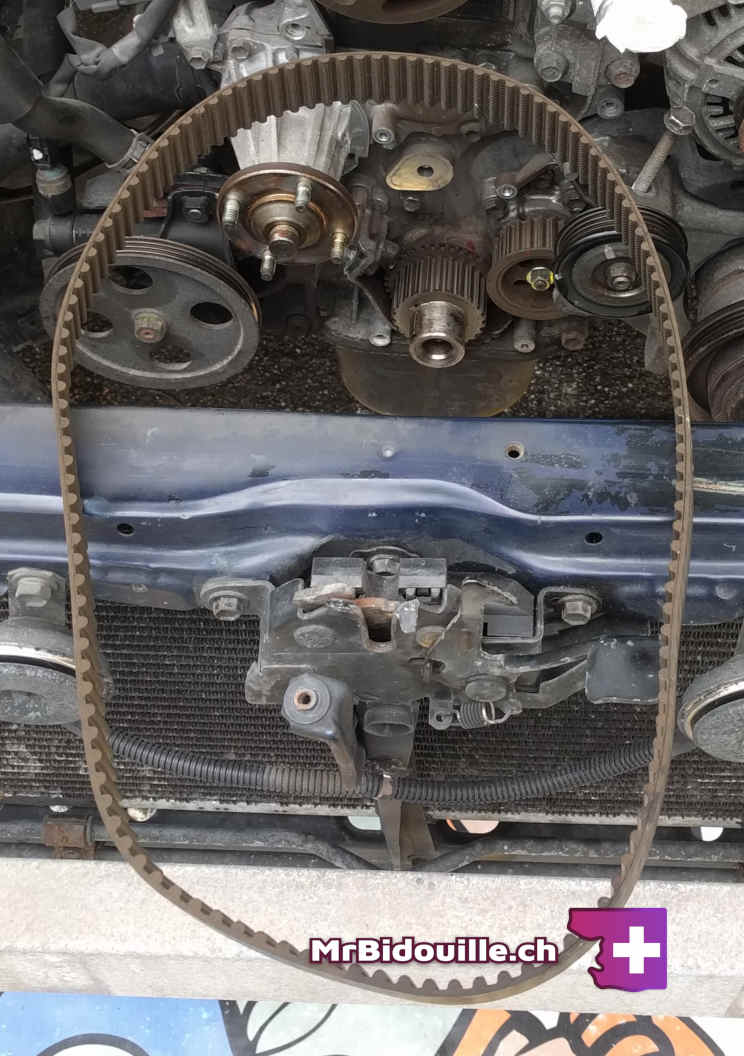
Quick reminder. Under no circumstances should you try to turn the two main pulleys now that the timing belt is removed. Otherwise, the timing will be wrong, and you risk damaging your engine.
9. Install the new timing belt
This step requires a lot of patience. I hope with the tips I'll give you it will go smoothly. As for myself, I had quite a bit of trouble finding the correct way to fit the new belt.
To begin with: always be delicate with the belt. Do not bend it, do not put liquids on it, etc.
Now is a good time to get some more compressed air on all surfaces to make sure no crap is trapped between the belt and the pulleys. The manual says to not wipe the pullyes with any cleaning agents. I used a bit of brake cleaner, that I let dry for a good amount of time, just to make sure.
First tensioner pulley
The first thing to do is installing the new first tensioner pulley.
Do not remove the little pin in your new pulley. It does the same job as our 5 mm key previously.
Install the pulley so that the outgoing pin is between the two screws on the engine block (see picture).
Align the bolt with the hole, and tighten with an 8 mm key. Take your time, and apply force in the direction of the engine block, because this bolt has a hard time threading in.
Seriously. Be patient. Tightening this in took me super long, but it's not hard. Just keep turning.
Belt alignment
Now it's time to align the belt. As mentioned previously, this step was very frustrating, but I hope with this method, it will be easy for you:
Place the belt on the bottom pulley first. Be mindful of the small guides all around the engine block.
Then, align the belt on the small pulley to the right. The play between the two sould be the minimum. It means that after laying it on the teeth of that pulley, you should pull upwards as much as possible on the right side.
Now, put the belt on the right side of the first tensioner pulley, to the left of the bottom pulley.
Align the belt with the upper pulley, starting from the left side. You shouldn't be able to mistake the correct tooth. With the right one, there is a small amount of play (that will be eliminated when the first tensioner pulley is tightened). With an extra tooth, you'll immidiatly see that there is too much play. And you cannot put it in with one less tooth. There is not enough play.
Now that the left side is validated, gently put the belt on the top and the right side on the teeth.
Second tensioner pulley
Now that the belt is in the right place, you will see that there is a whole lot of play on the right side. That's because we need to reinstall the second tensioner pulley (already installed on the previous picture).
The manual said to install it before the belt, but I just could not get the belt in place with the pulley already installed. That's why I suggest installing it now, which is rather easy. You might need to insert it at a bit of an angle initially, but once you tighten it up, it will place itself straight.
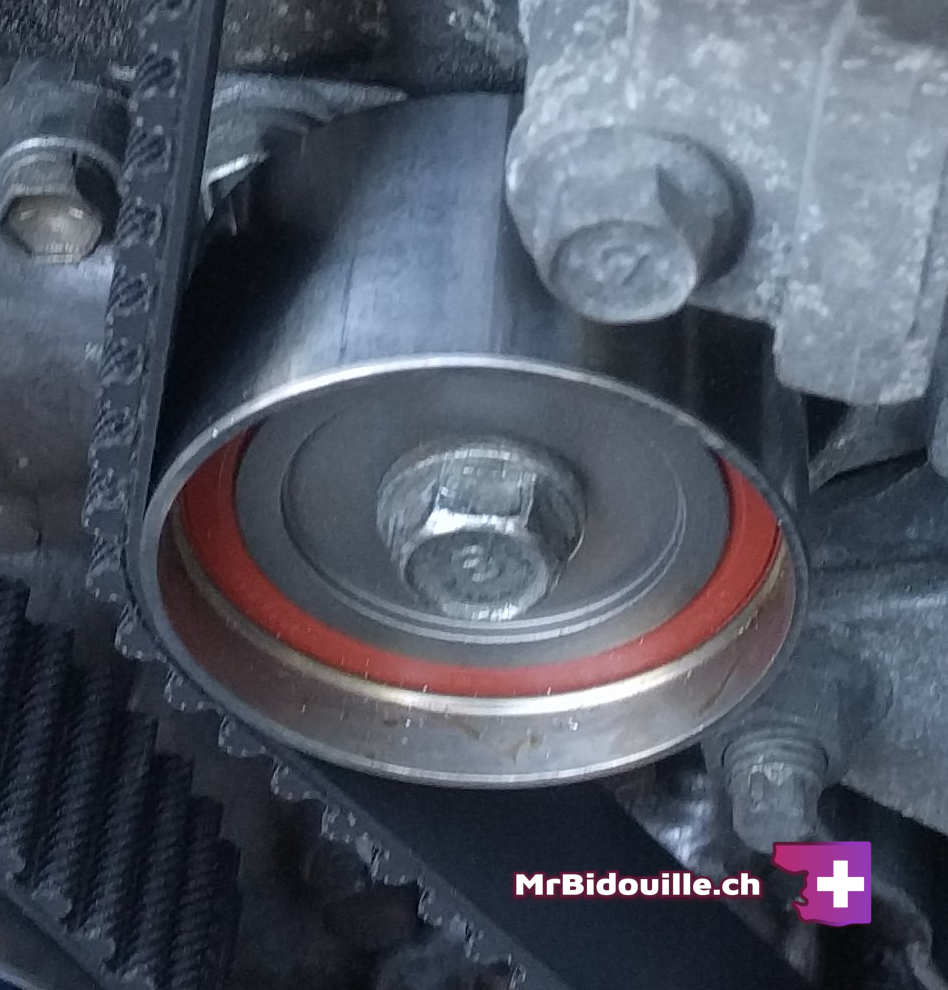
You can immediately torque this bolt down. The manual recommends 37 Nm.
Also check the position of the belt depth-wise. It should be almost at the end. You can adjust it by gently pushing on its side.

Applying tension
We're all good. We can tighten the first tensioner pulley.
First, torque down the 8 mm bolt. The manual recommends 42.5 Nm.

Now you can remove the little 5 mm pin. I applied a bit of force clockwise on the big 10 mm hole in order to remove the pin (the same way we de-tensionned the old one) then gently applied the tension by removing my force on the 10 mm key.
Timing test
Congratulations, your timing belt is in place and tightened ! Check one more time that the teeth are all in place and the play is not abnormal.
Now it's time to test the timing. To do that, we are going to do a full rotation of the engine twice and check the timing after each turn.
To turn the engine, we could again use the 17 mm at the top, or better yet, temporarly reinstall the crankshaft pulley bolt and turn it gently, applying the least amount of force, to be able to remove it once we are done.
I also reinstalled the cup-like guide. Warning, on this picture, I installed it backwards ! It doesn't matter right now, but as we will soon see, it should be installed the other way around.

It's now time to turn. Always clockwise !
If after two turns the marks are still aligned, it means the belt is in fact correctly installed.
If the timing is not aligned anymore, you'll have to remove the belt, correct the position of the pulleys (turning them as little as possible to avoid damaging the engine) and start again from "9. Install the new timing belt".
But if you were careful and patient, there should be not timing issues.
Reinstalling the covers
Remove the crankshaft pulley bolt by gently hitting the braker bar anticlockwise. The alignment of the marks is not important anymore. Install the cup-like guide plate with the cup facing outside (see picture).
It's time again to give the area some compressed air to make sure it's clean and it stays clean until we put the covers back on.
You can then put the second cover back on. Note that on this picture, I inserted a bolt at the top right, even though the bolt that goes there is longer and should go through both covers.
I also forgot the one at the bottom left.
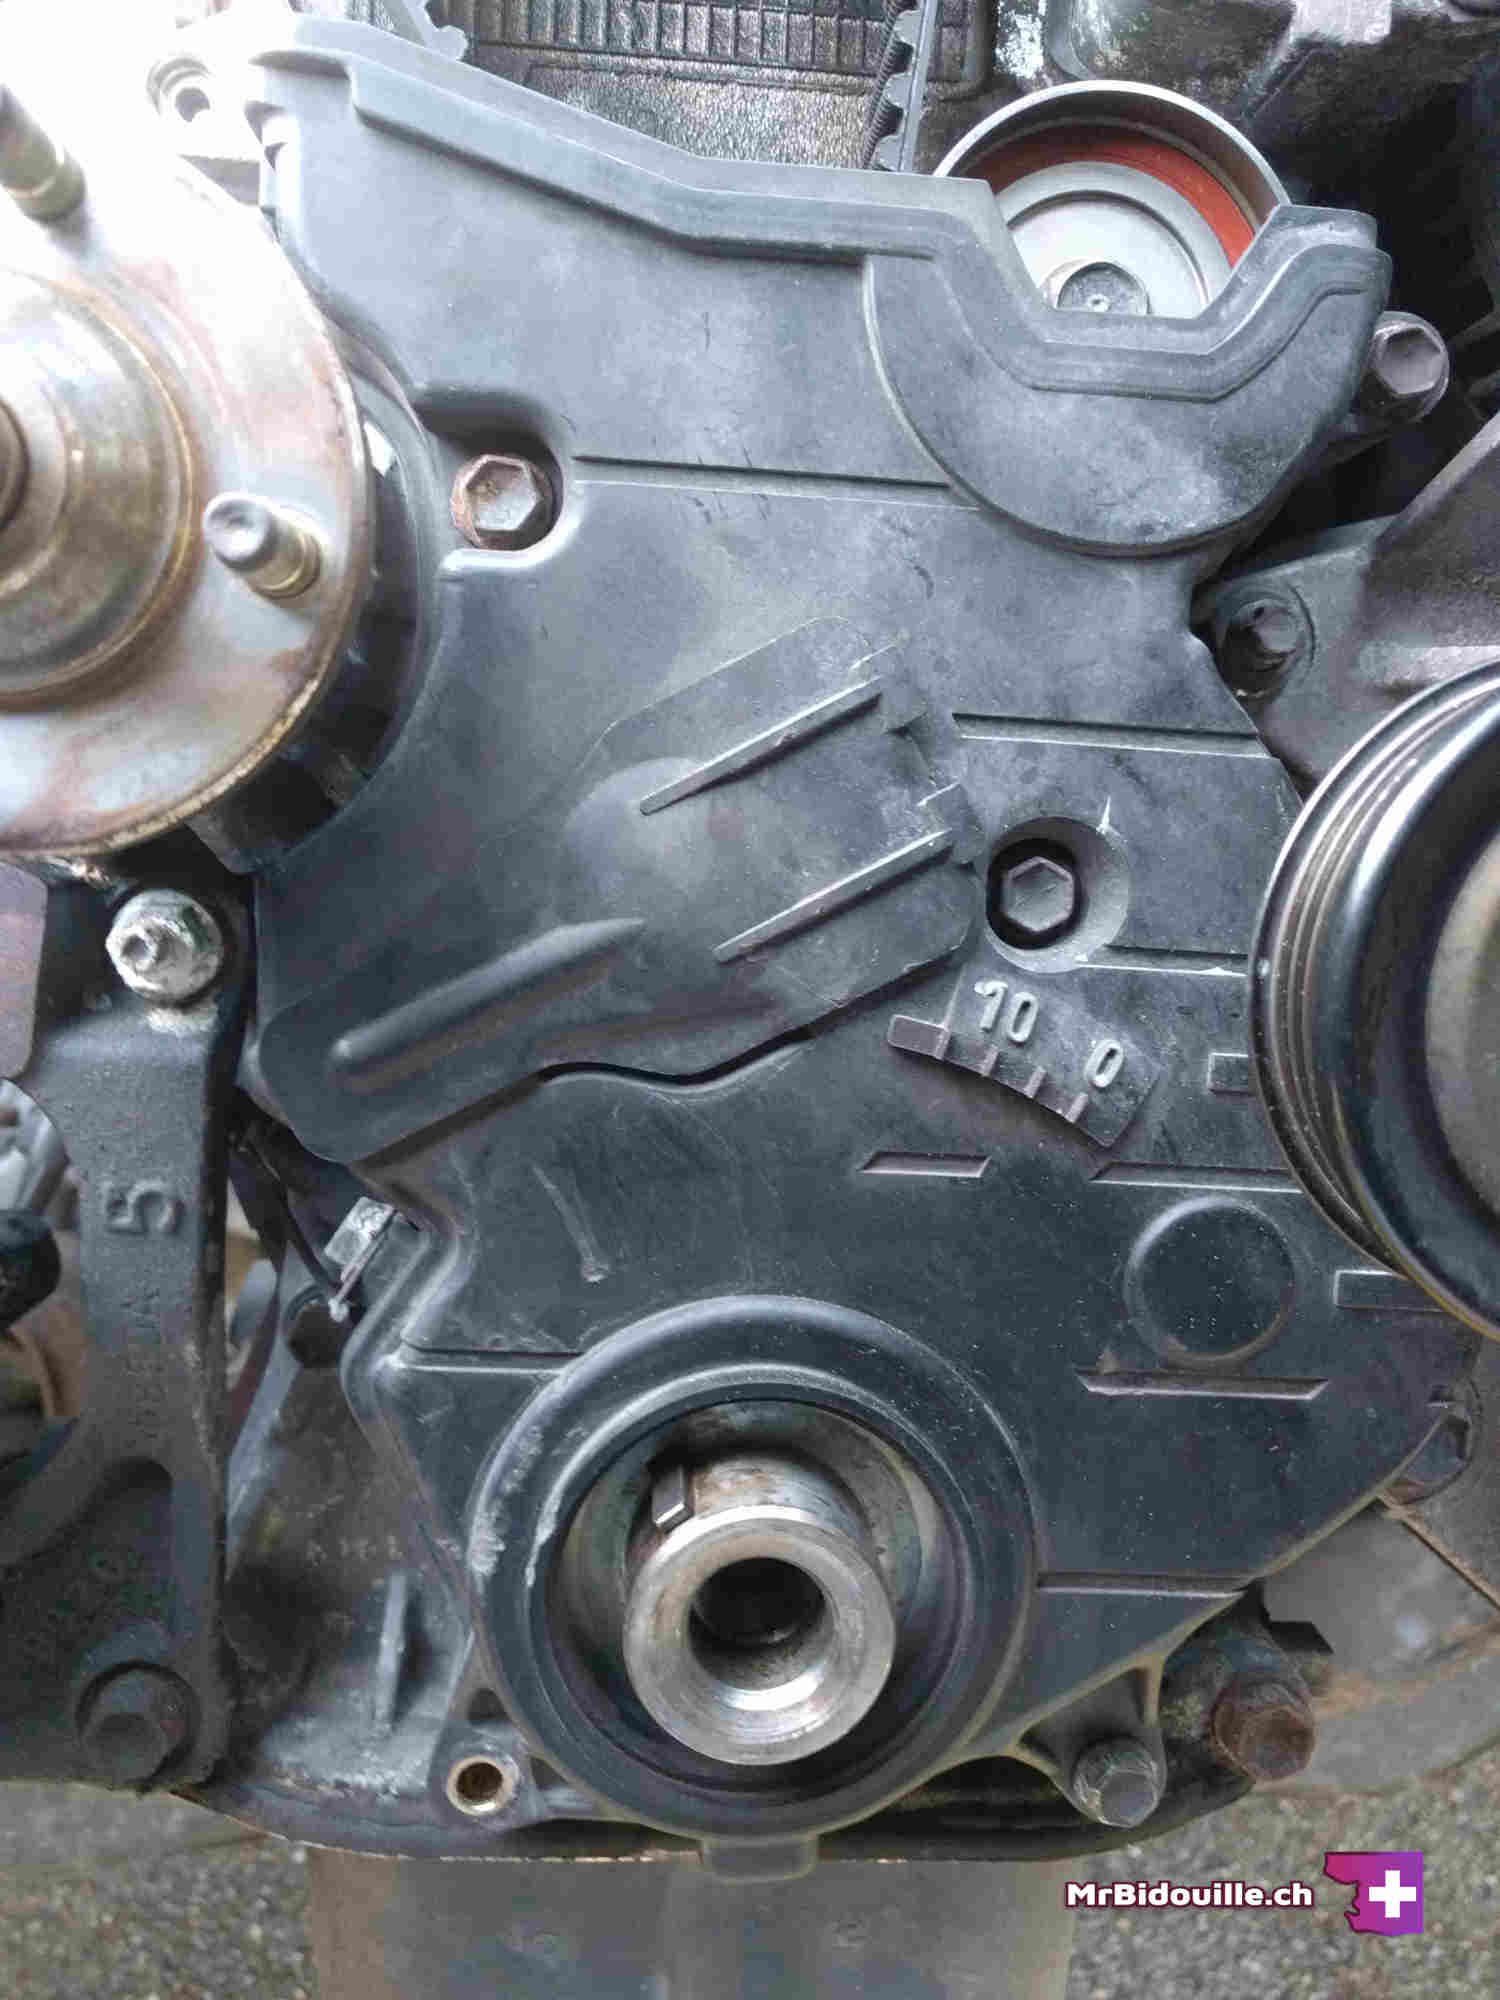
All that was fixed when I put the first cover back on !
This cover being installed, it won't be removed again for the next 10 years ! That's crazy when you think about it.
The manual says to use 6 Nm for the cover bolts. I simply tightened them by hand with my ratchet.
10. Install the crankshaft pulley bolt
Time to reinstall the crankshaft pulley and the bolt. The pulley slides on super easily. Makes you wonder why it was so hard to get it out. If it doesn't seem to be all the way in, hit it gently with a hammer and a big block of wood to spread the force and not damage it.
You can see that our notch is not aligned with the zero mark anymore. On my side, I know that the offset is the exact one I left after removing the crankshaft pulley bolt after rotating the engine twice to test the timing. So this is all normal.
If you are a maniac and you realigned precisely before removing the bolt, then the notch should be perfectly aligned.
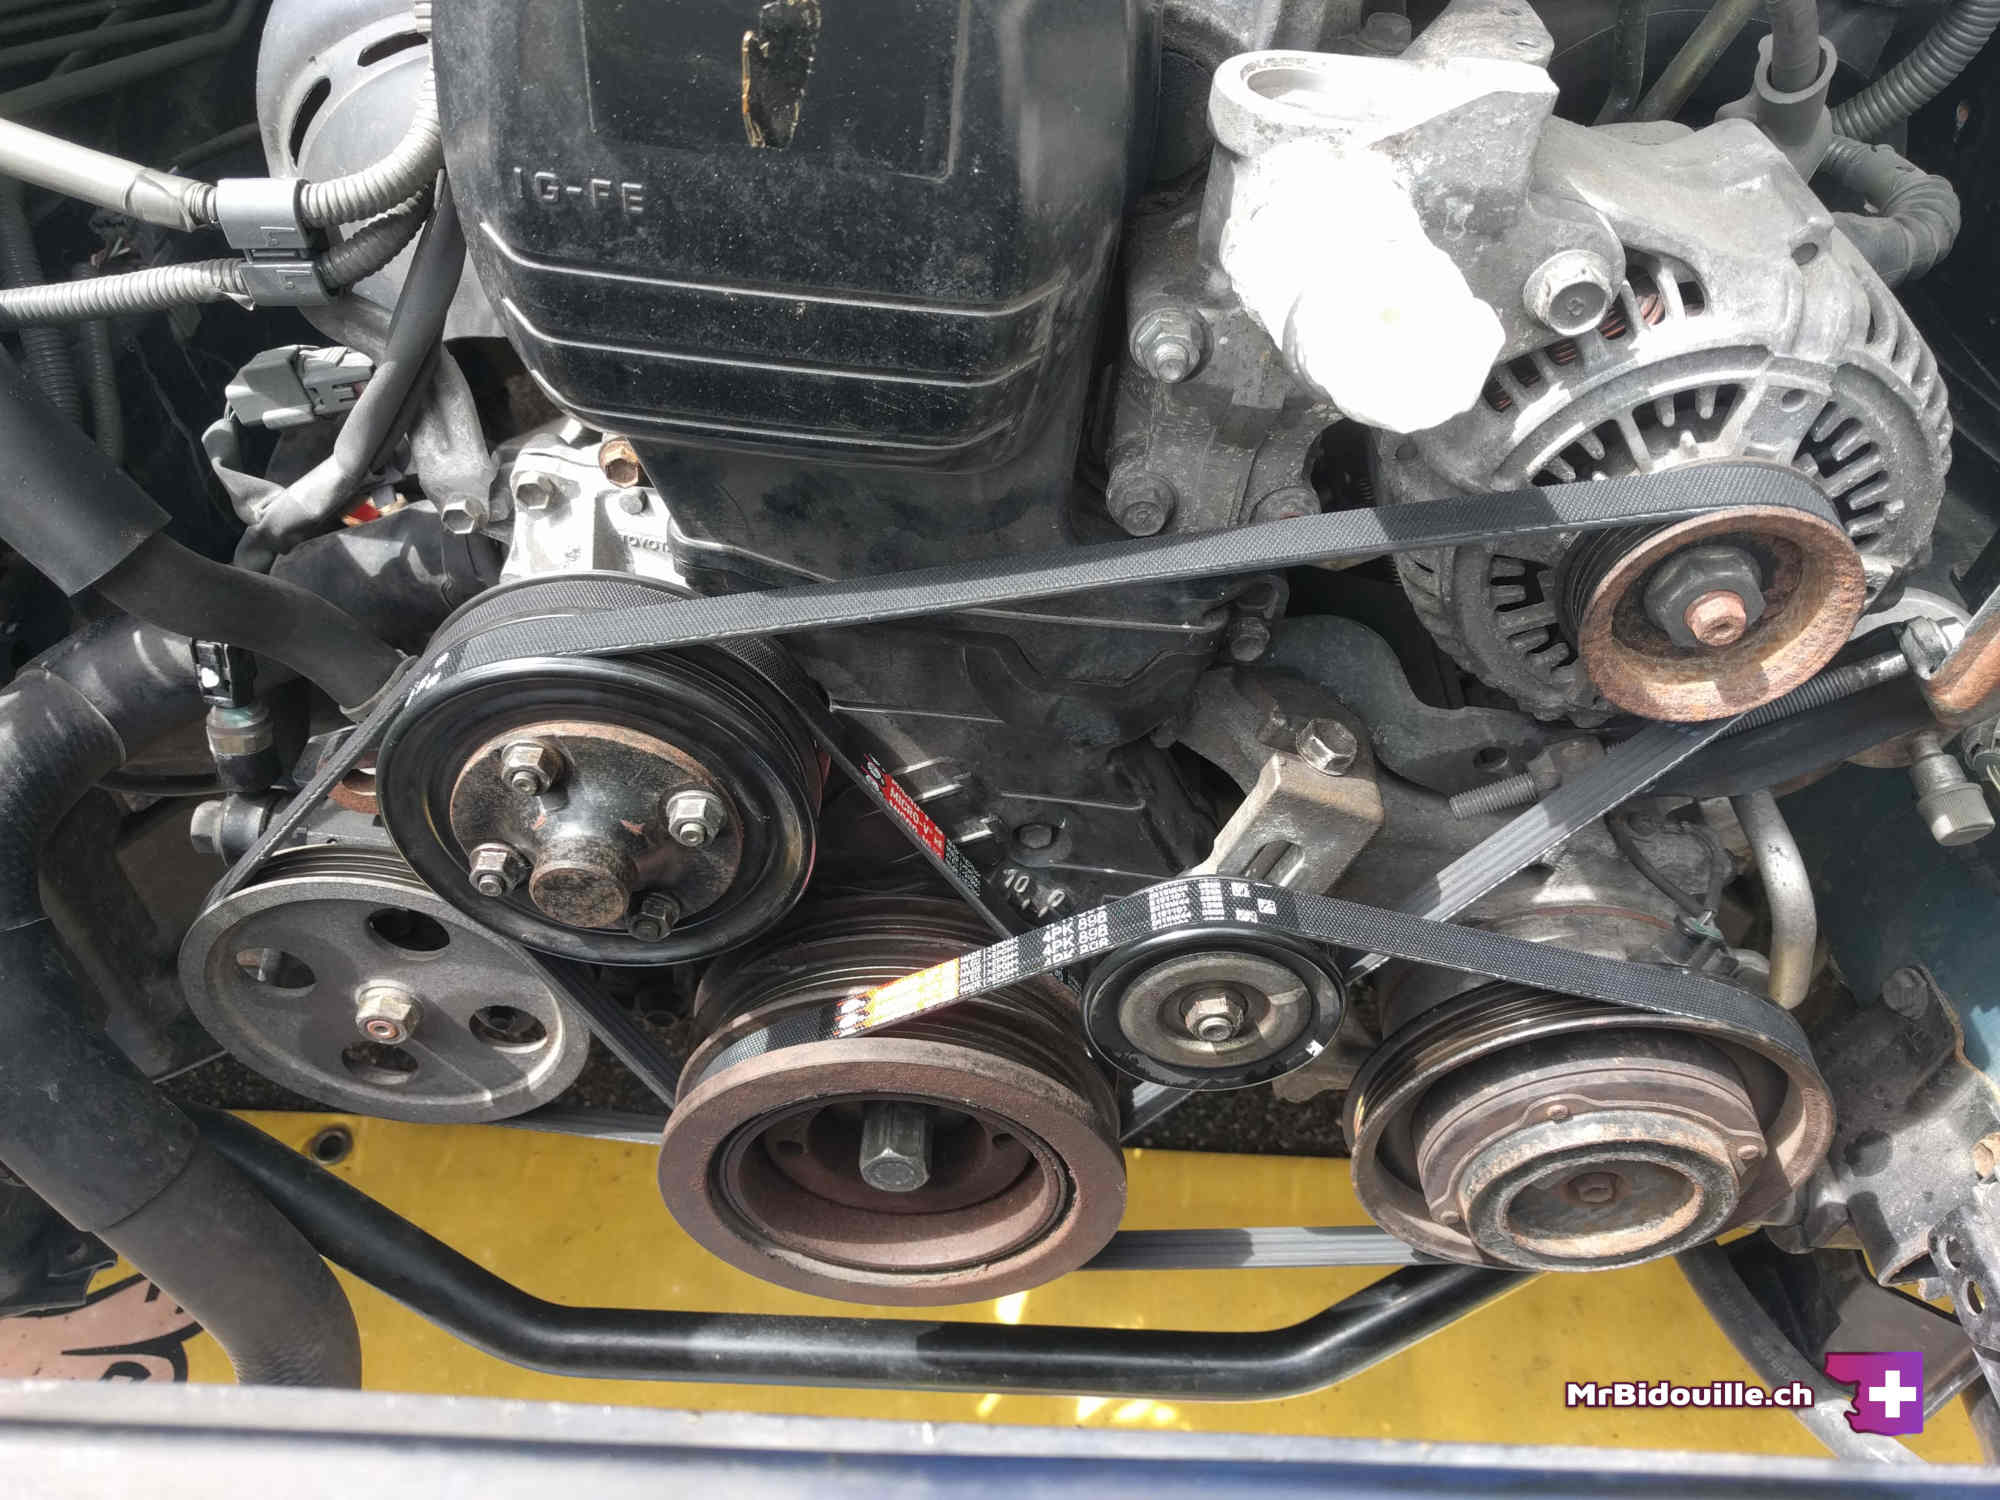
Now the bolt. But we are going to need to torque it to 220 Nm !
We are again going to use the old auxiliary belt. Here is how are going to tangle it this time.
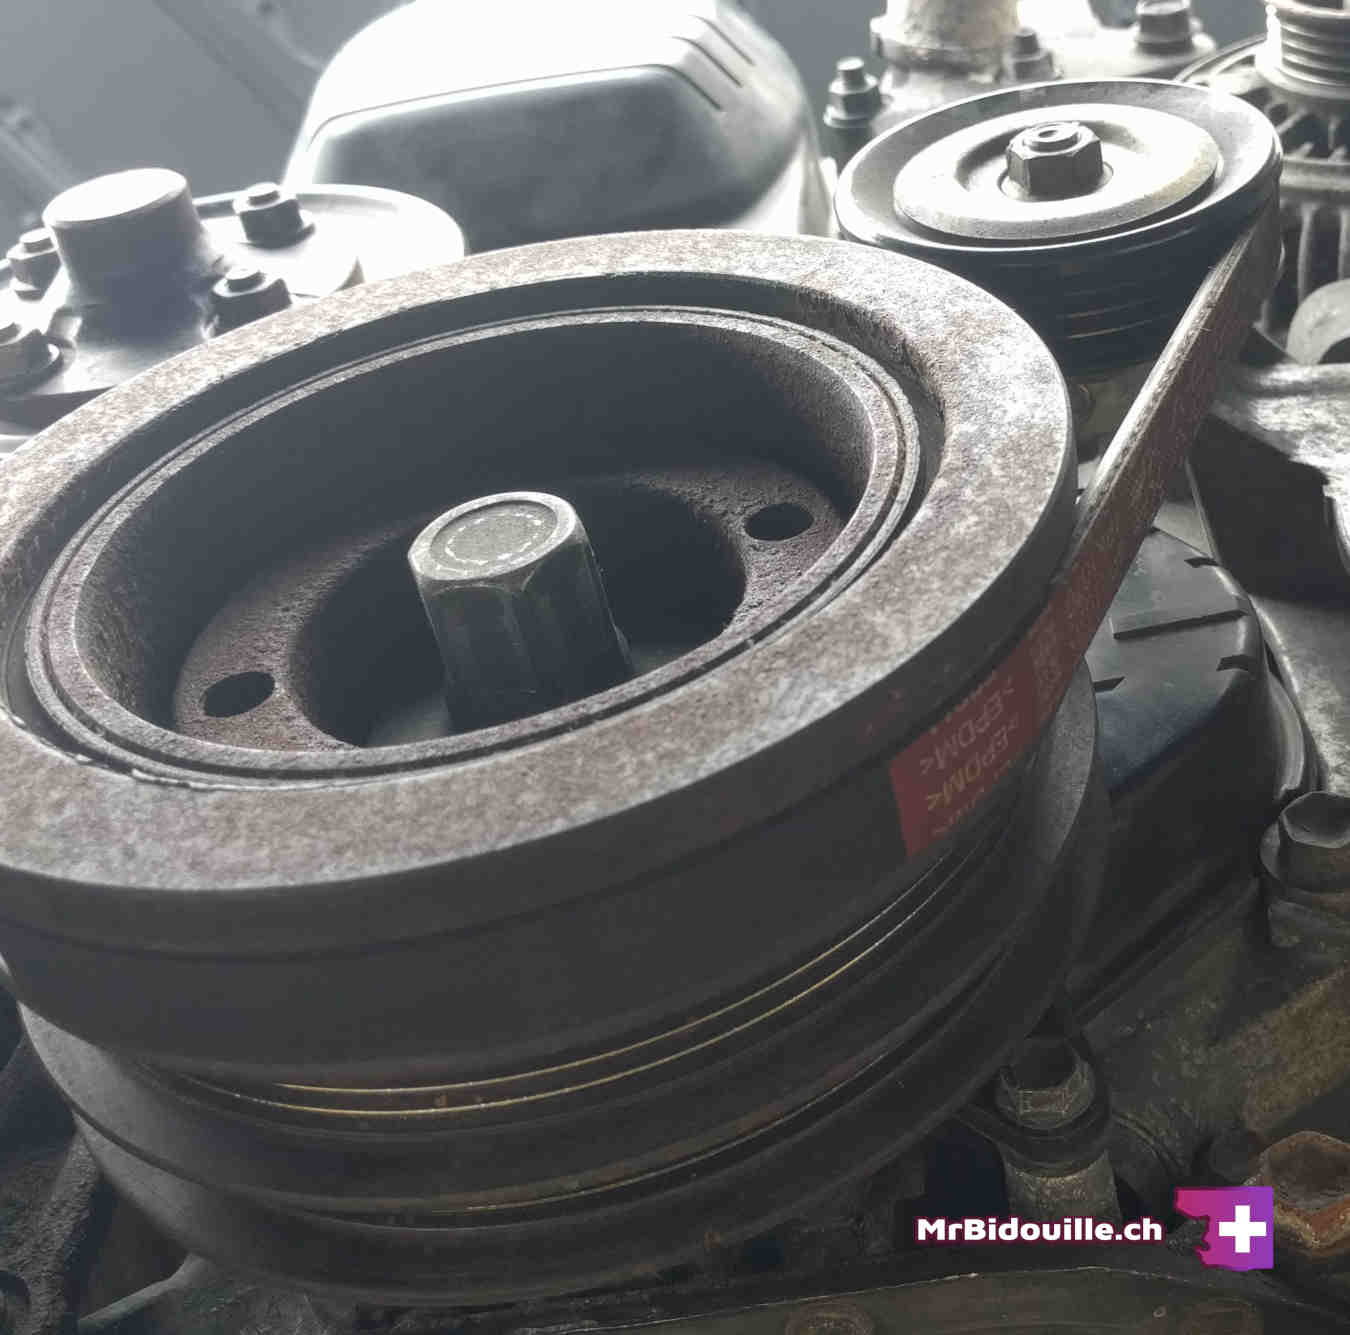

Tighten a minimum the center pully nut.
This time, no risk of damaging the engine, because to tighten, we are rotating the engine in the correct direction anyways. Sadly, I don't have enough space to fit my digital torque adapter. So I just pulled on the breaker bar as much as I could, keeping in mind how much I pulled on it previously to undo the bolt. If you have the necessary tools to calculate, torque it to 220 Nm.
Once it's done, we can remove the old auxiliary bolt for the last time. Untighten the nut of the small pulley, then turn the engine the wrong way as little as possible until the tension on the belt is small enough to remove it.
11. Reinstall the rest
First auxiliary
Reinstall the two pieces of the water pump pulley. I tried to tighten the 4 nuts while we were tightening the crankshaft pulley bolt, but the pulley kept slipping (that's why you see it already installed on the previous pictures). So installing it now isn't any worse.
To tighten, maintein the pulley in place with your hand and put as much force on it as possible.
Then, place the new first auxiliary belt. You can't mistake it, it's the thinnest that we need, and it's the only one that will fit here.
Then tighten the 2 bolts (from under the car, like before) while maintaining a downwards pressure by hand on the left pulley. Check that the tension is close to the original tension, that you got a feel for previously.
Second auxiliary
Same thing here, place the new belt. It's the longest one of the two remaining.
Tighten the 3 bolts with the wanted tension. Pull upwards on the alternator to increase tension.
Third auxiliary
And finally the third auxiliary. Untighten the center pulley, place the belt first on the crankshaft pulley at the bottom, then slide it gently on the right pulley. Then tighten the long bolt to increase tension. Finally tighten the center nut.
It's all good ! You'll see that I was quite light on details on this part. But I honestly think that this is an easy part of the work. You just have to take your time to place the belts, then tighten them until the tension is the same as before.
Radiator
Place the radiator. Reconnect everything that was previously removed. Nothing complexe here. Don't forget the connector at the bottom next to the left hose and check that the drain valve is nicely tightened. The fan connectors being held with cable ties, we'll have to put new ones in. You'll need three.
Spark plugs and ignition coils
Reinstall the spark plugs after making sure the area is clean. Use compressed air if necessary to clean the area before removing your paper from the holes.
The spark plugs should be torqued down to 17.5 Nm.
Place the coils on top and connect them. You should use 6 Nm for the bolts.
You can then fit back the cover.
Air intake
Reinstall the main air box. Don't forget the air temperature sensor. I would advice you wait before reinstalling the second part of the intake (the one that goes above the radiator). It will be easier to check for coolant leaks if that piece is not installed.
Front bumper
If you have nothing else to do on the car, you can reinstall the front bumper.
Engine undercover
This one I suggest you wait until the very end before reinstalling. It's easier to check for leaks and access things from underneath if it's not installed.
Engine coolant
You'll need to refill the engine coolant. You will be able to put between 4L and 5L. After starting the car, you might need to put some more in, as it will have moved around the circuit and filled empty areas.
12. Test & ending
So here we are. It's all done. You should start the engine to check that everything is in order. Listen for noises, etc. Then go for a road test.
I wish you the best of luck if you decide to do this job. I honestly think this is a rewarding experience. I myself was horrified at the idea of changing my timing belt and though I'd have the garage do it for me.
But it's very accessible, will cost you much less and in the end will teach you plenty about mechanics and make you more comfortable working on your car.
And with that, we have reached the end of this article. If you have any questions, please don't hesitate to put them in the comments below. I'll answer if I can. I am however not an expert, and as always, I'd ask that you take your own responsabilities and check my words for yourself.
You can now subscribe to the blog by email using the pink mail button at the bottom left of the screen. I will only use your email to send you a notification when I post a new article, no other bullshit.
 Obviously I could not resist putting the Japanese sticker on
Bidouille